Creations
Sometimes the creative itch strikes and I make things offline. Some of these side hobbies certainly aren't professional quality, but I had fun making them and wanted to share. Sometimes I even take work in progress pictures on my phone. Please forgive the quality as these are often taken in the middle of a creative mess.
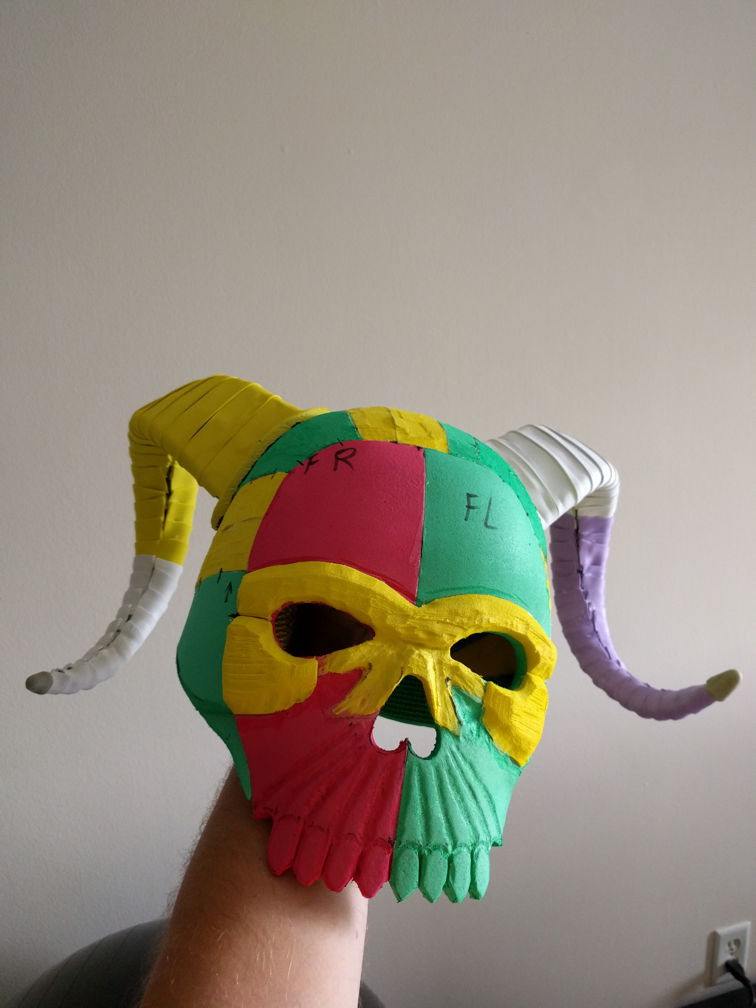
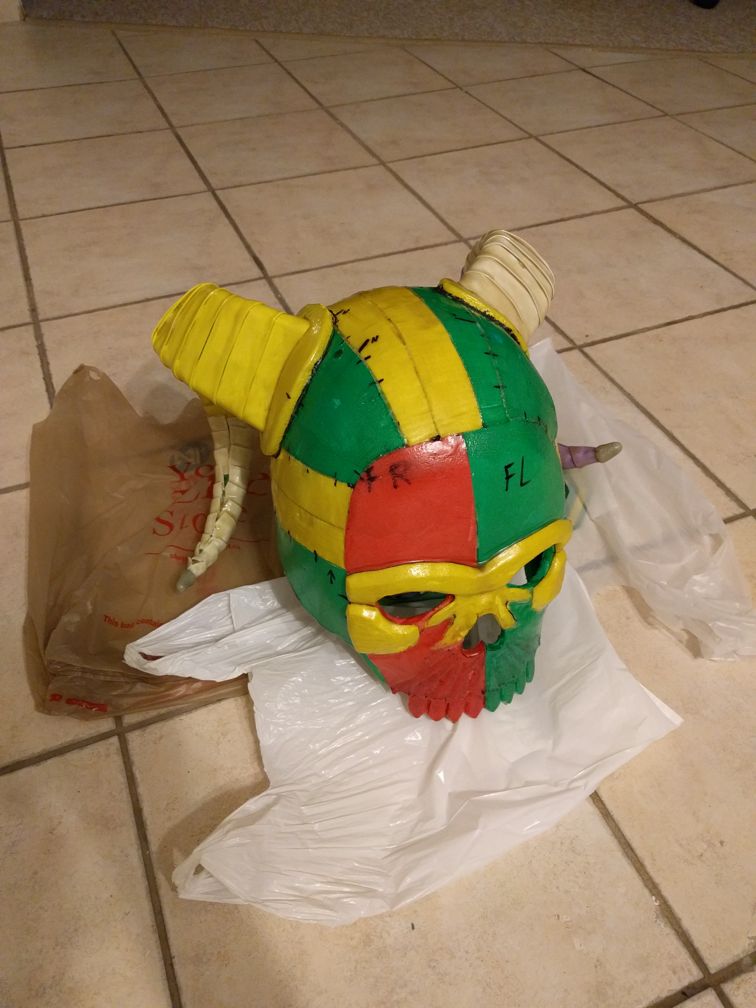
Diablo Necromancer Costume
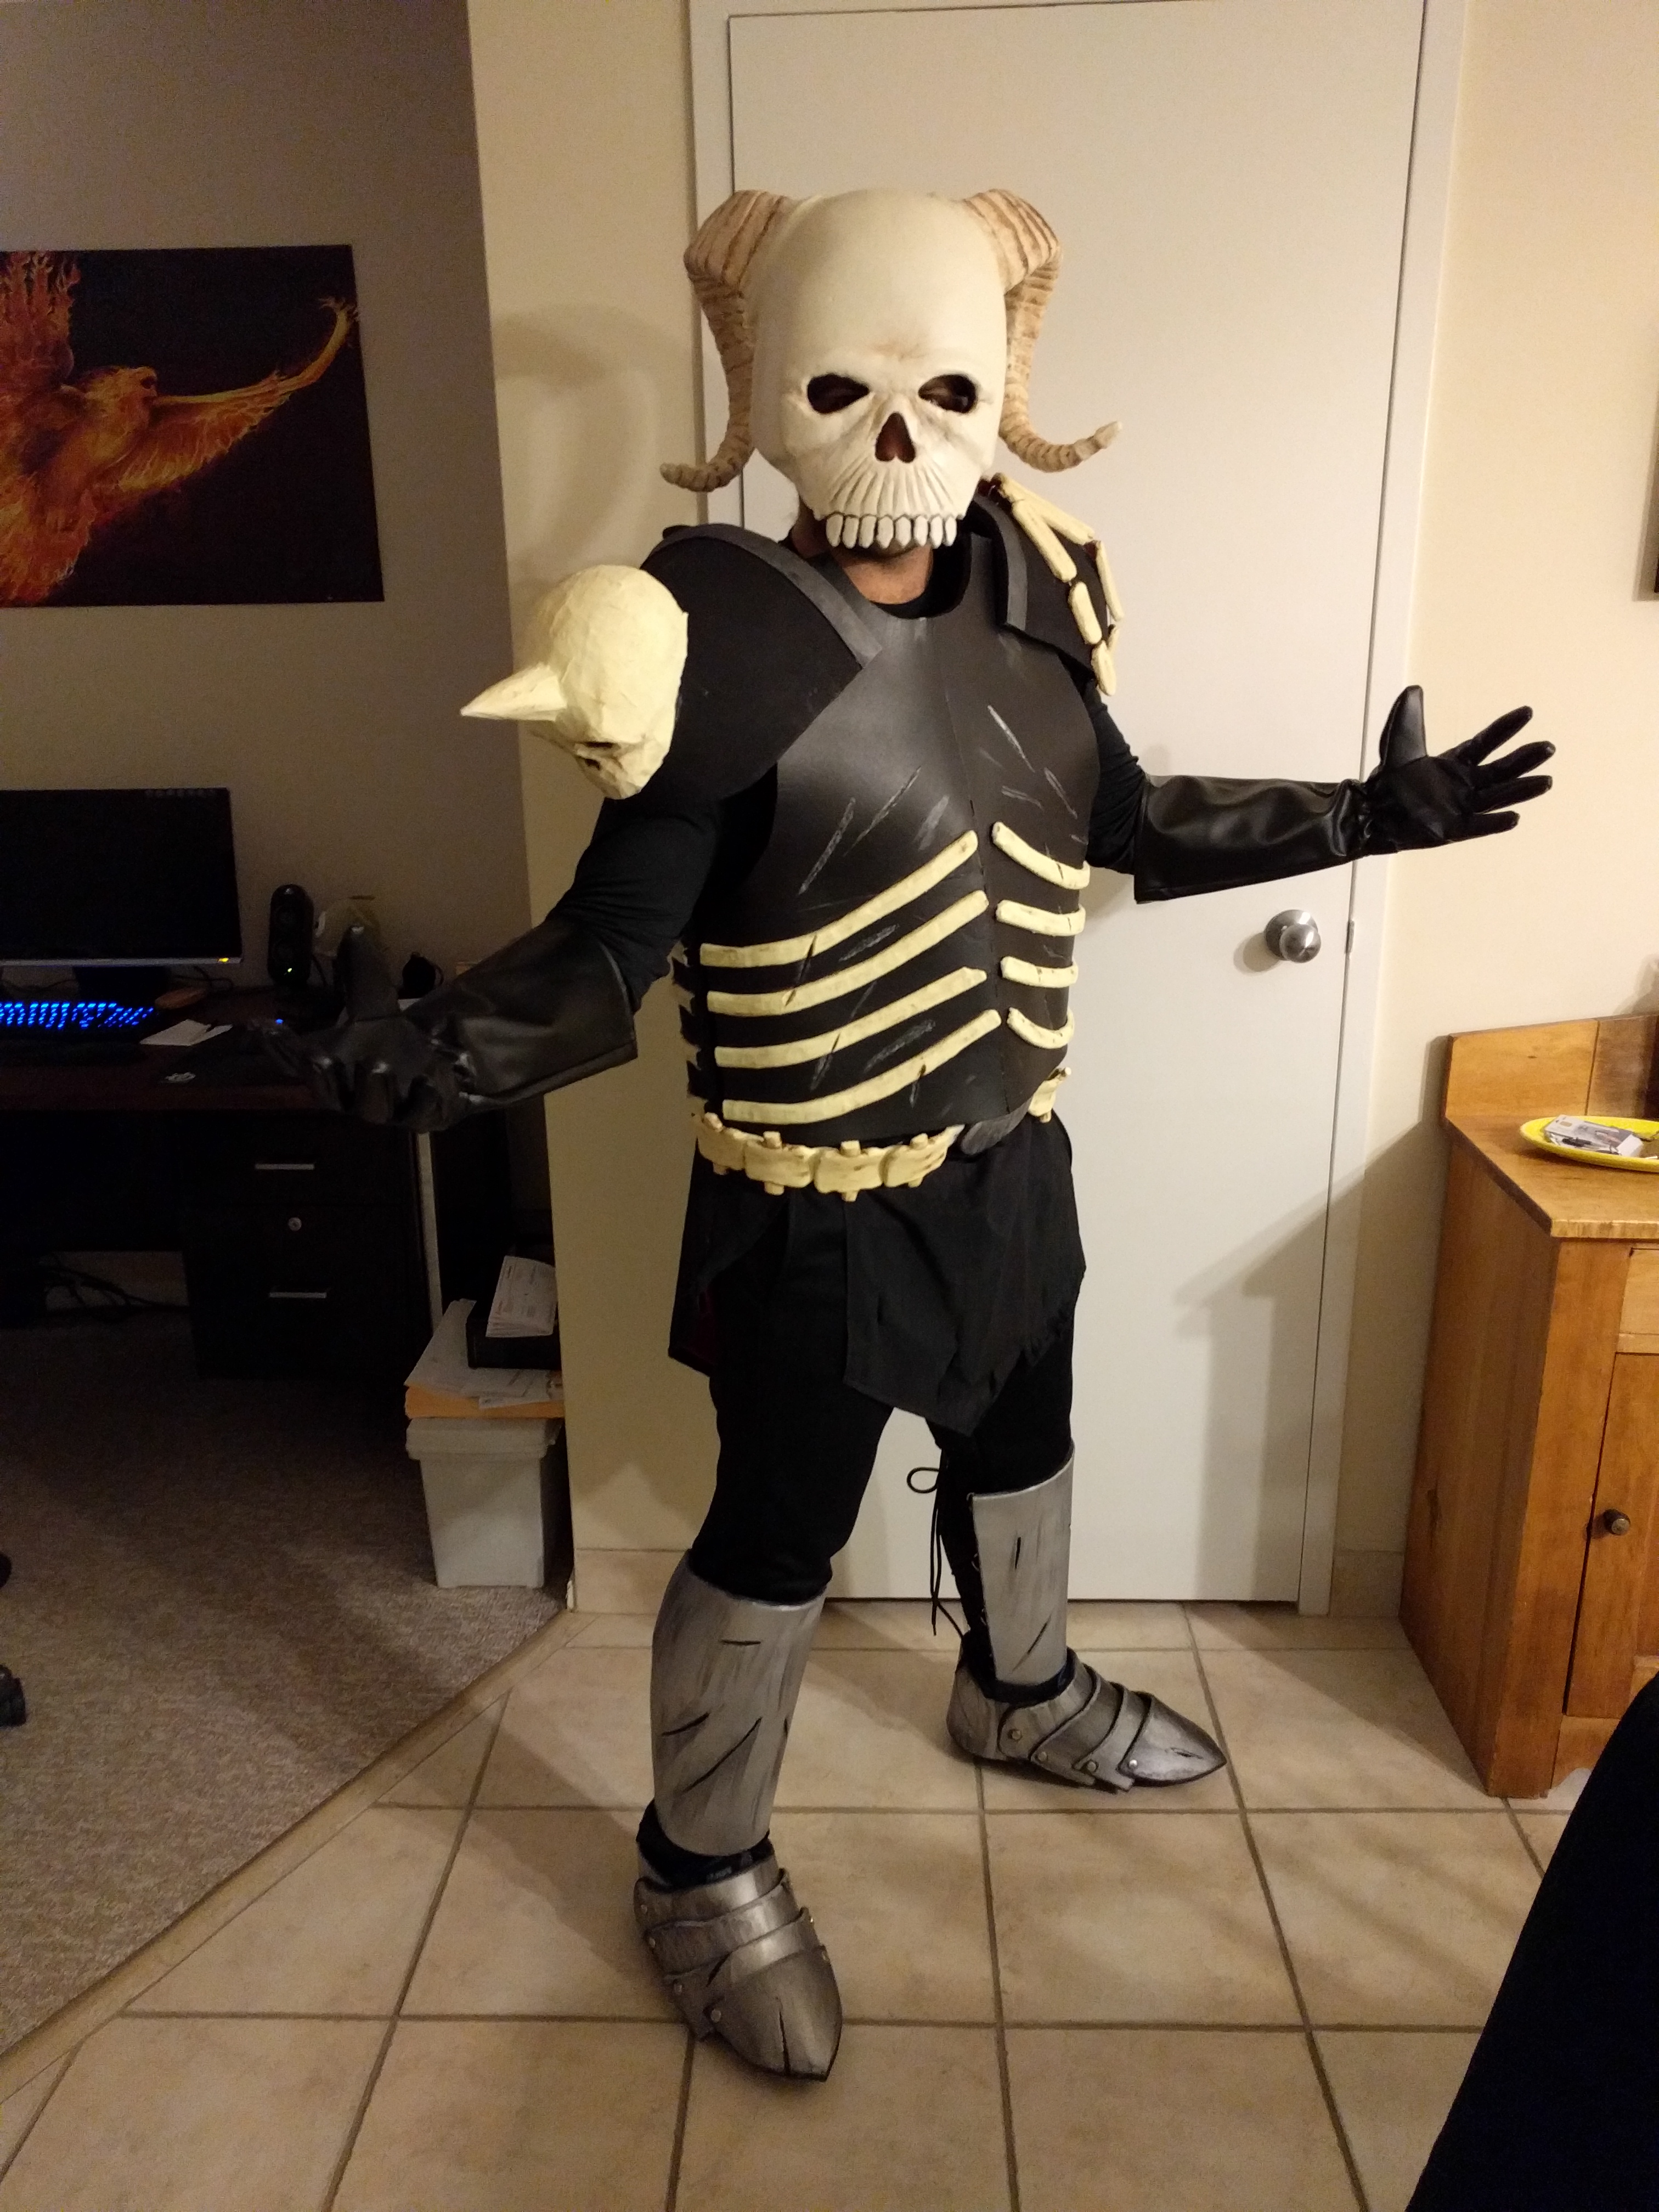
I find costume making really fascinating, and decided to try my hand at it. The construction is mostly foam, but has body filler, resin, and sewn fabric parts too. I had spent a little time in a workshop before taking this project on, but part of the appeal was that it would make me work in a number of different mediums if I wanted to achieve quality results. It's definitely a "first costume" and has some of that "clearly the first time they've tried this" look compared to many well known costumers, but I'm still pretty proud of it.
I learned a lot making it and it was a lot of fun. I took a bunch of pictures of the progress (when I remembered), so feel free to follow along and see how I did things. You could use the series as instructions, but since this was my first time that may not be advisable.
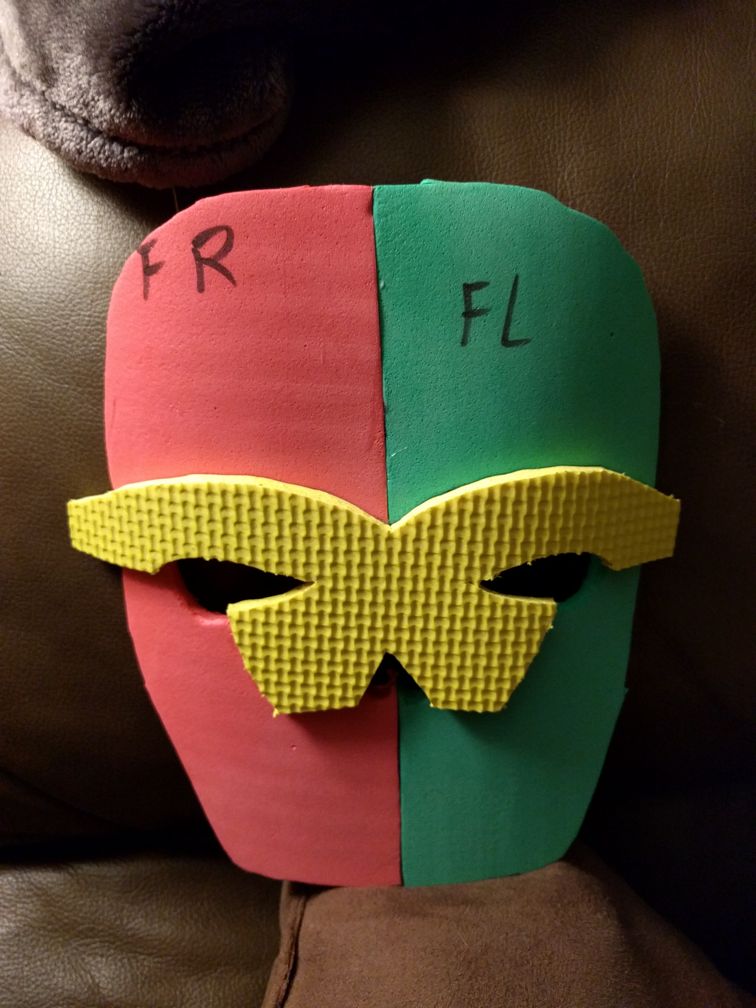
Bone Helm
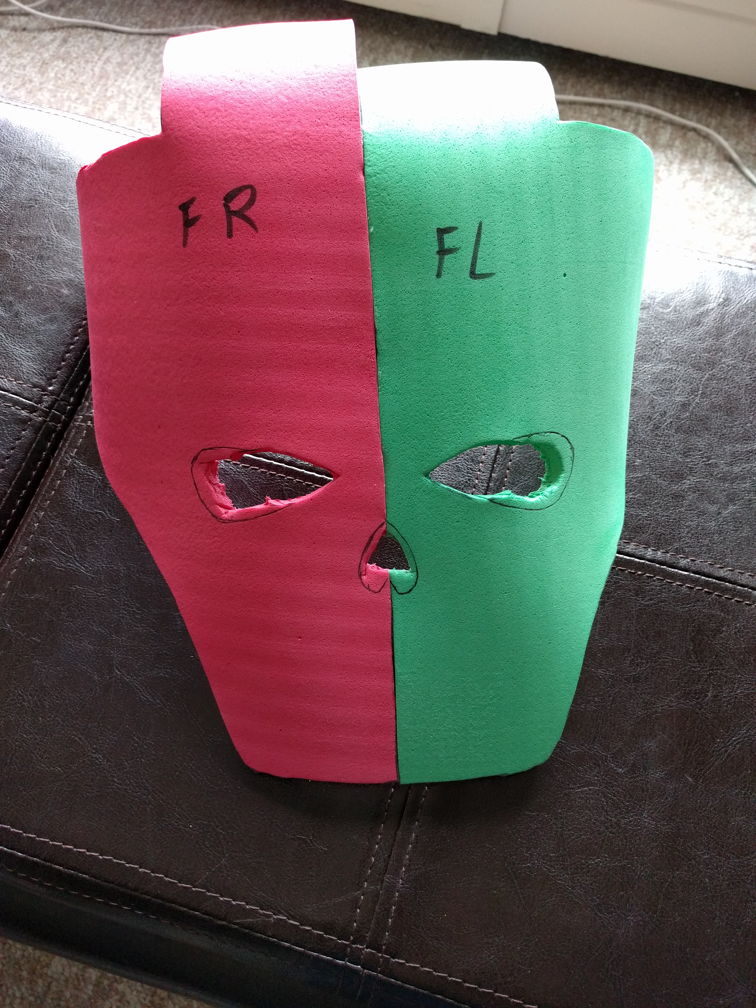
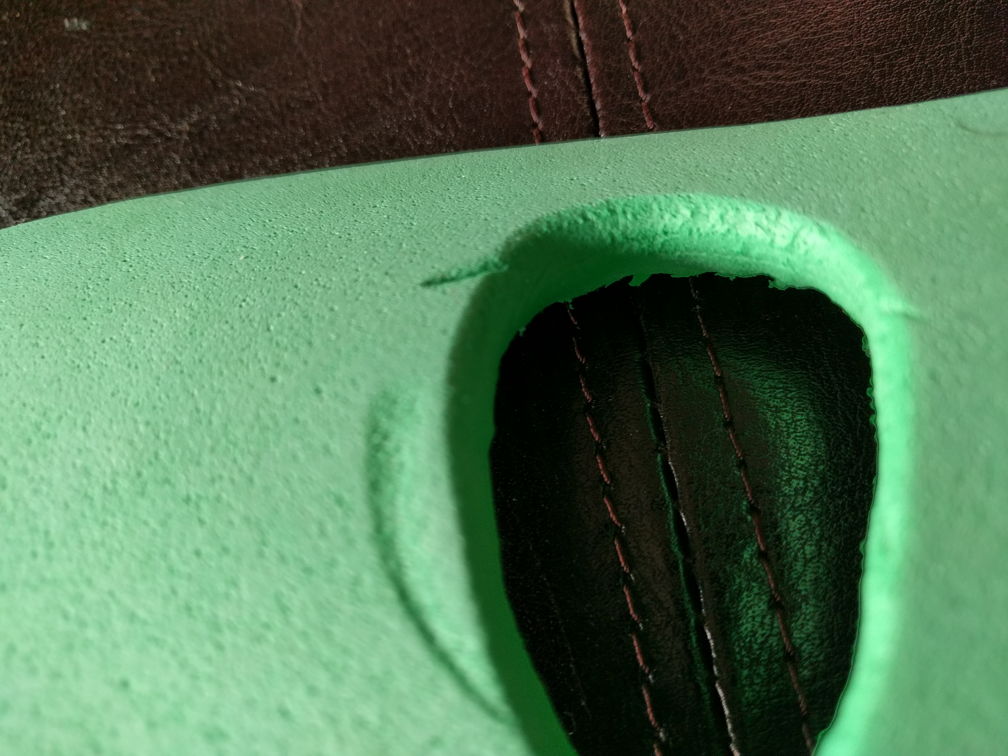
Decide to jump right in after watching a few tutorials online. Rough out a mask pattern that matches your face and add straps to it on the sides and top. These pieces of foam are joined together with contact cement. I use contact cement for all of my foam joints, but I've been told hot glue can work as a reasonable replacement. It's just harder to get a nice seam with hot glue.
I was new at using a rotary tool. I made a bunch of mistakes when trying to round over edges, but they won't matter so long as we take care of them later. Remember that you can make mistakes as you go.
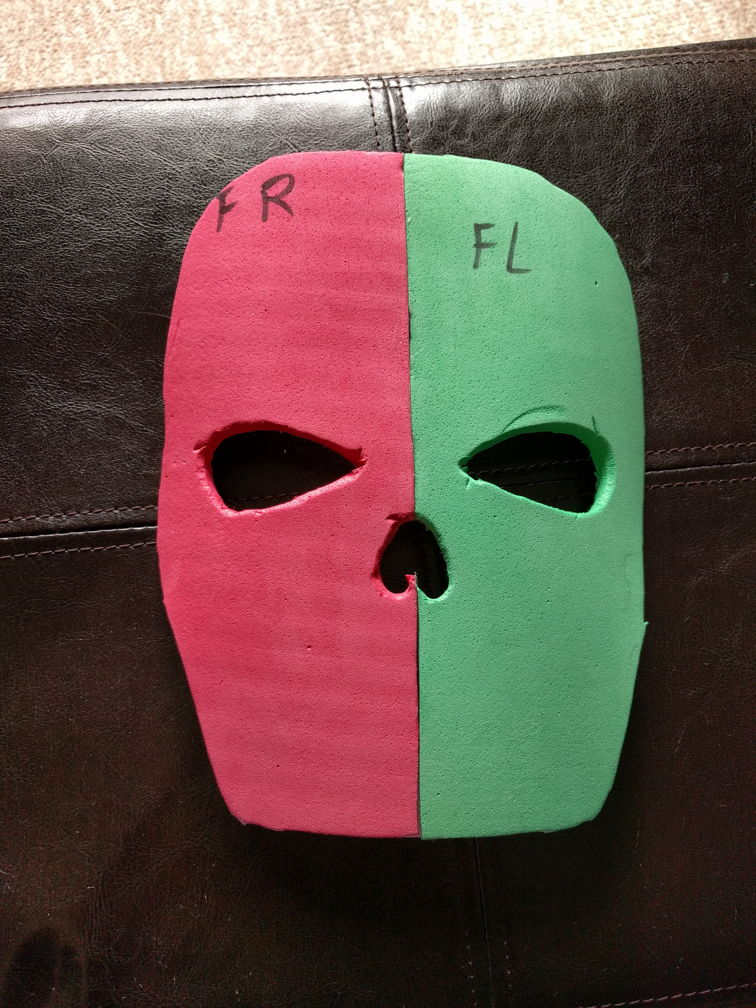
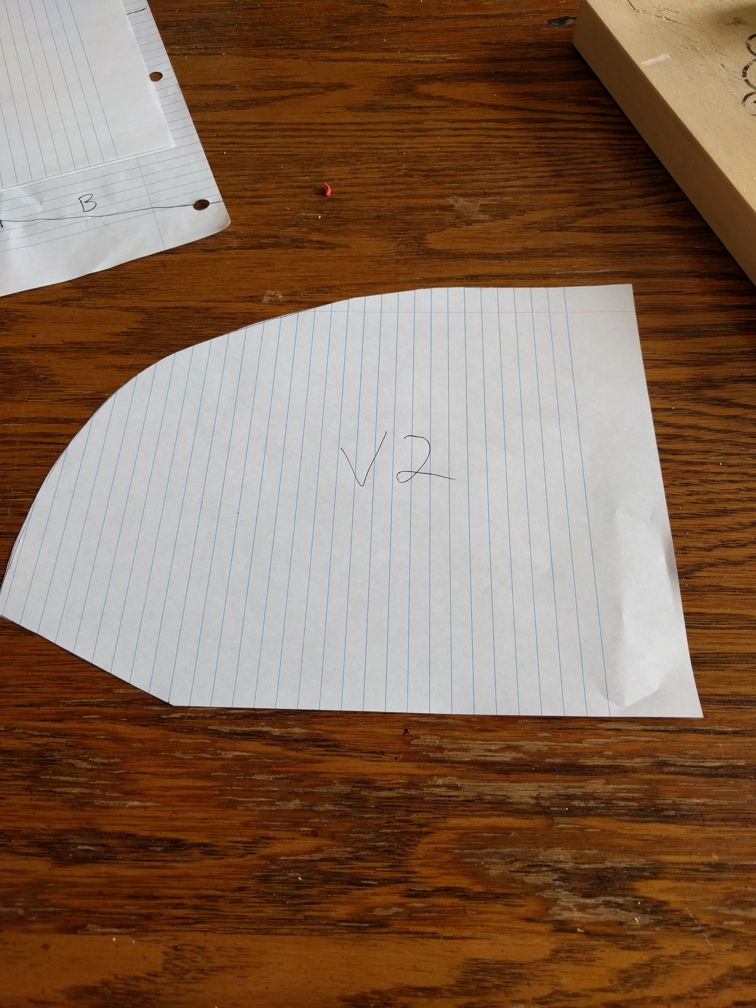
Determine that you don't actually know better than the experts and just salvage what you can from your original strappy prototype to use for the mask proper. The plan is to make this fit with a little room for glasses to avoid needing to wear contacts, so we can probably make the mask a separate piece.
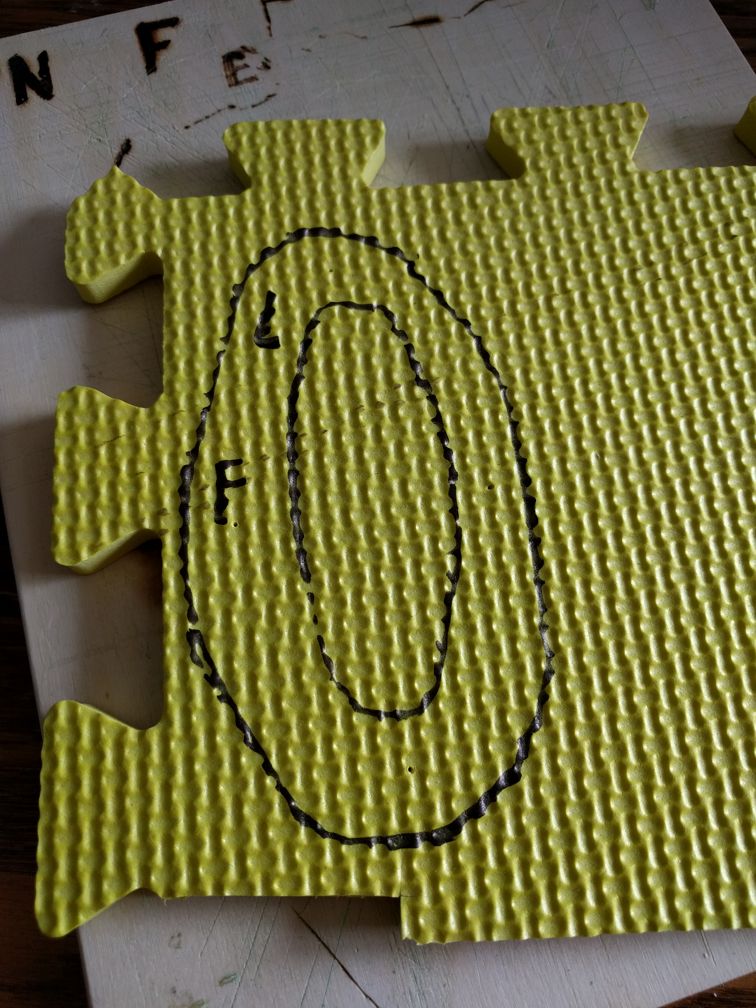
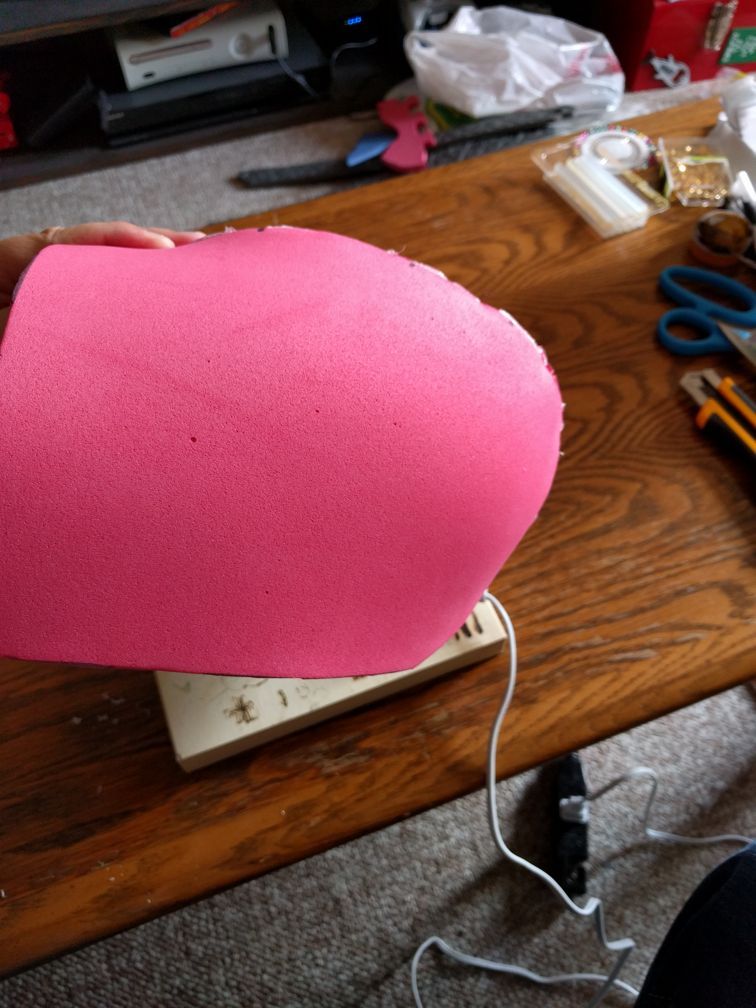
Faces aren't flat, so we need to add some dimension. Plop some extra foam on there. This is cheap floor mat foam, so it's textured on one side. The plan will be to grind in the general shapes we want, so we'll be getting rid of that undesirable texture shortly.
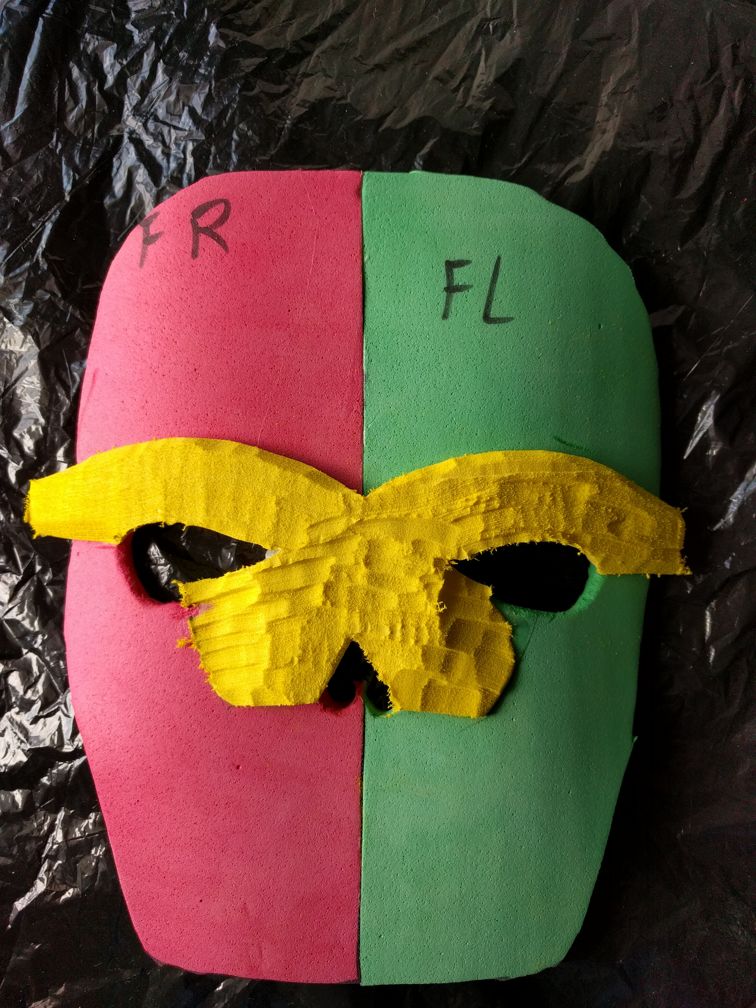
Grind off all that texture and give the edges some shape with a rotary tool. This is still a pretty chunky face, so we'll want to do a little more shaping.
Grind in even more. Get some definition on the bridge of the nose and the brow. The transition to the flush faces of the mask is pretty messy, but we'll clean it up later. At this point we're just aiming for good enough.
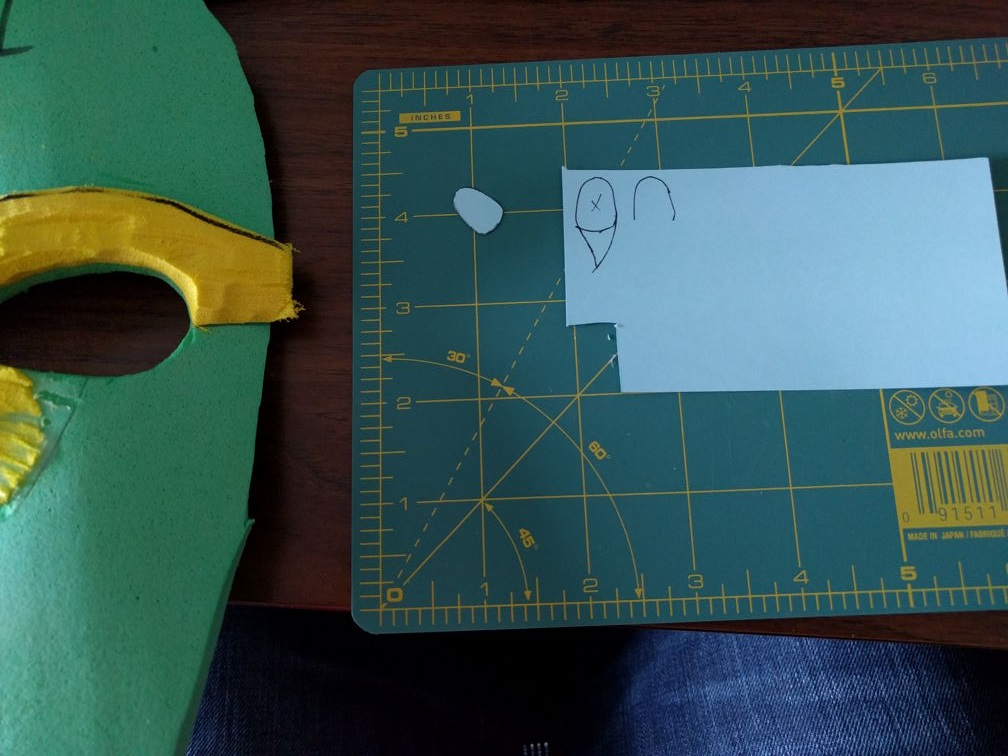
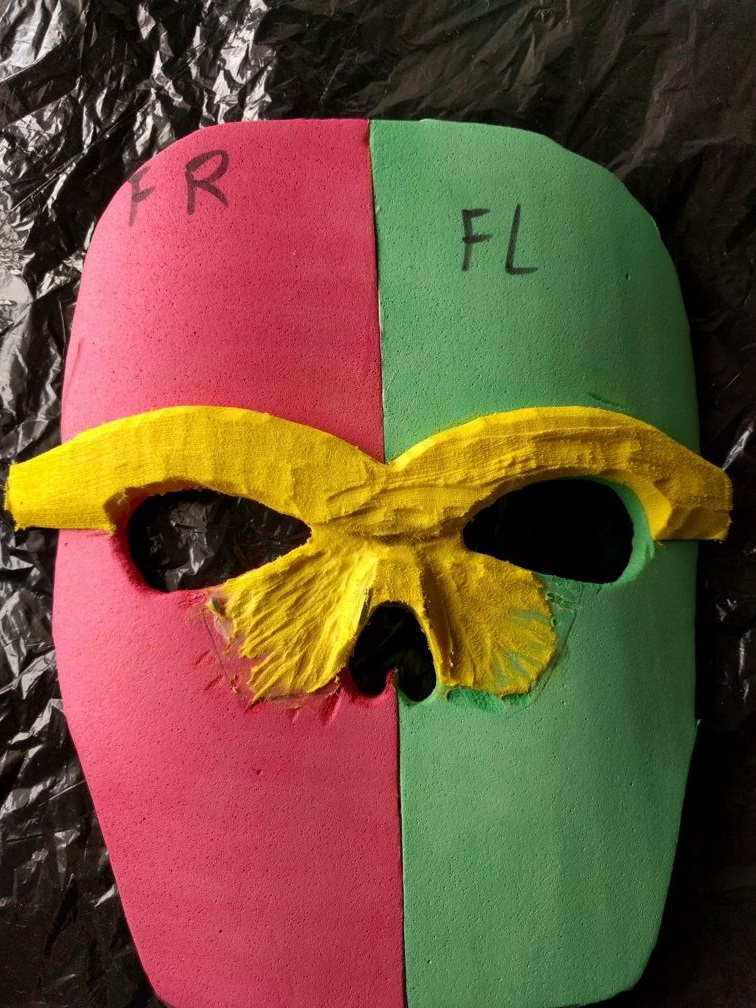
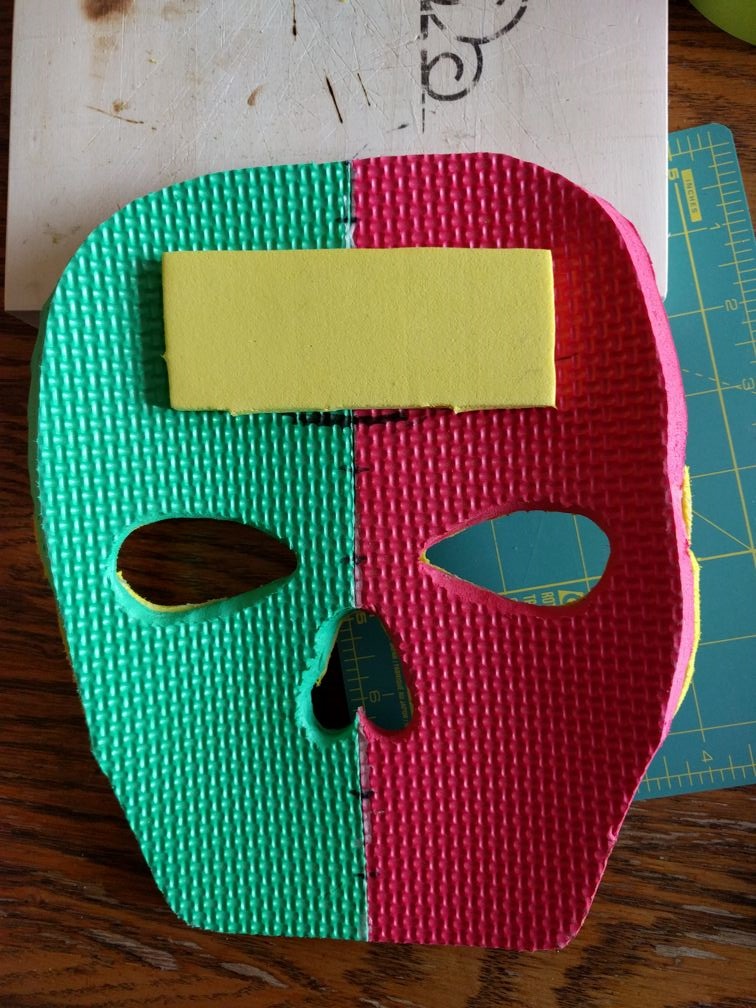
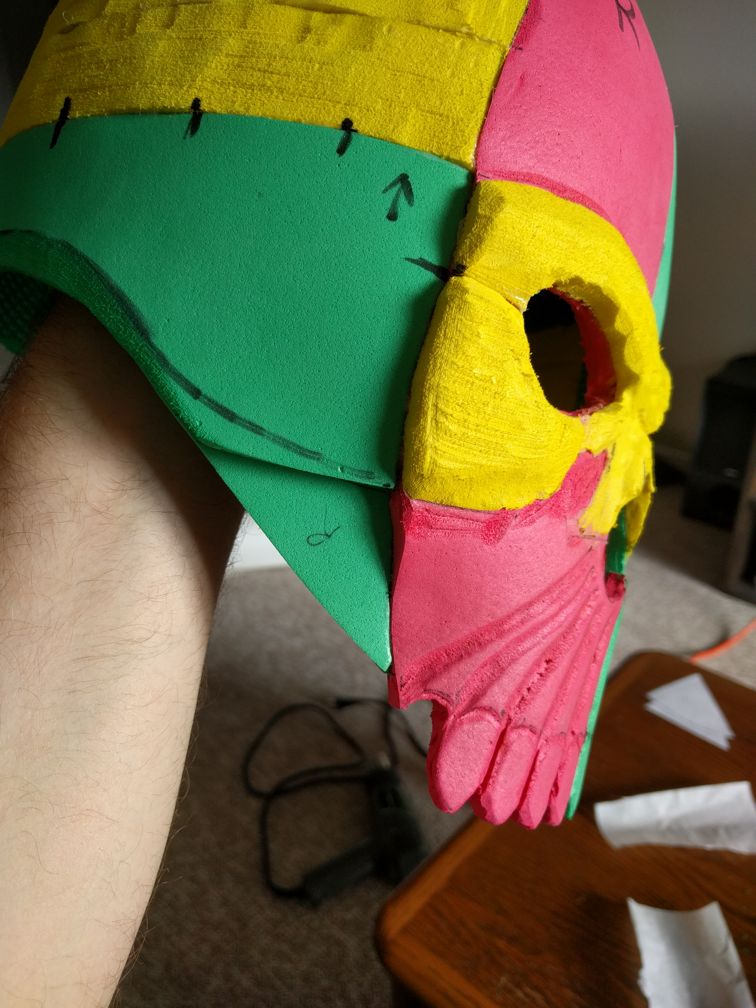
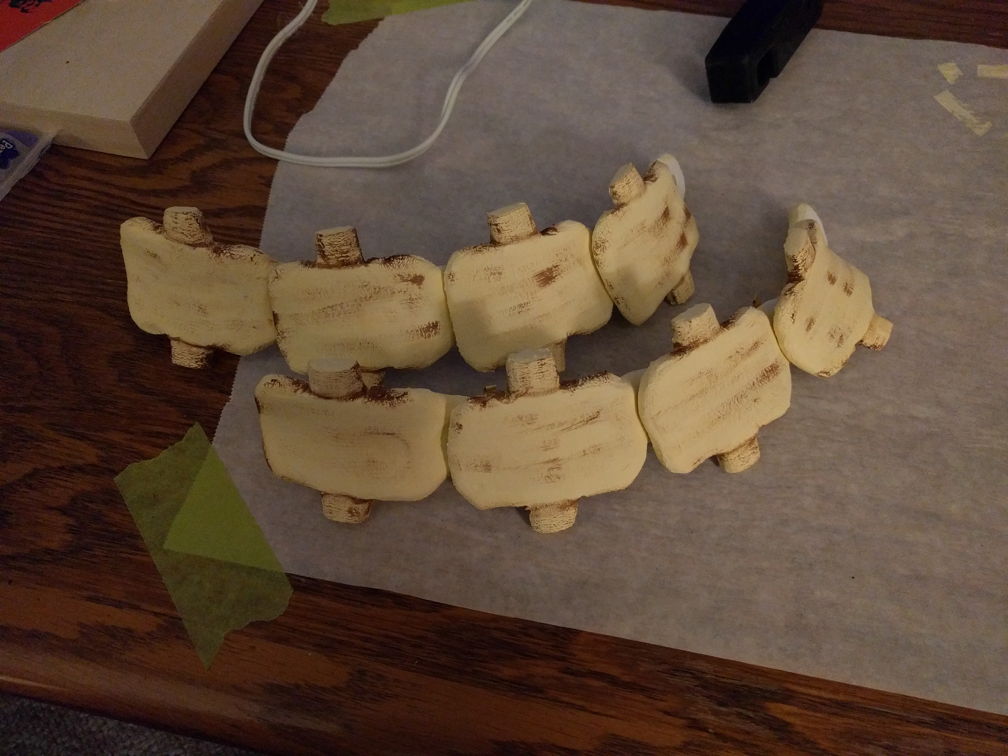
This mask/helmet will have teeth along the bottom ridge to mimic the top part of the mouth. Normal people teeth aren't all the same size and shape, but this is presumably the skull of some demon, so we'll make a template in card stock and use it to make our teeth kind of even. We can make them look a little less precise later.
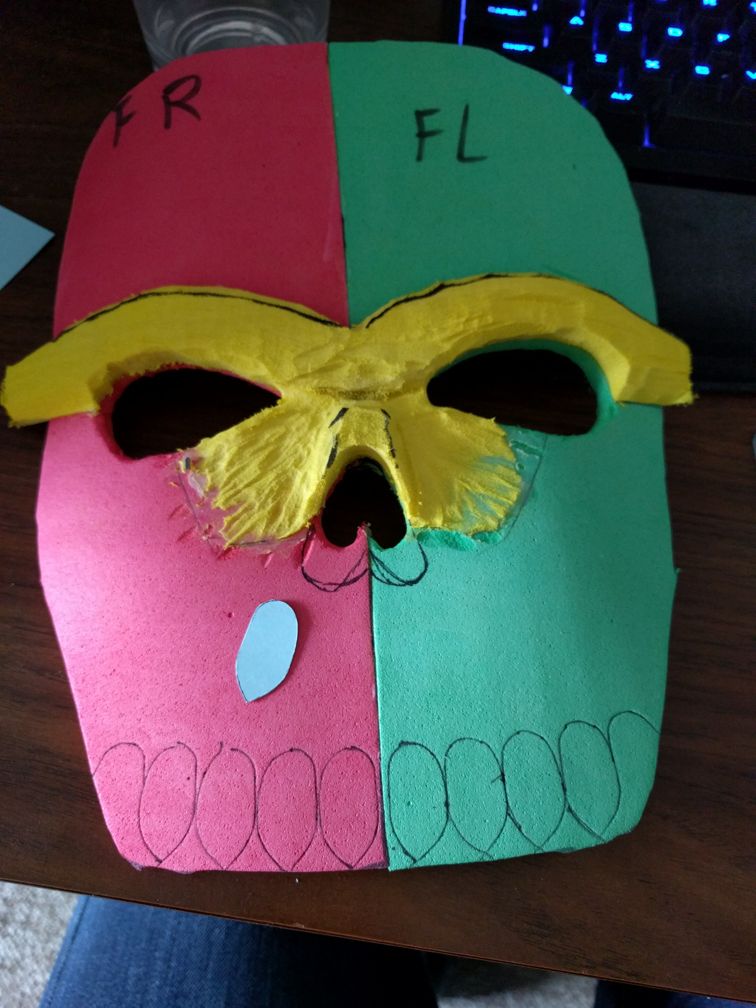
Use our nifty template to draw out some teeth. This is one area where having a symmetrical mask will really help. I also drew out a larger nose cavity since the one I had looked a little too dainty.
Draw out some guides for carving in the ridges found underneath the top lip. At this stage it looks ridiculous. I was pretty convinced I was about to ruin it, but I kept going to see if I could prove myself wrong.
Use that trusty rotary tool with a roundish bit on the end and carve in those face ridges. It looks a little less dumb. All may not be lost.

Continue on with a small bit in the rotary tool and rough in the outlines of the teeth. I didn't chop off the gaps between the points at this point because they're providing some stability. Last thing I wanted was to mangle one of the teeth on the mask by accident in one of the coming steps and then have to do some foam surgery to correct it.

While we still have the face smooshed mostly flat, let's bulk up the cheeks and use the rotary tool to grind them down into a shape we like. This was done the same way as the brows and I didn't have a particular strategy other than grinding at it until it looked roughly right.
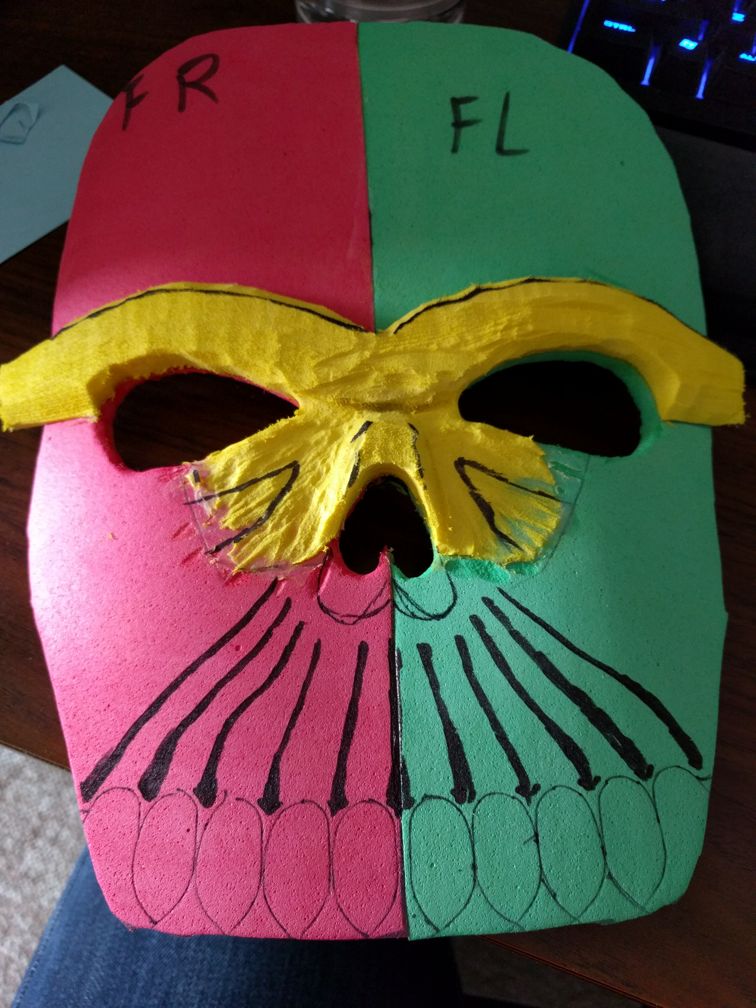
There are times when working with foam feels magical. This was one of those times. You can heat foam up with a heat gun pretty easily. If you get a good uniform heat, you can get all kinds of complex curves into them that the foam will hold when it cools. The teeth and ridges looked considerably better once I'd put some of that curvature into the mask.
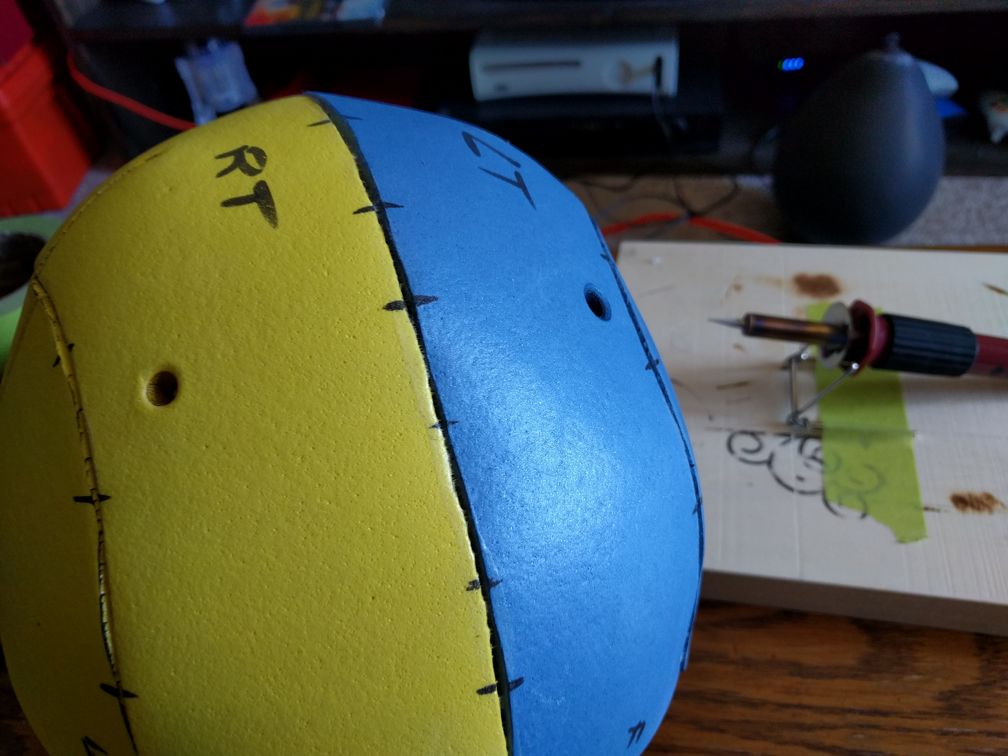
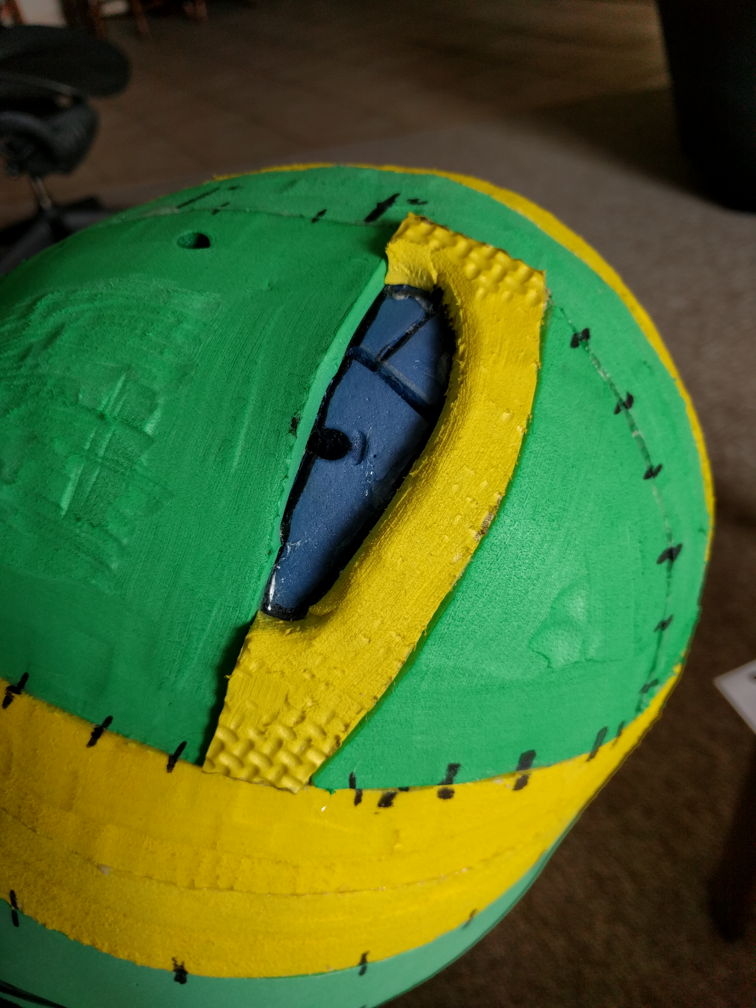
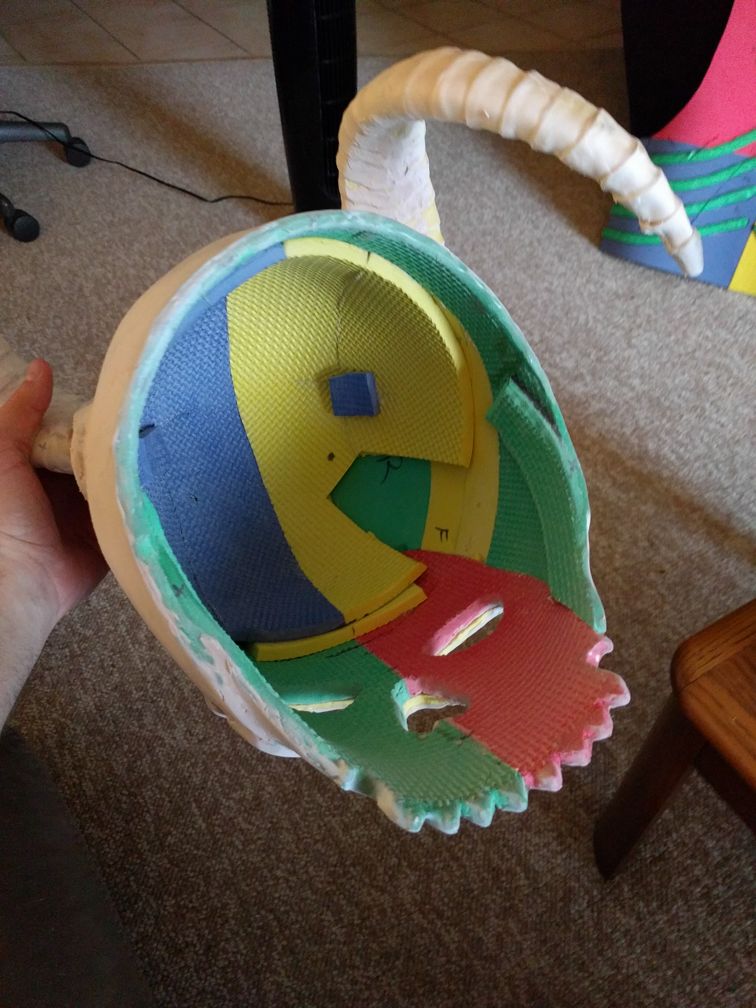
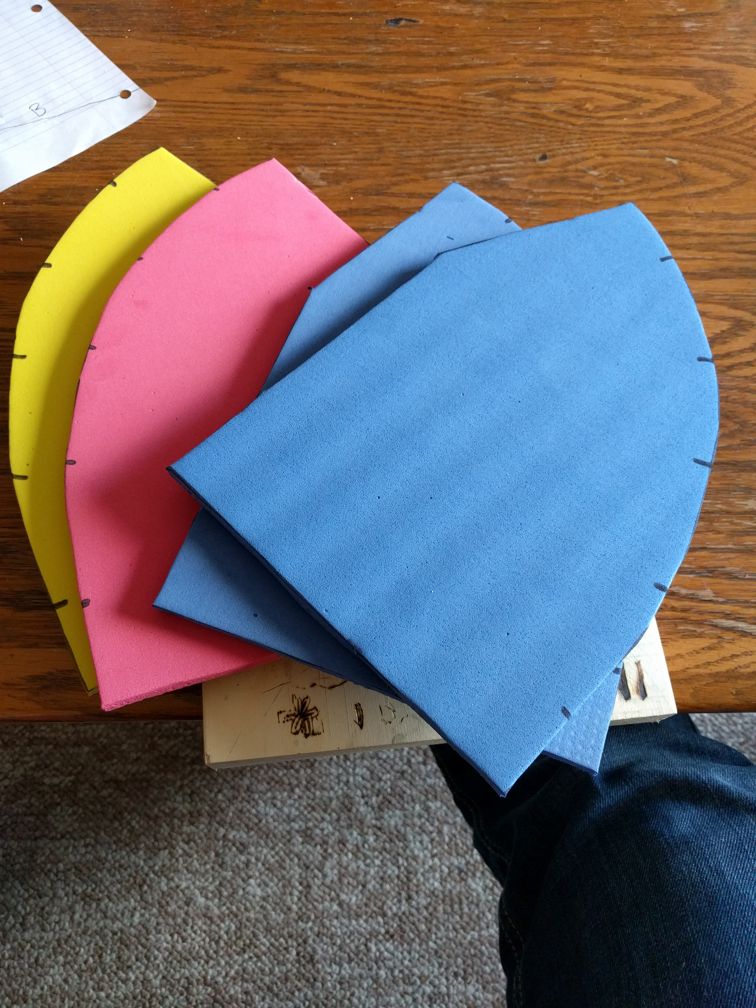
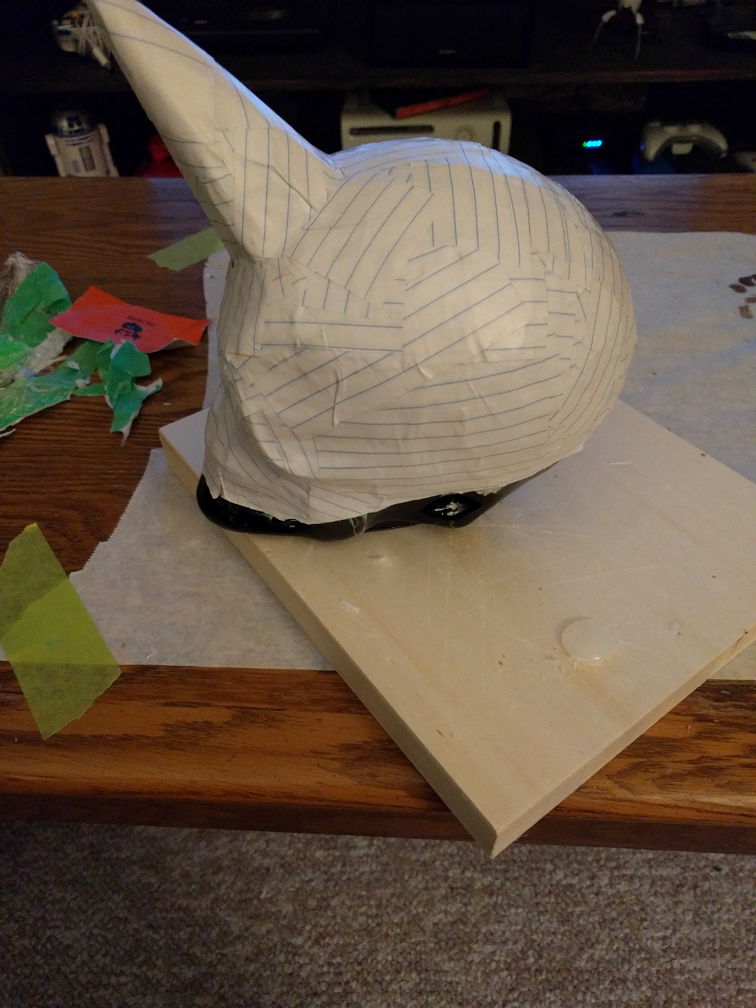
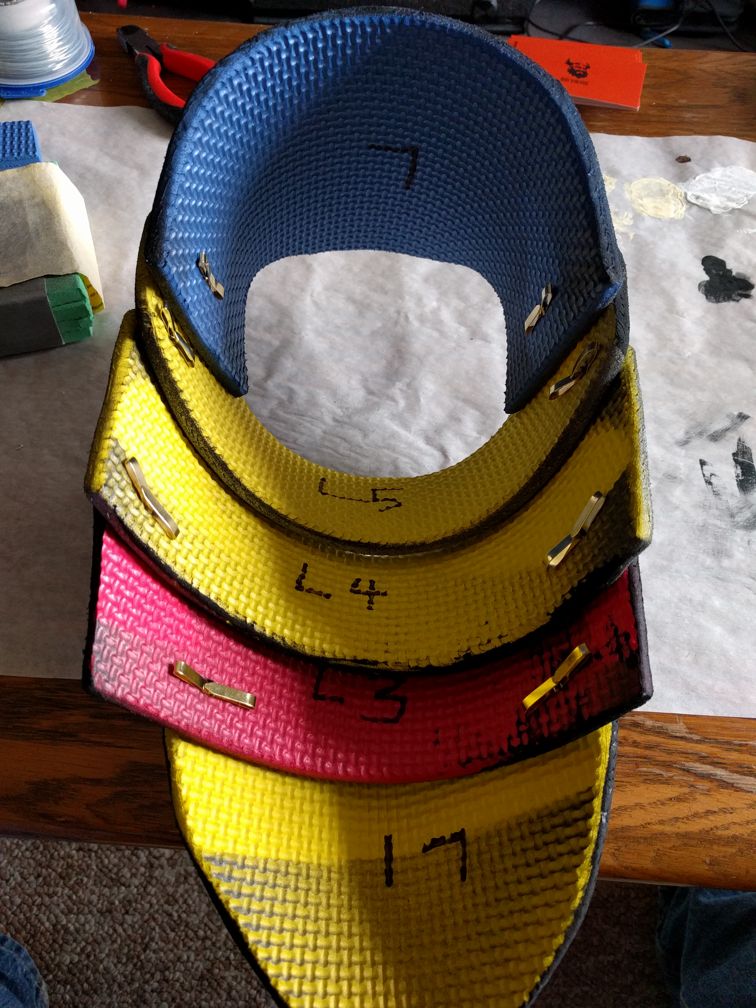
Now it's time to work on the base. Follow Evil Ted's foam helmet tutorial and make a nice little cap that fits your dome really well. I punched some holes in with a soldering iron where I thought my horns would go. Turns out those holes didn't work very well, but making perfect holes with a soldering iron works really well in foam.
As I mentioned, we want room for glasses in this helmet, so we need to extend the mask away from the dome of the cap. Pop a little spacer in at whatever level the mask will join with the foam cap.
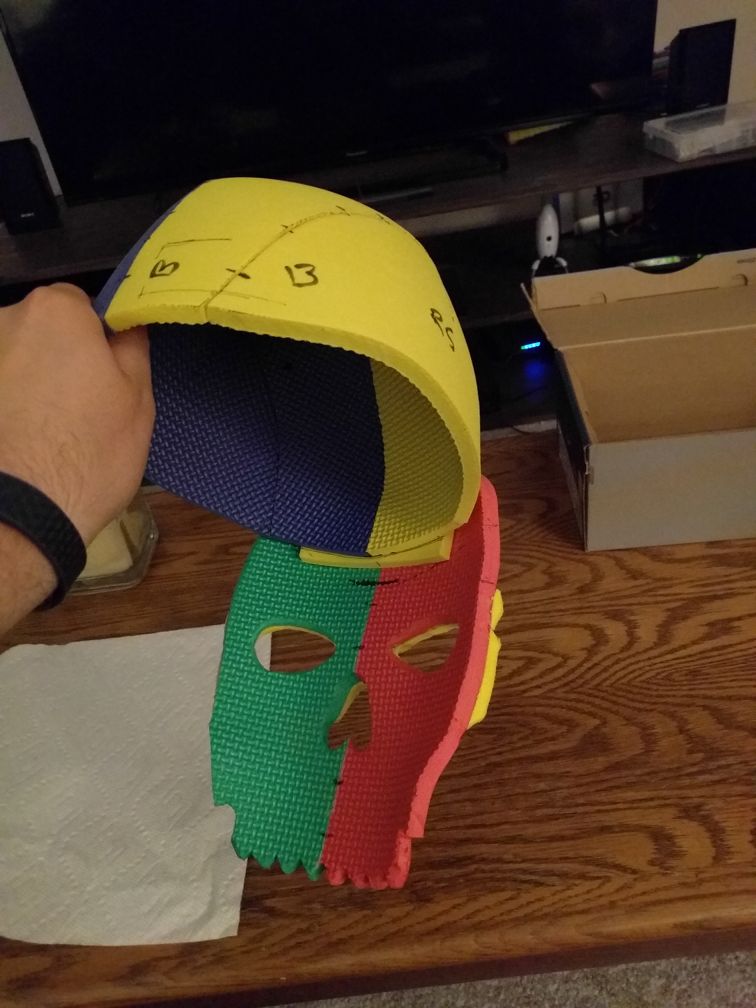
Now you can cement the mask (with the spacer) to the helmet base itself.
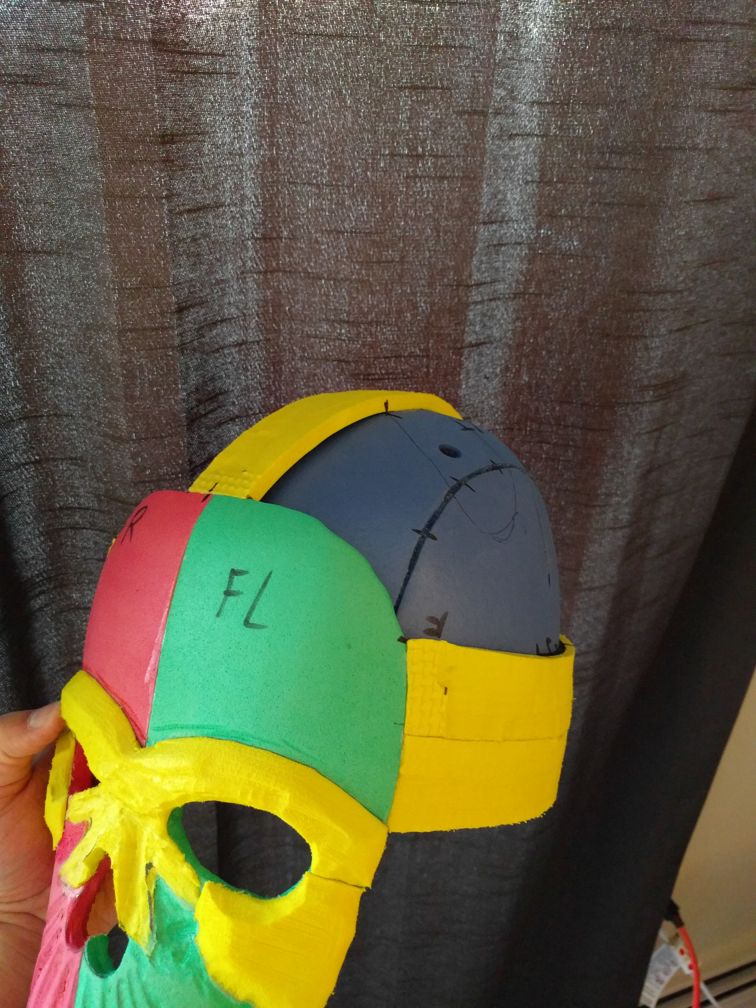
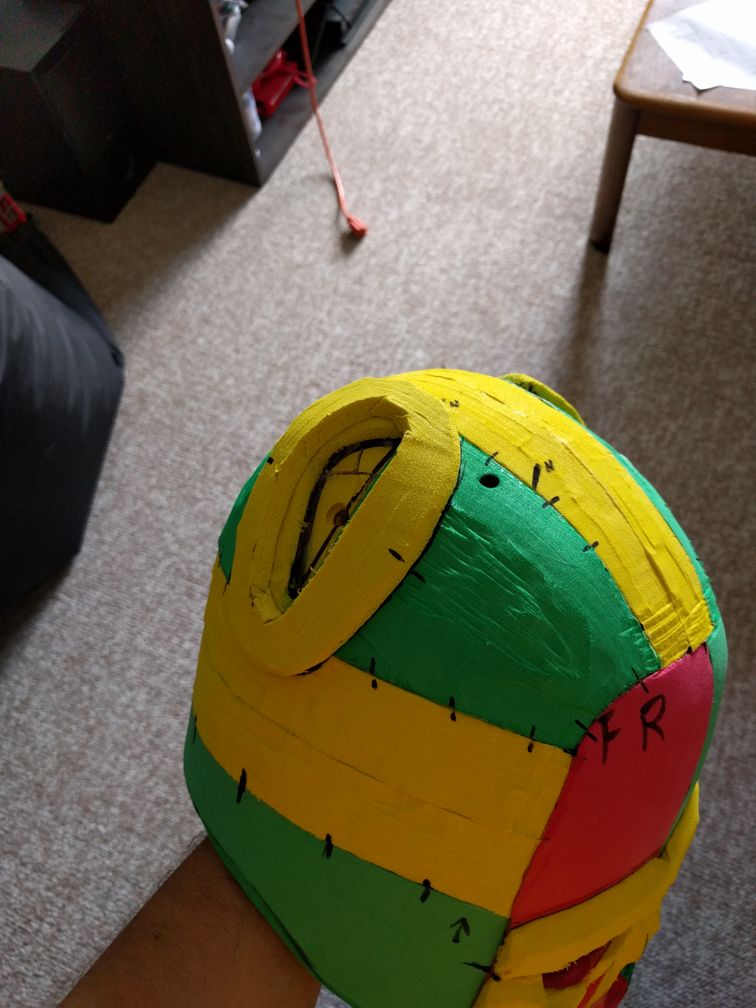
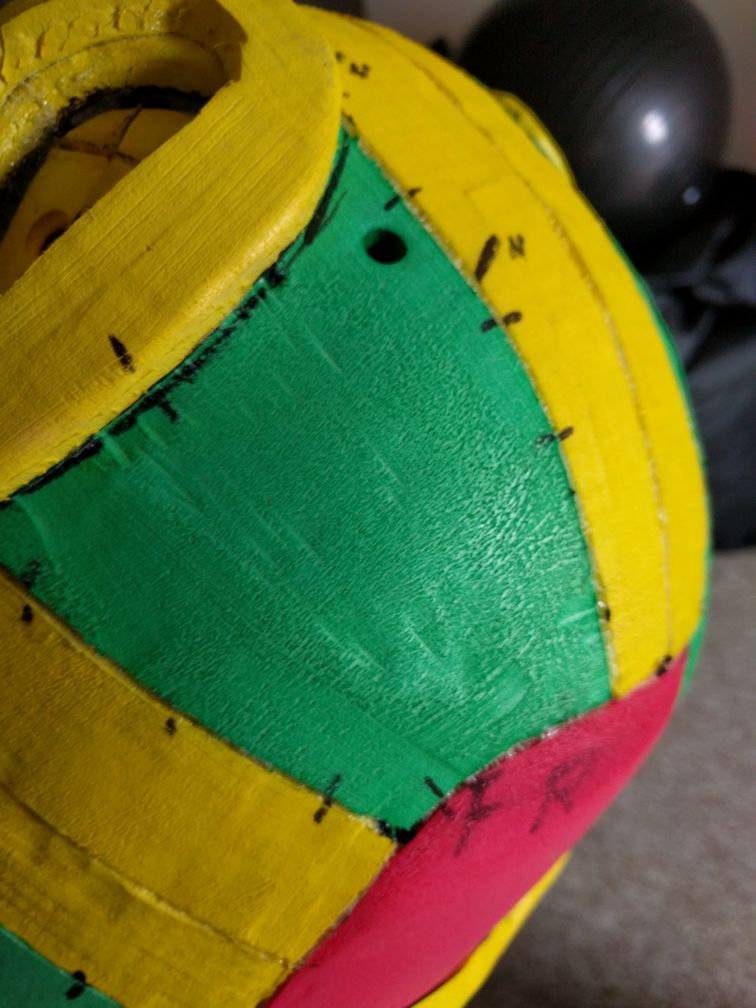
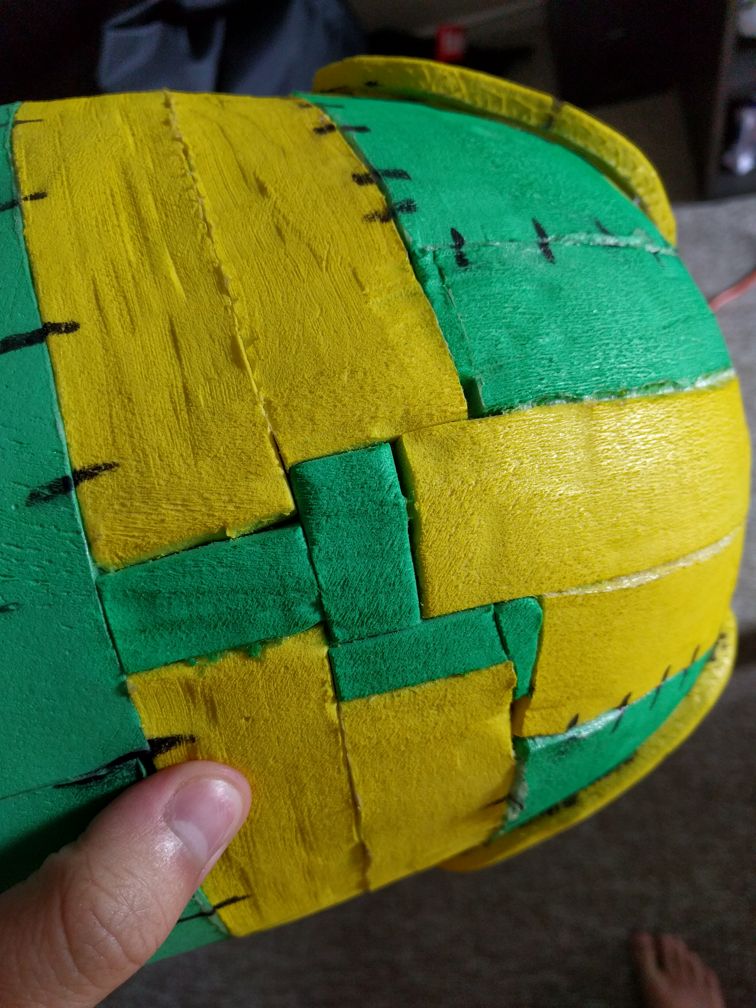
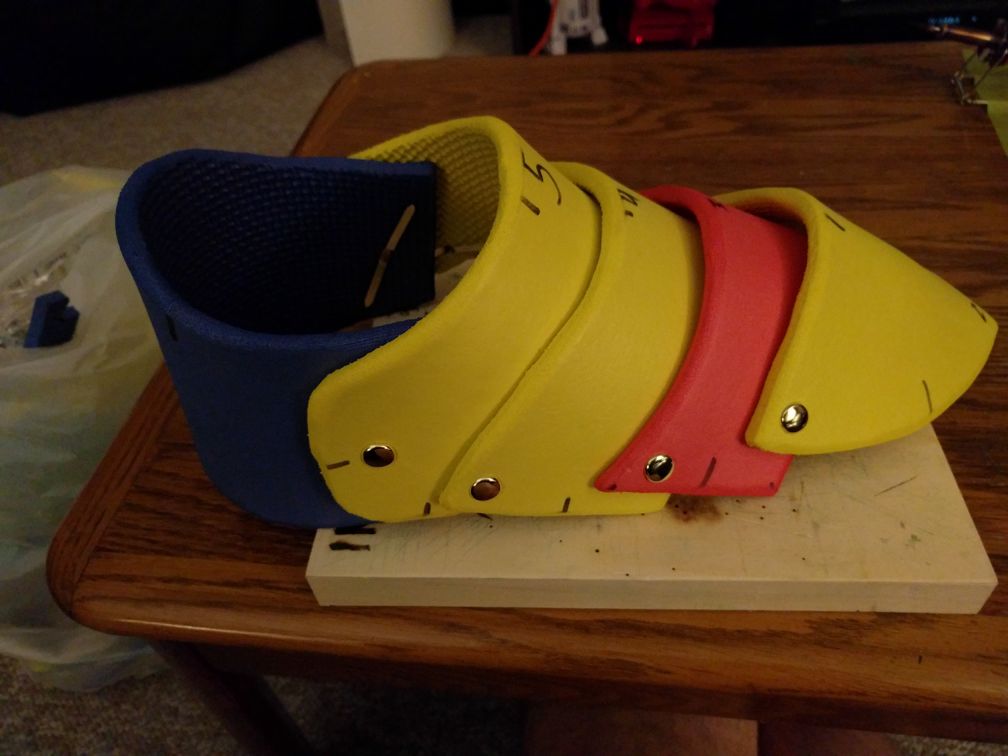
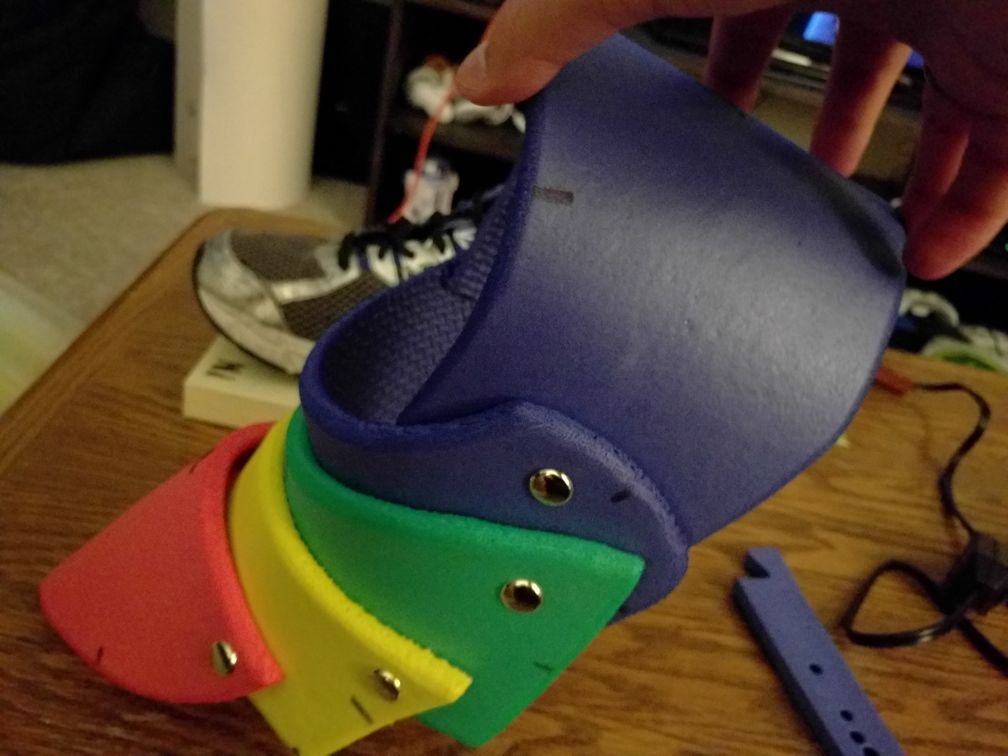
The mask is quite a ways away from the skull cap, so we need to add more foam straps (cemented on their edges) to make our new outside layer.
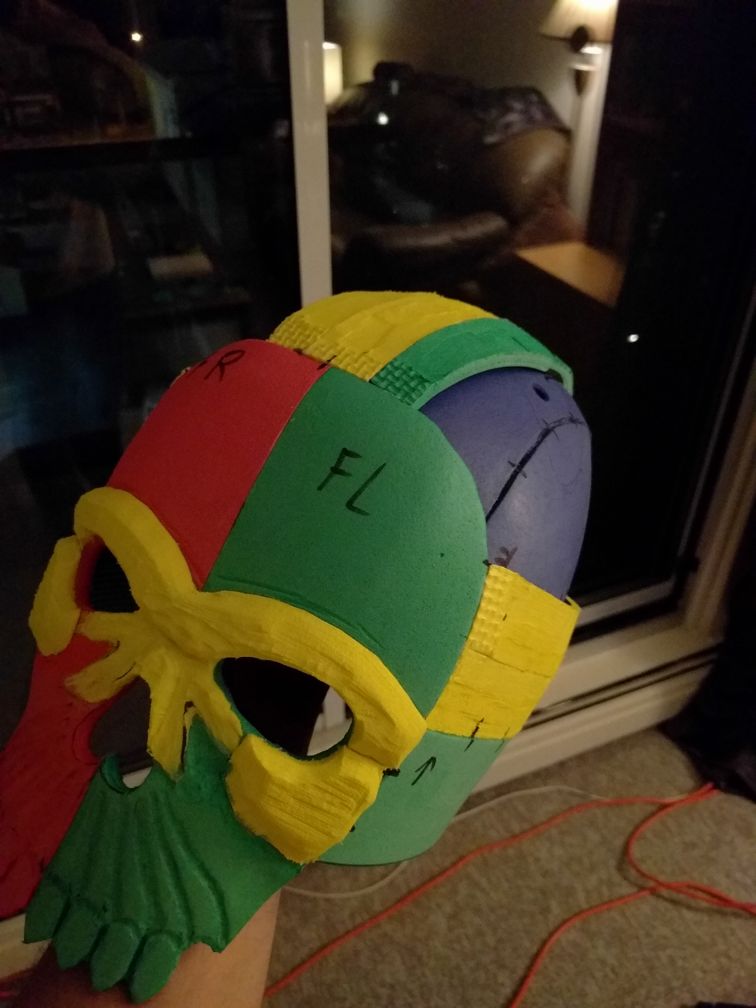
Add even more straps. The foam means we can put some curve into it. Also notice that it's easier to remove the texture on one side of the foam while it's still flat, so I'm doing that up to the ends before I cement the straps in. Why did I leave the ends of the straps textured? Simply because grinding at the end of the foam often resulted in the foam jumping around and the bit of the rotary tool would chew up my nice, clean gluing surface.
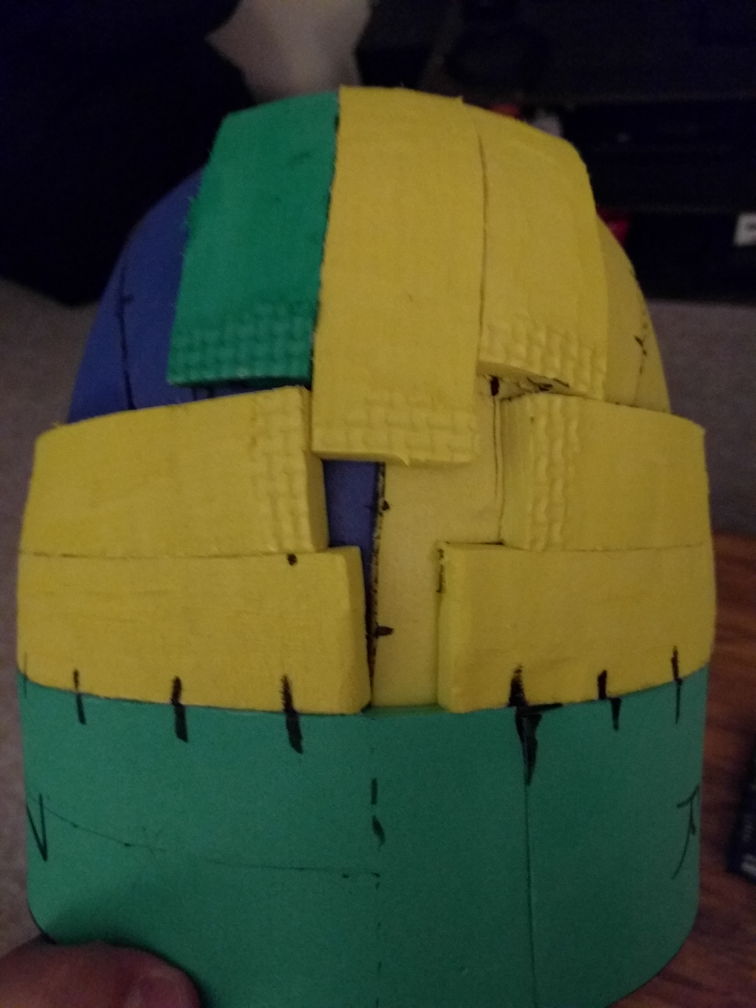
The straps won't line up nicely at the back unless you're better at this than I am. We can fill them in with more foam.
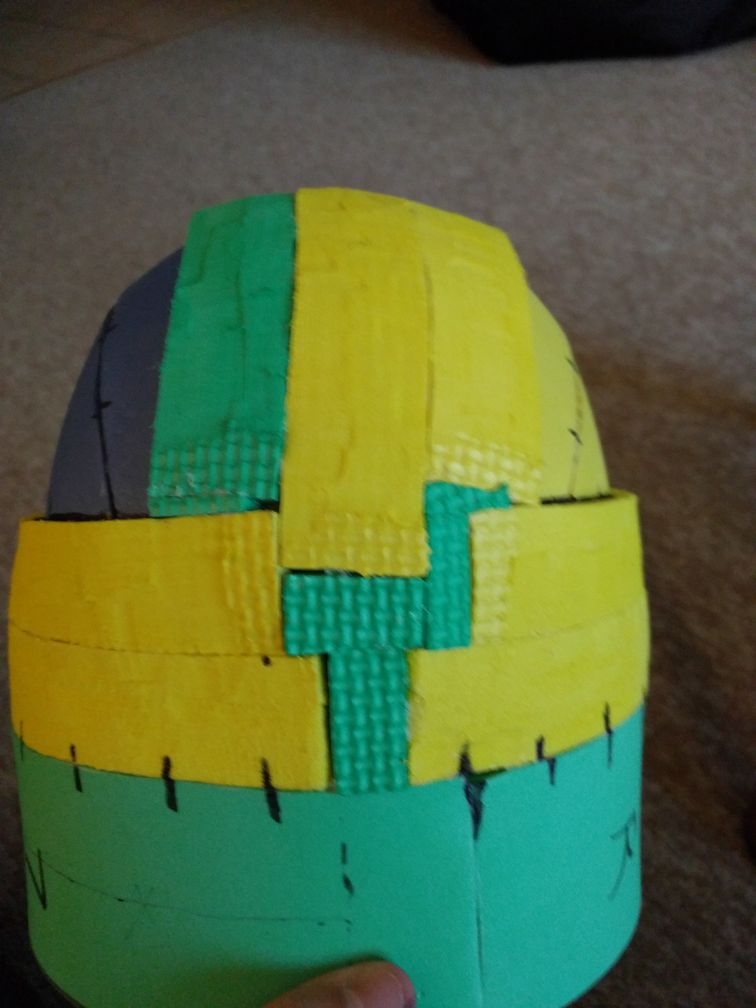
A few custom foam chunks fill those gaps nicely.
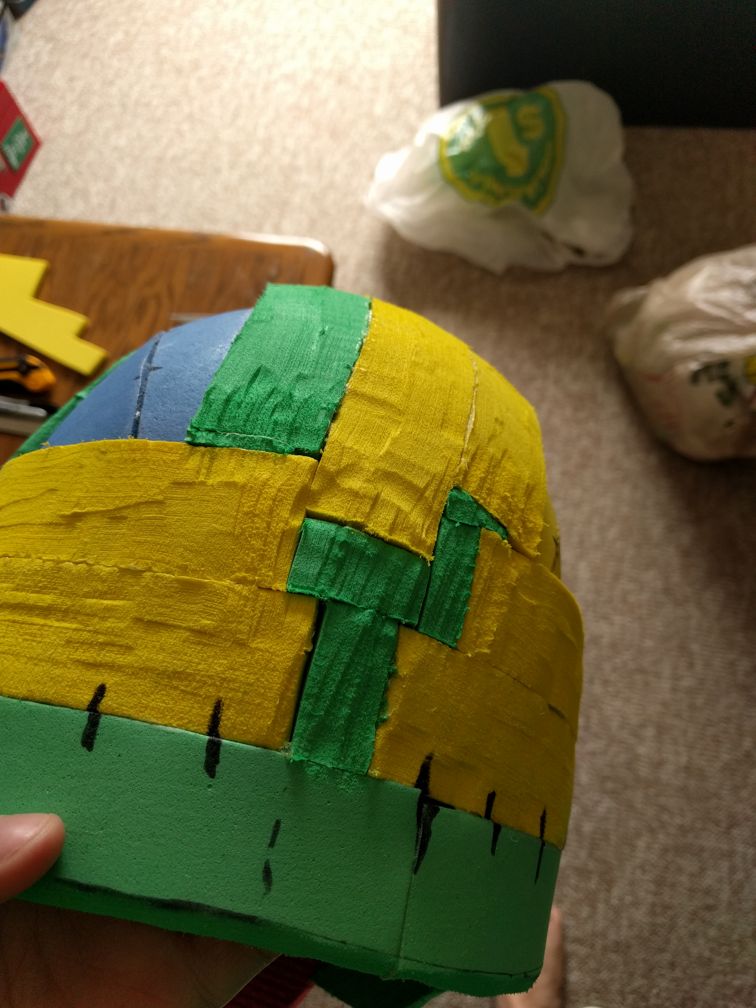
Now that the chunks have been glued in, I can rough grind the texture off them. It's not pretty, but we can clean everything up later.
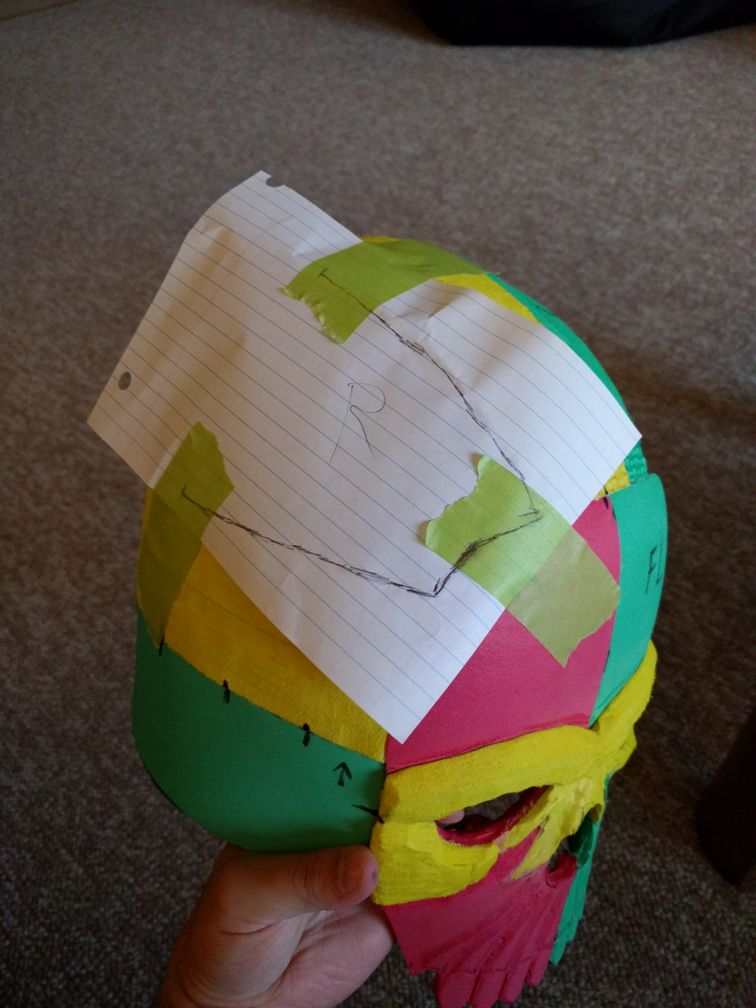
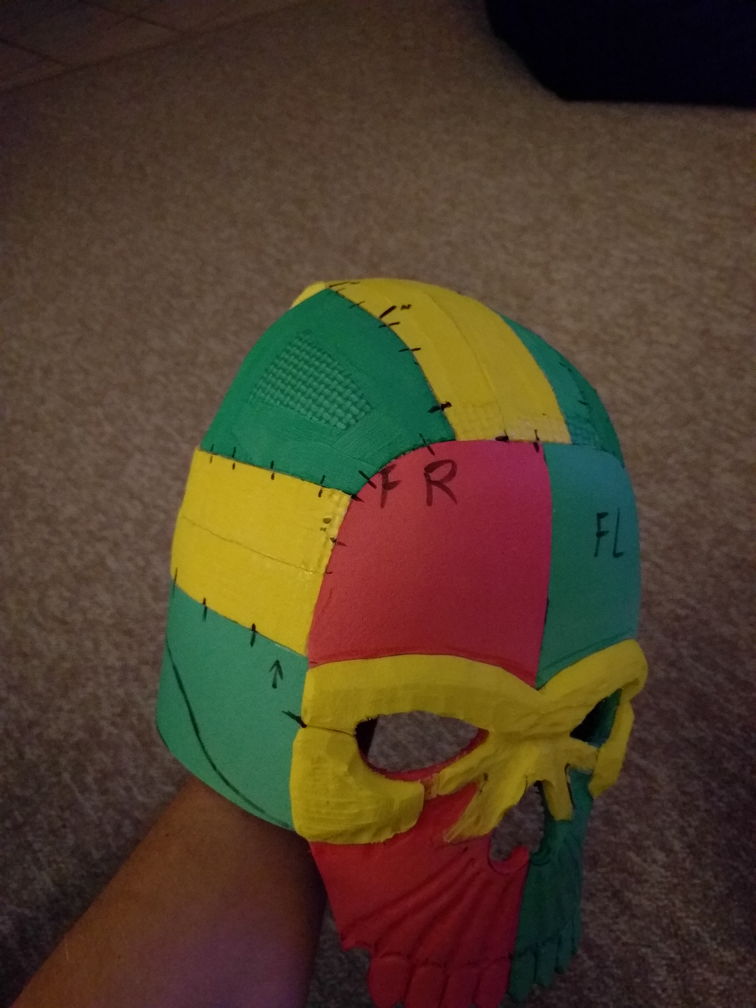
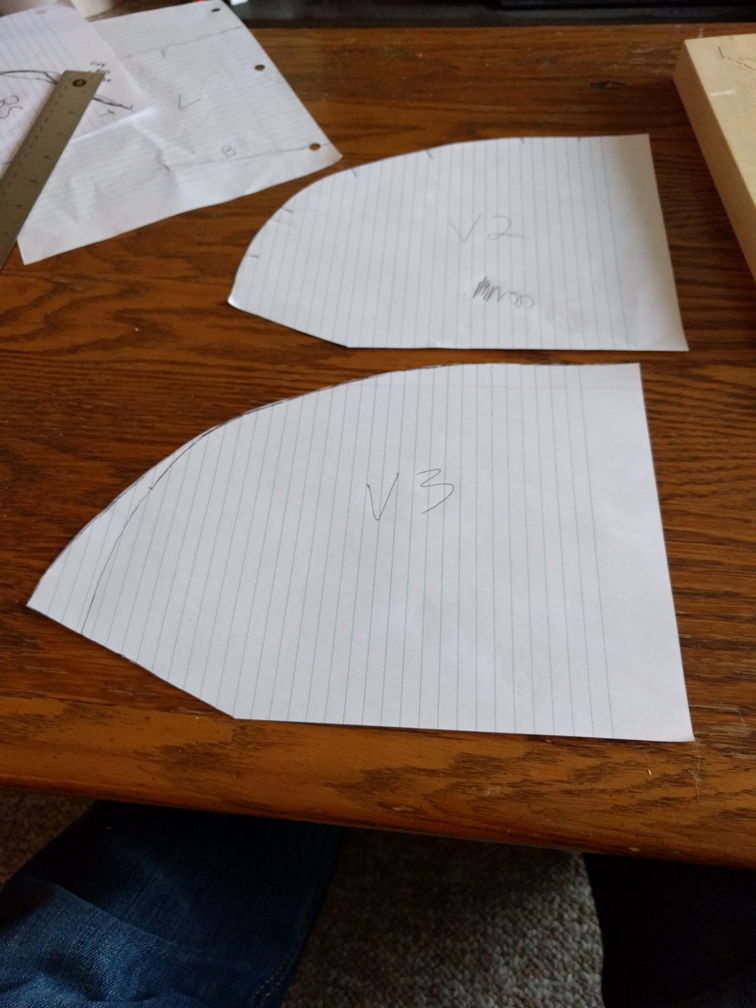
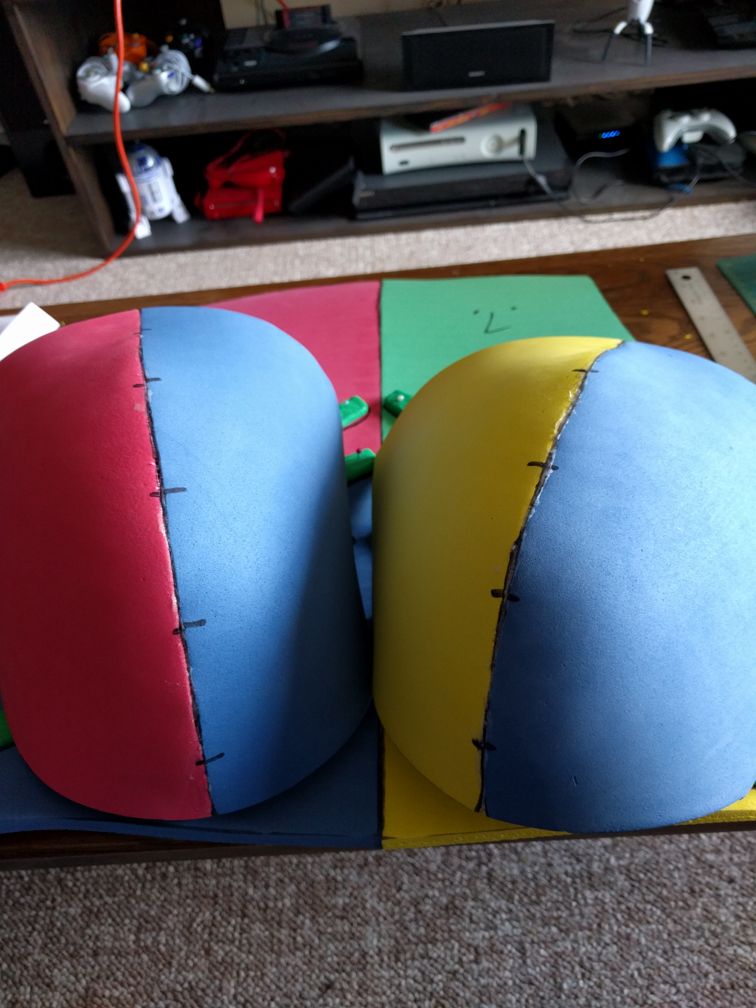
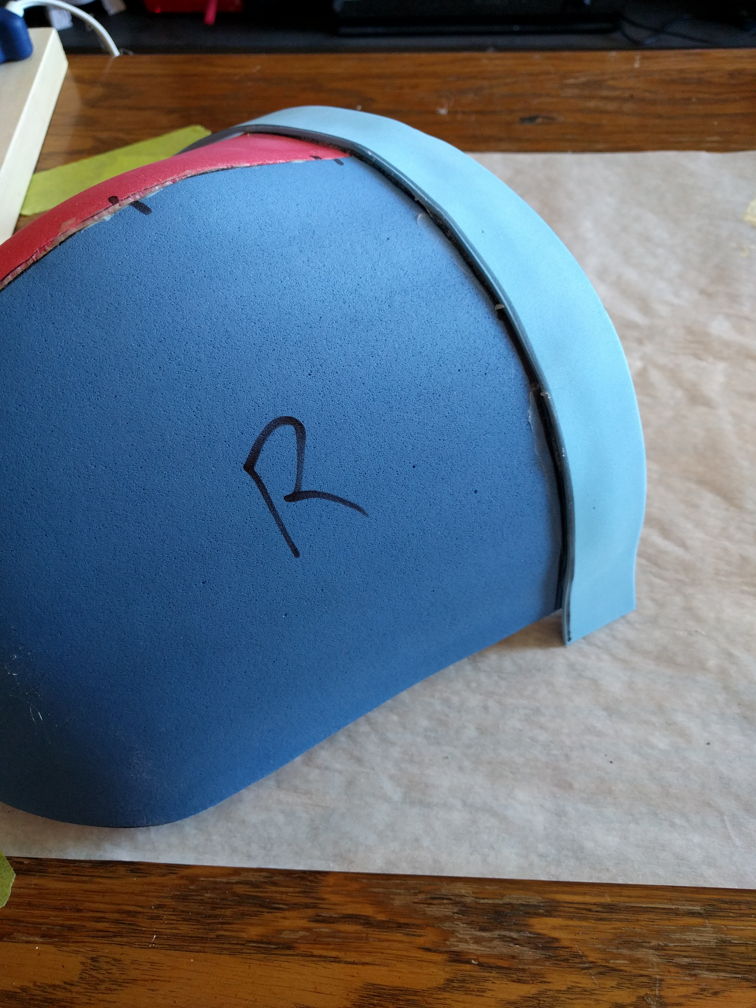
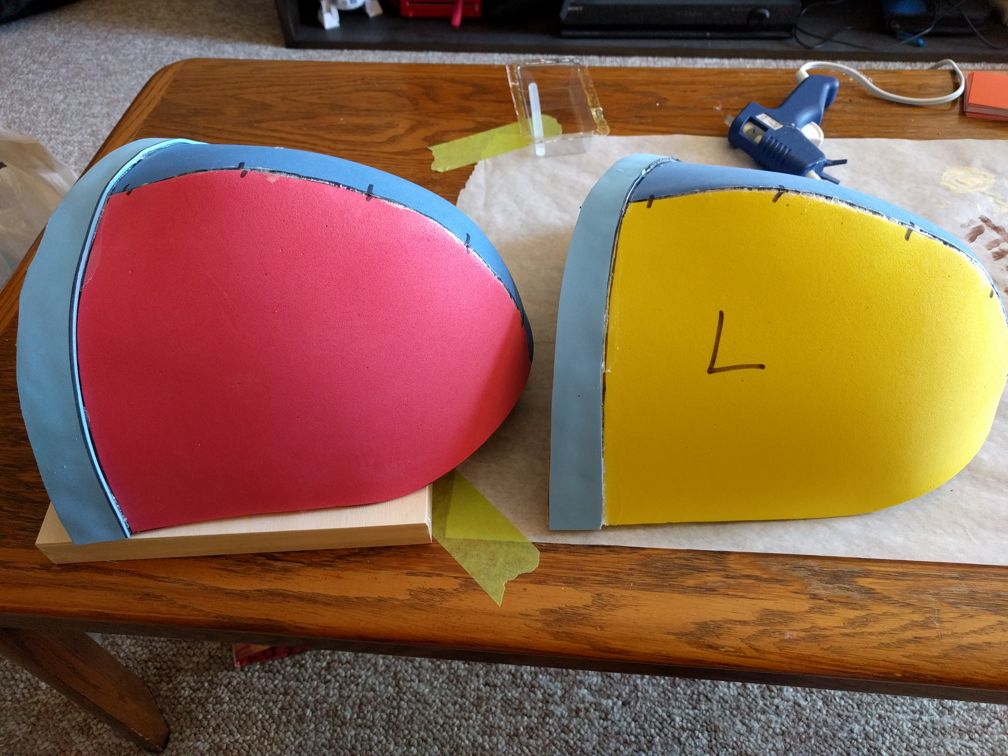
The two edges at the side that are missing straps aren't really going to benefit from more straps. I figured I'd make a couple custom pieces to fill those gaps, and to do that I did some very rough patterning. I taped some paper over it and used a pen to feel around for the edge of the foam. After I had that, I could cut it out. Repeat 3 more times (2 gaps that each needed front and back) and you're in business. While I tried to keep the helmet as symmetrical as possible, the straps weren't exactly the same size, so I couldn't reuse the template from the right on the left.

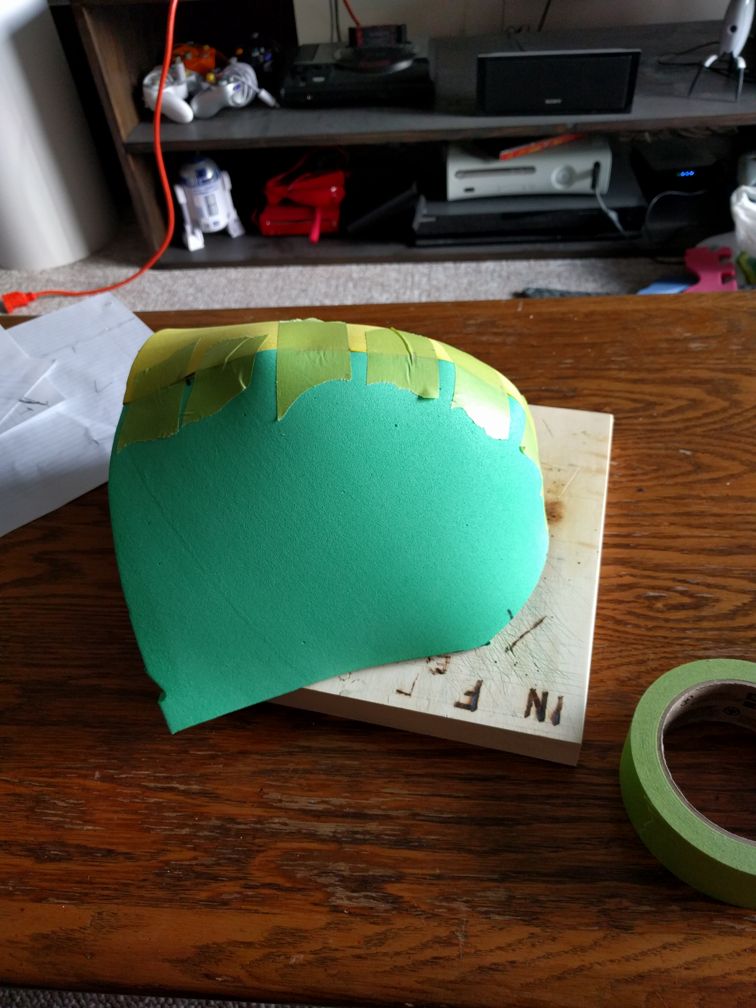
Once the piece is traced from your template, cut out of foam and had a bunch of the texture sanded off, it's time to heat it up and use your knee to dish it. This will make it easier to glue into place since it's already stretched the way it needs to be. You can dry fit it in the helmet between heatings to see how you're doing on mimicing the shape.
Glue those gap filler pieces in once they're all dished. You'll notice all kinds of black sharpie lines across my foam. I use those as registration marks and whenever possible I will maintain them all the way from initial pattern to final, shaped foam cut. Gluing in place exactly where you want is pretty easy when you have the registration marks since you just need to connect them. Go slow so you can get your seams just right. Contact cement doesn't mess around and you're not going to be able to remove it easily.
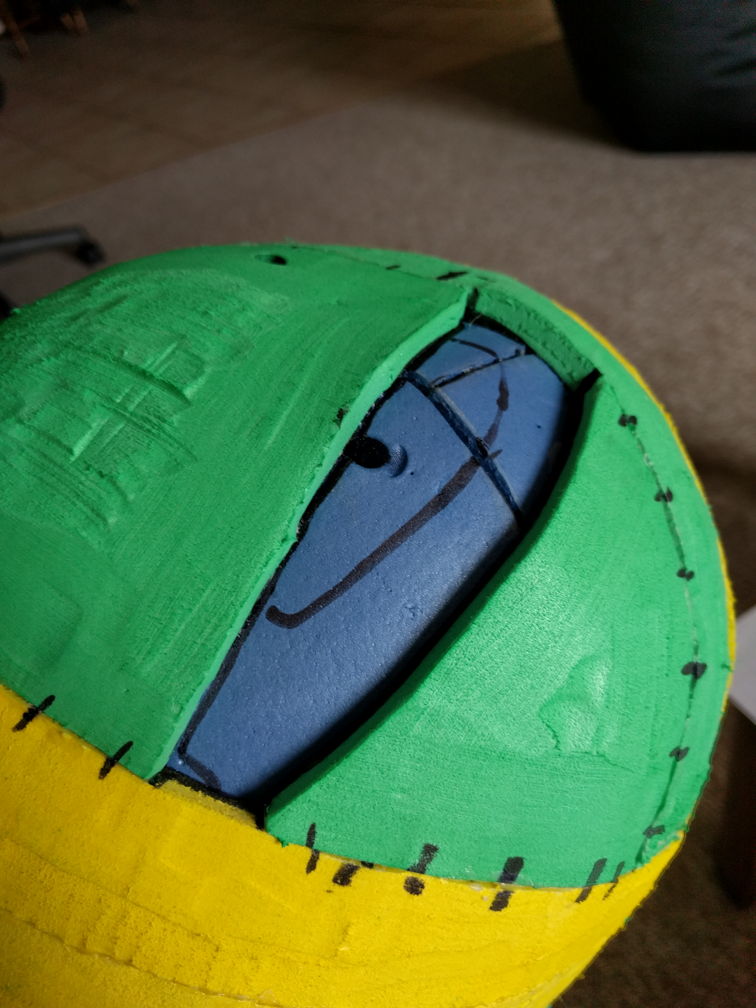
The back, bottom edge of the helm looks awful as a hard, rectangular edge, so we plot out a line to trim it back and curve it a bit.

The rotary tool makes short work of the curve.
There are still some hard edges in here so we'll want to clean them up with our rotary tool.
There! That's a bunch better. there are some sizeable gaps, but we'll solve those through other means.
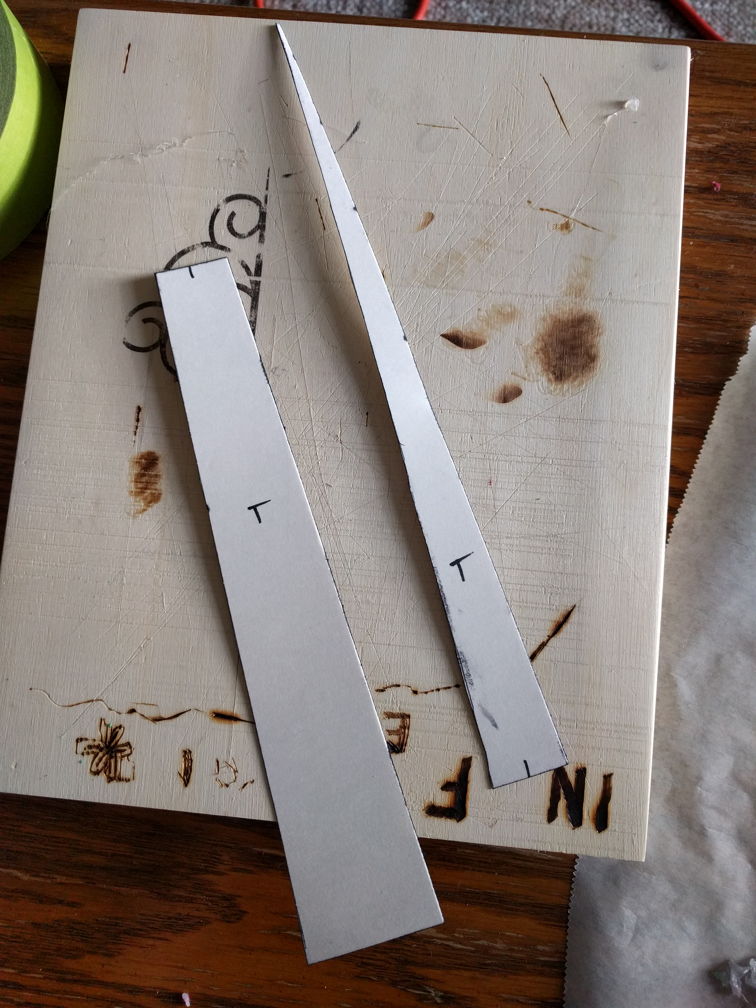
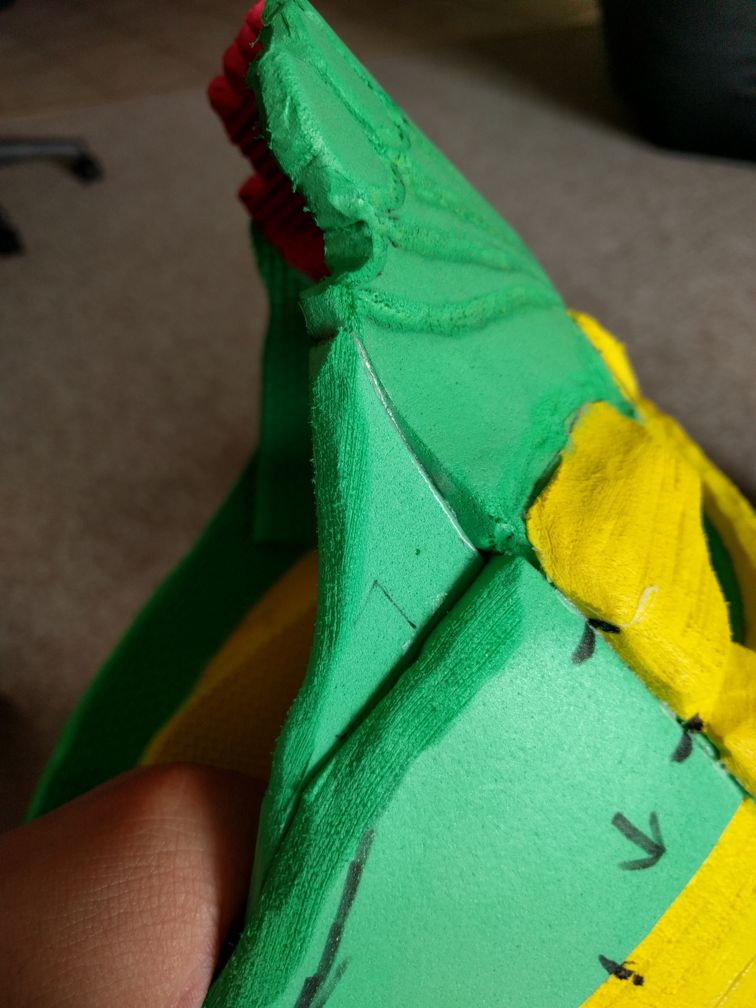
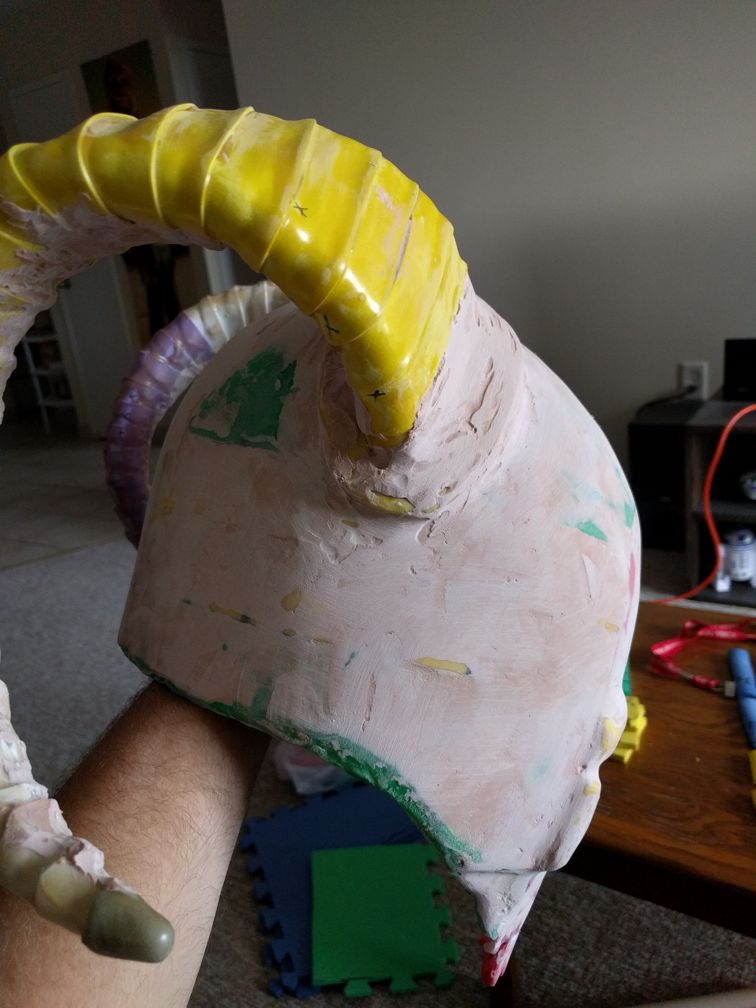
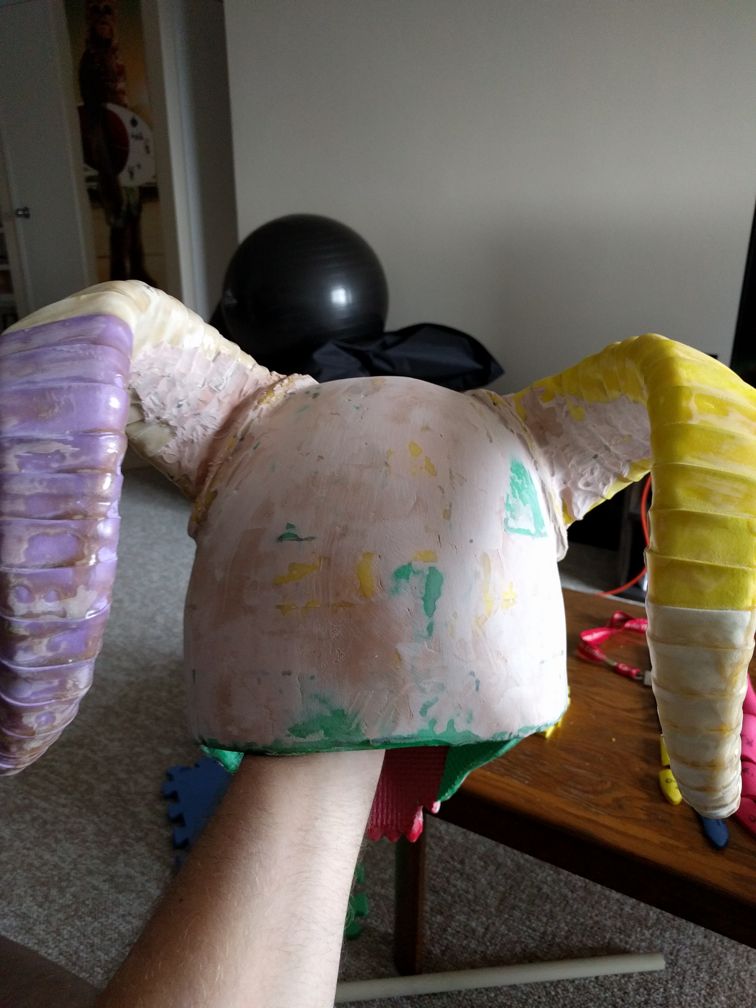
Helmet's looking good so we'll get some big ol' goat horns underway. Start with a super fancy pattern for a super long triangle.
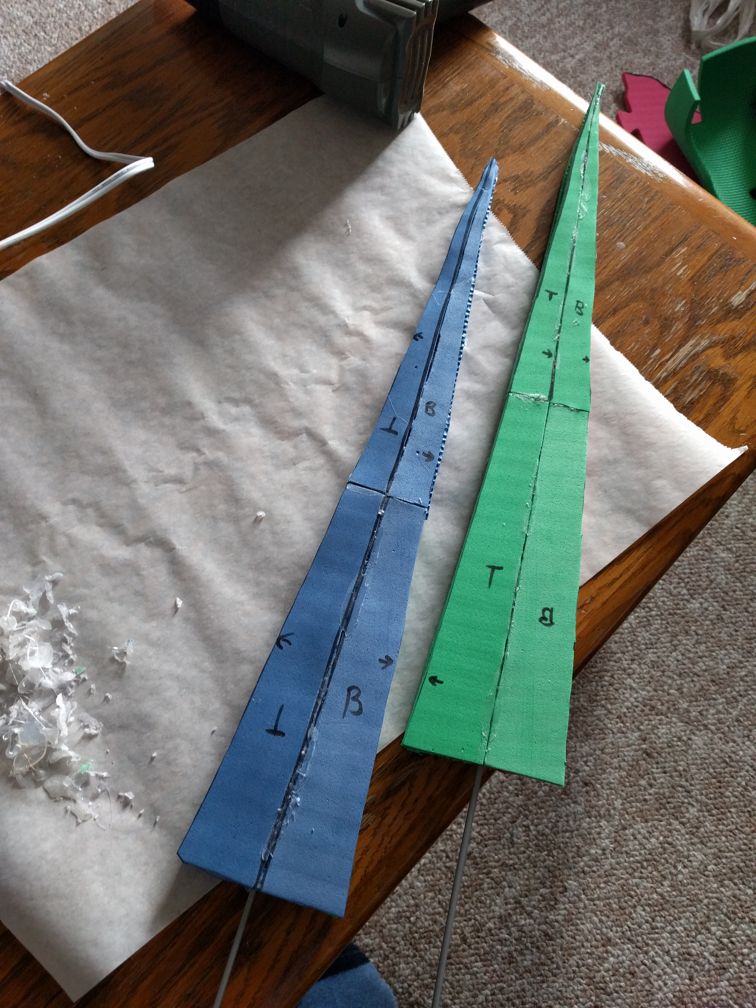
Cut out the foam for the horns so you have 2 layers for each horn. Then you can clue them back to back with a straightened coat hanger in the middle. The tip can be right at the tip of the triangle, but you'll want some serious excess at the base so you can mount them to the helmet.
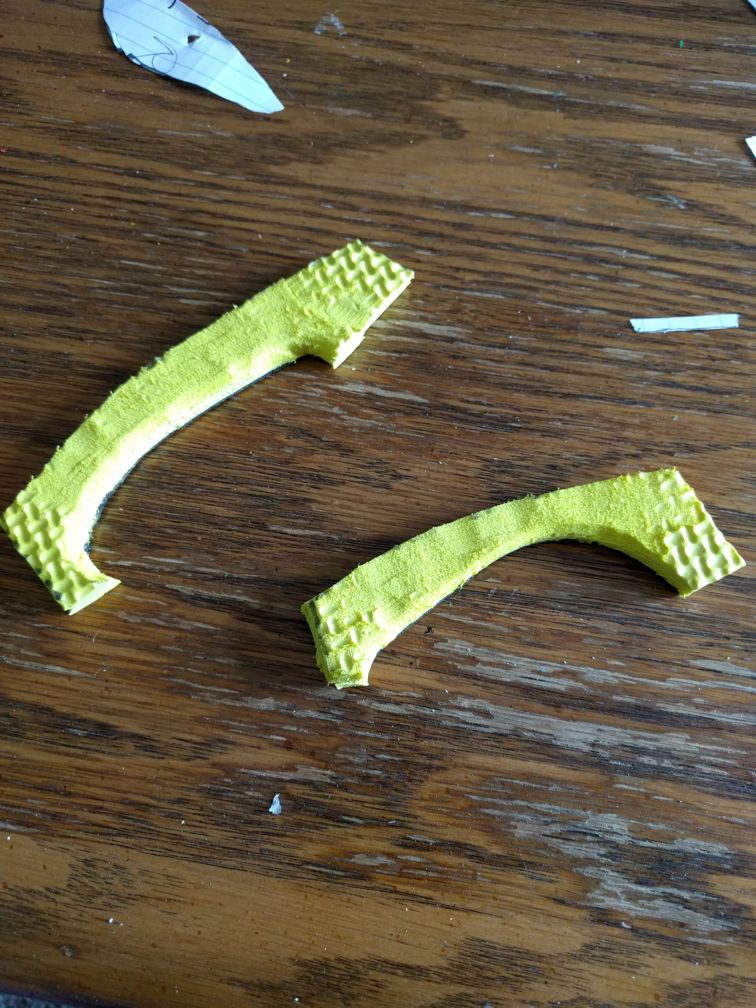
Cut out some smaller triangles (just one set per horn). These will go near the bottom of each of the horns. You'll want to grind off the edges to give you a more rounded set of horns.
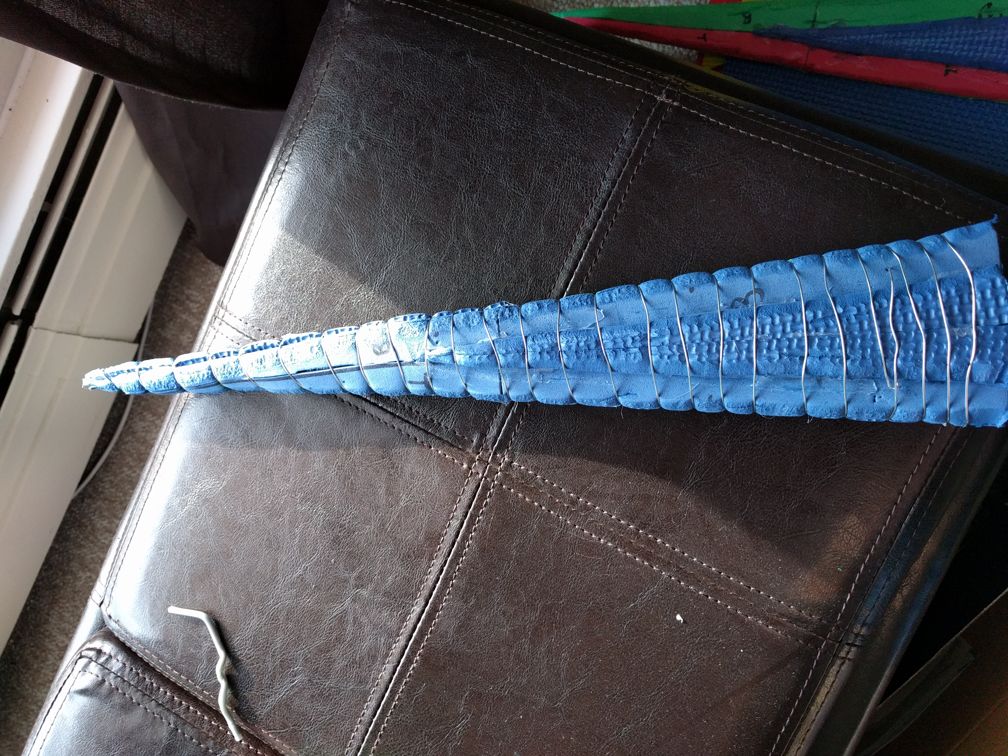
Take a smaller wire and wrap it around the horn. The coat hanger on the inside will give it some rigidity, but the wire wrapped around the horn will give you more rigidity once you've curved the horns.
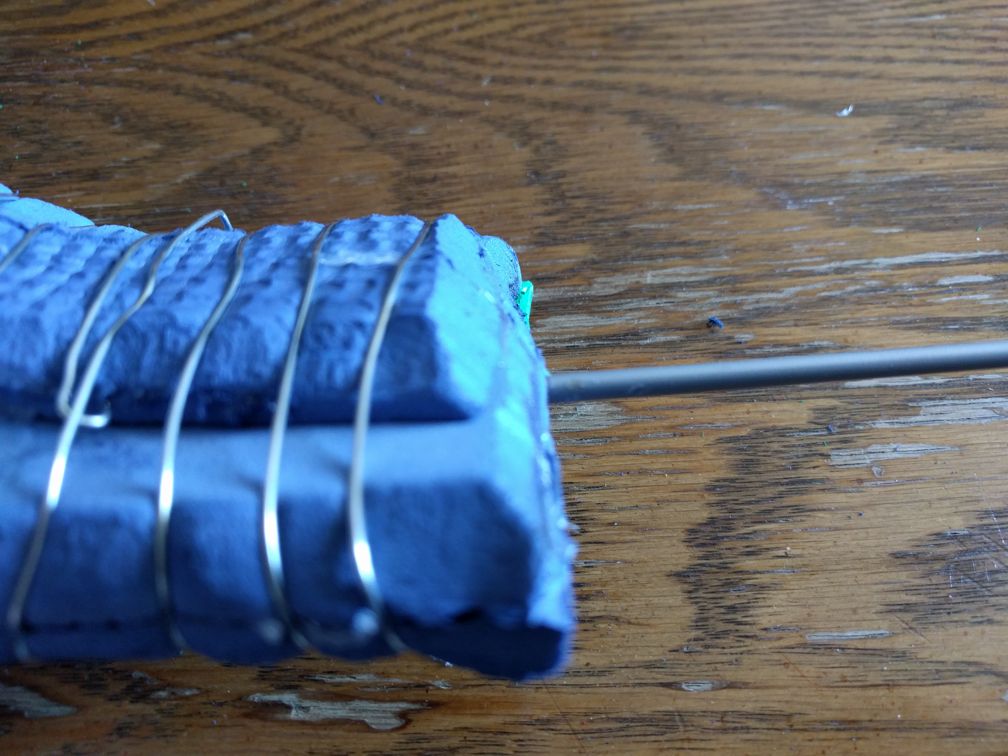
The foam will naturally form a 90 degree angle at the base. That's not something I wanted, so I cleaned up the edge to let it lie on an angle.
Make sure the wire is safely tucked away. You don't want any sharp edges hanging around. Poke the wire into the foam to keep it from poking you!
Twist and pry a nice curve into those horns.
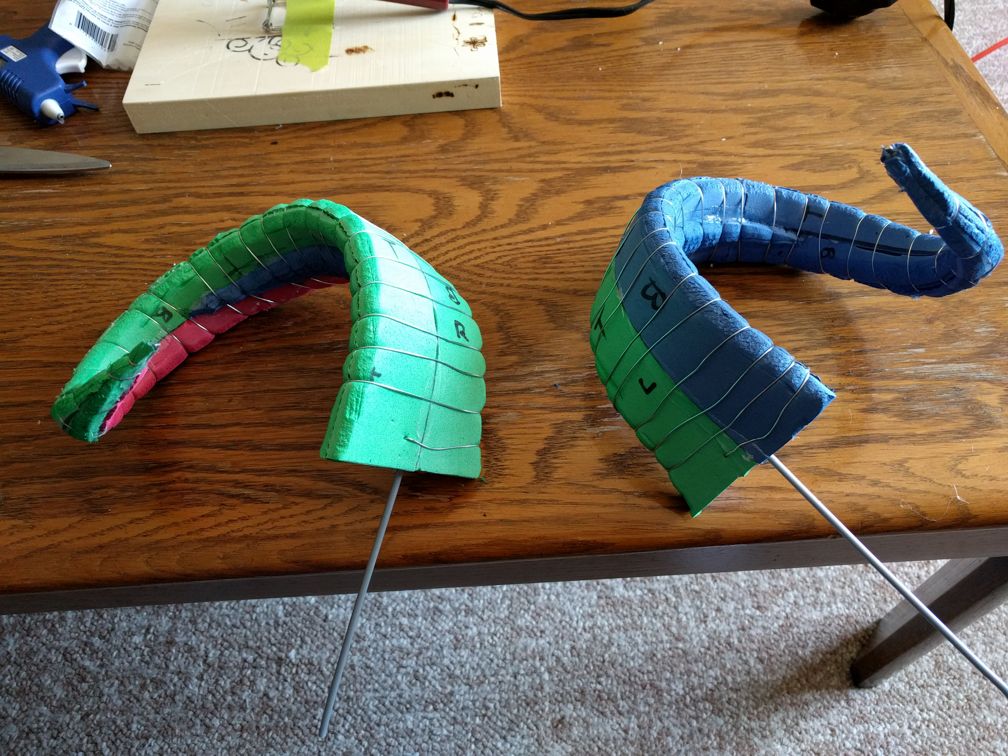
Then do it again to the other horn so they roughly match!
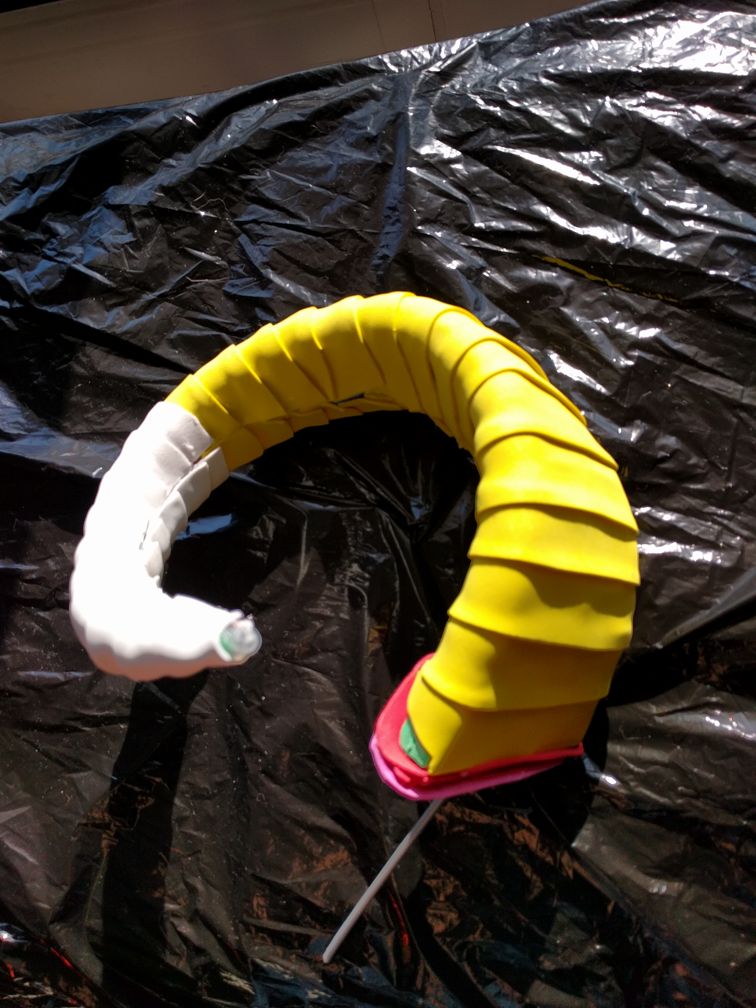
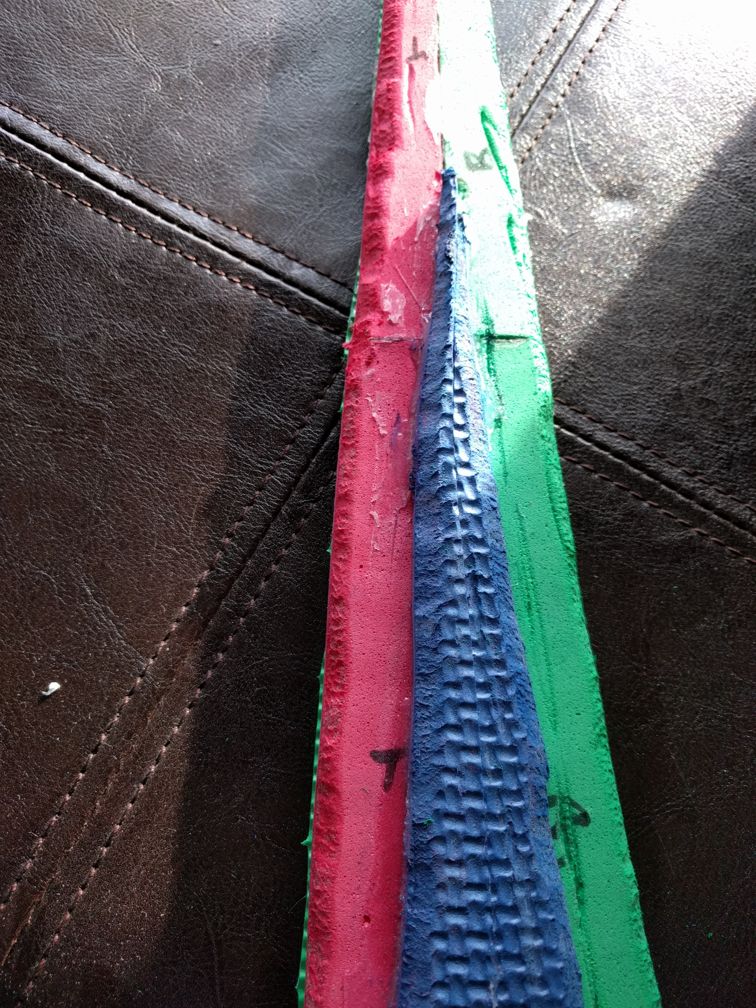
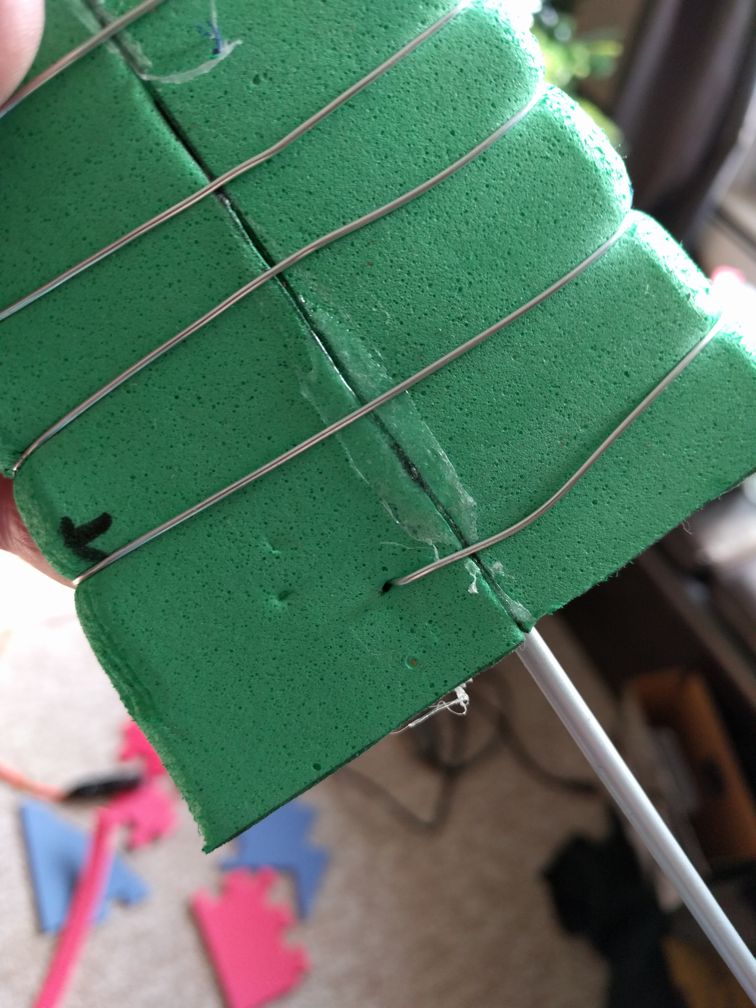
Take some thinner craft foam and cut it into strips. Then go from bottom to top with a slight overlap. This should give you some cool ridges It's pretty important to do this after you put the curve in or it won't line up right. The curve can still be refined a bit afterwards, but not too much.
I recommend gluing the tip with some hot glue before you do the layers. This should help keep the other point of the wire out of harms way.
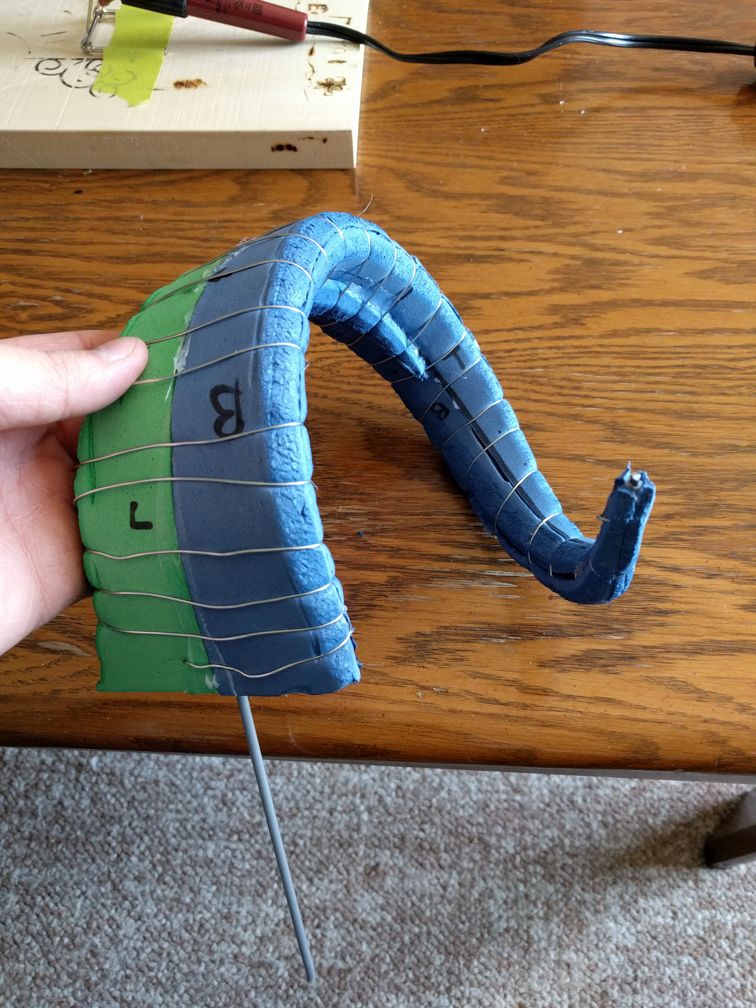
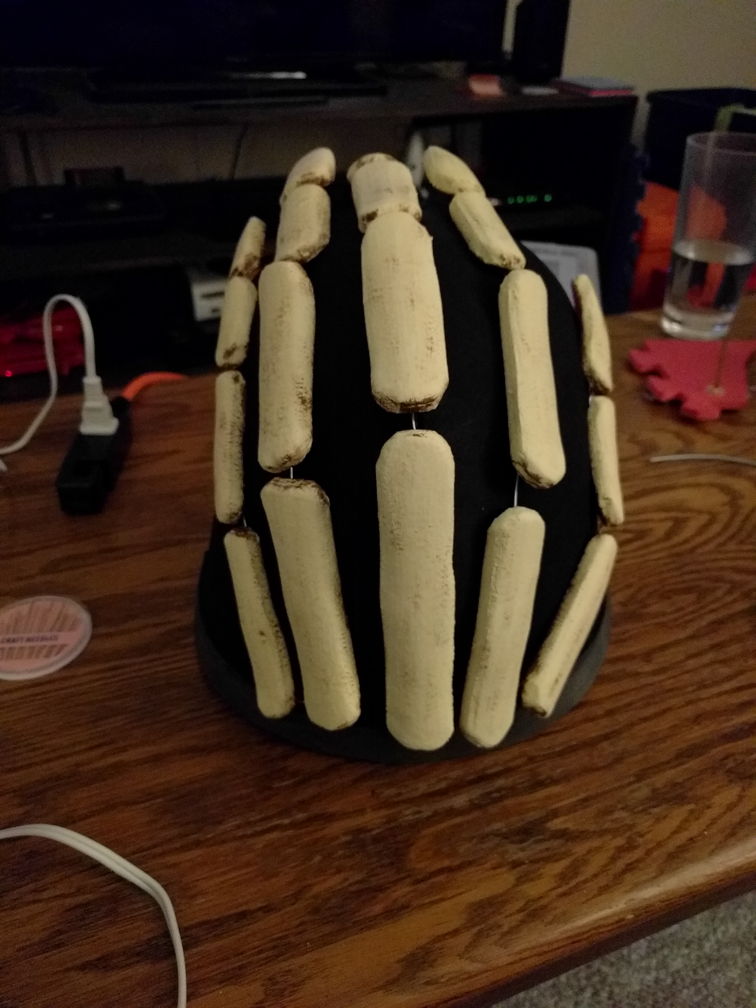
With the horns mostly sorted, we should probably fix up where they'll attach to the helmet. Add in some fillers from some more custom cut foam.
Pop those fillers in.
Now we want some bulk where the horns meet the helmet, so we'll pattern out a rough ring of foam to circle the horn socket.
Clean up that ring of foam with the rotary tool and glue it down.
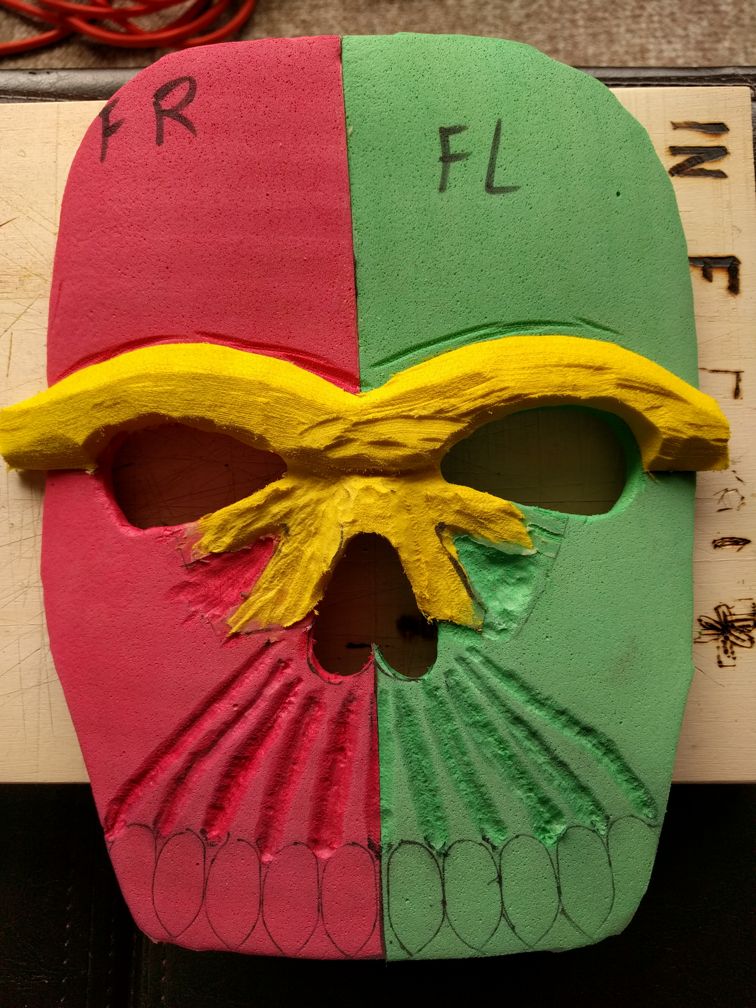
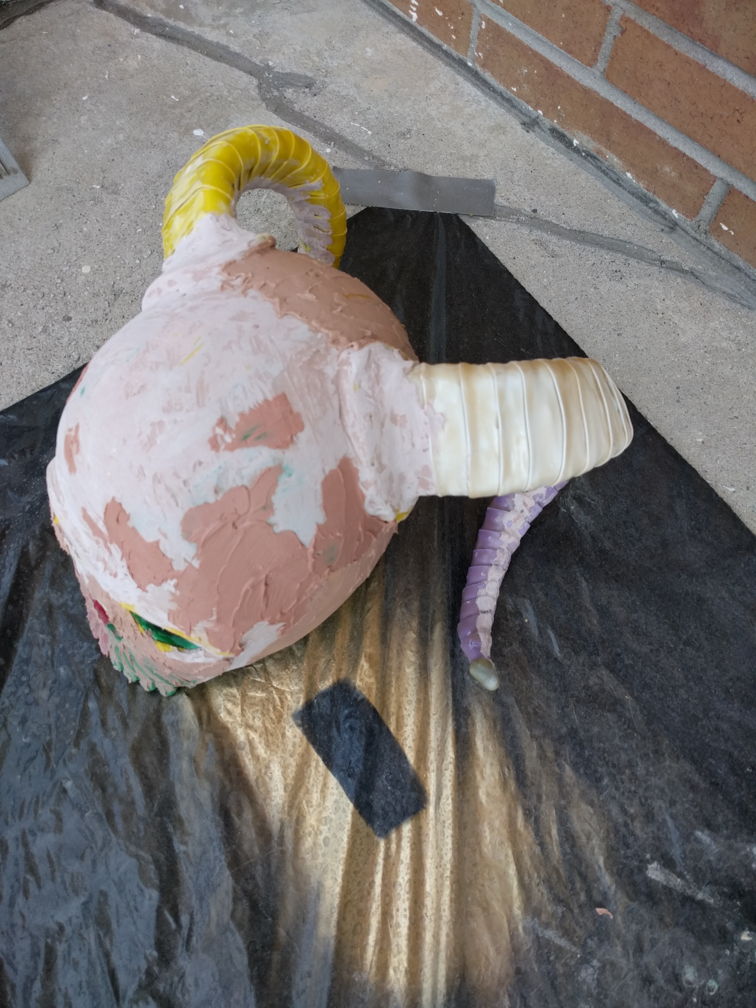
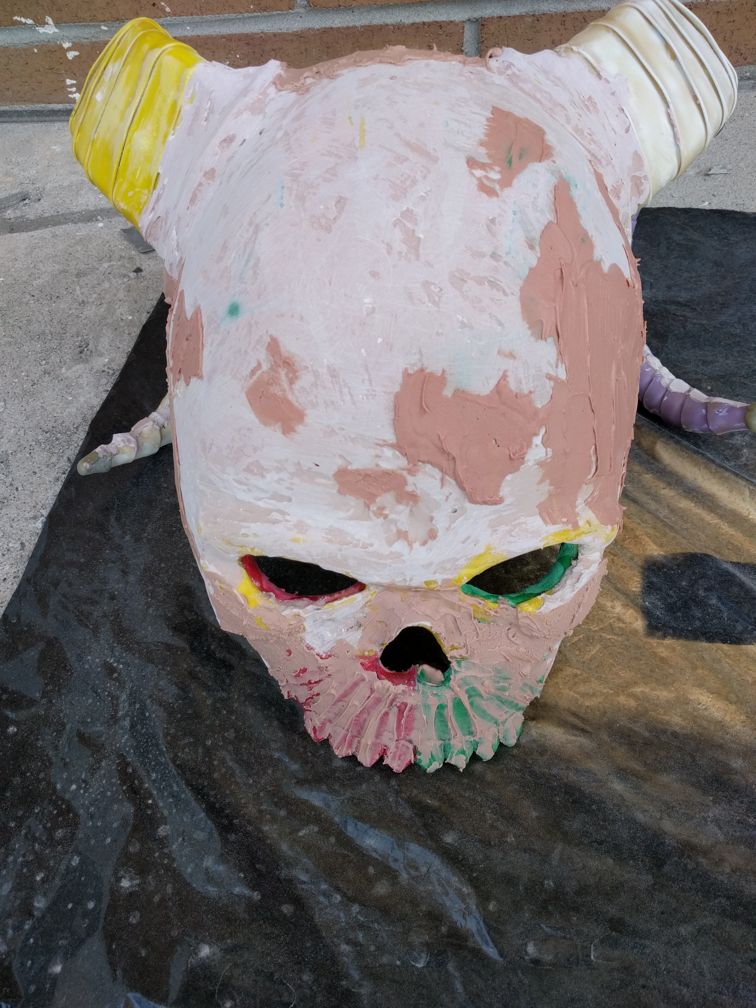
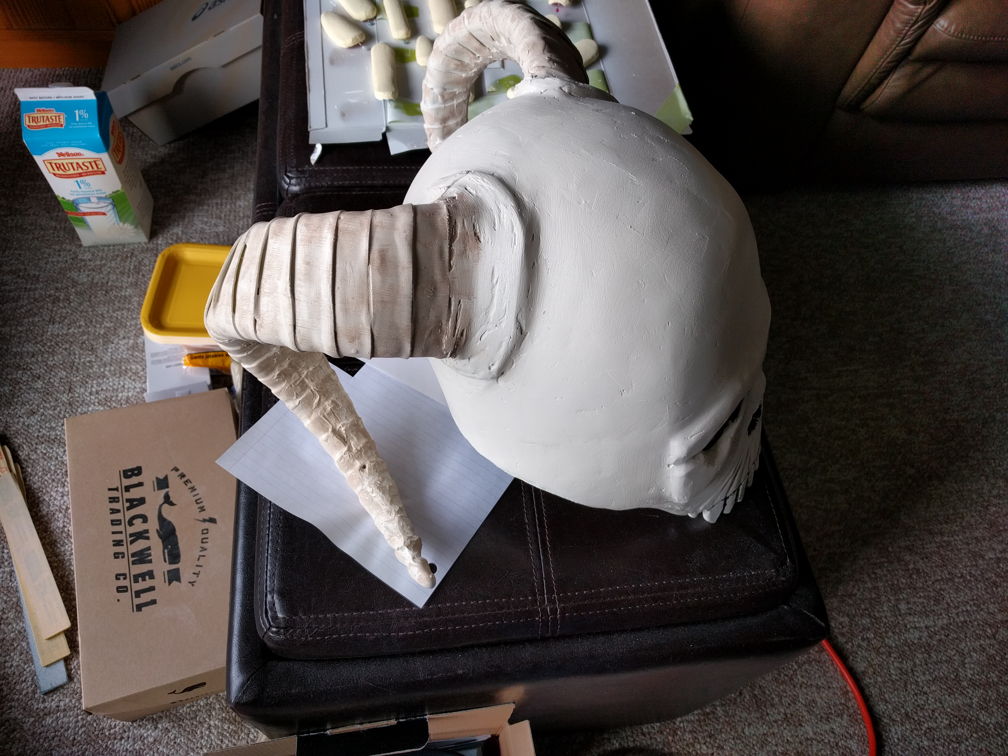
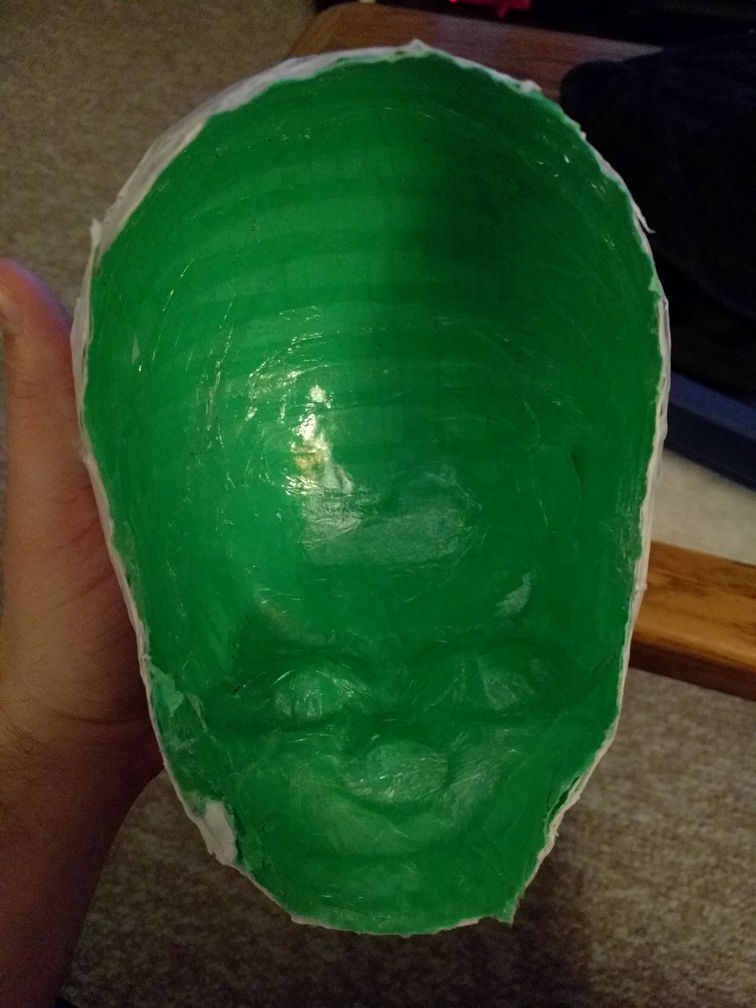
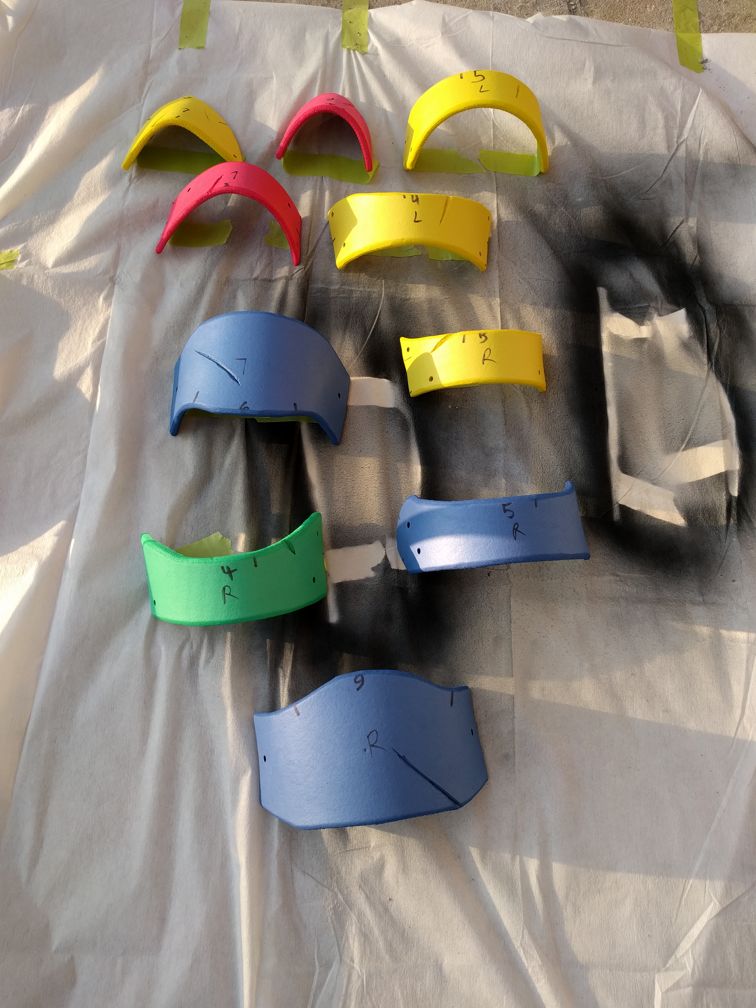
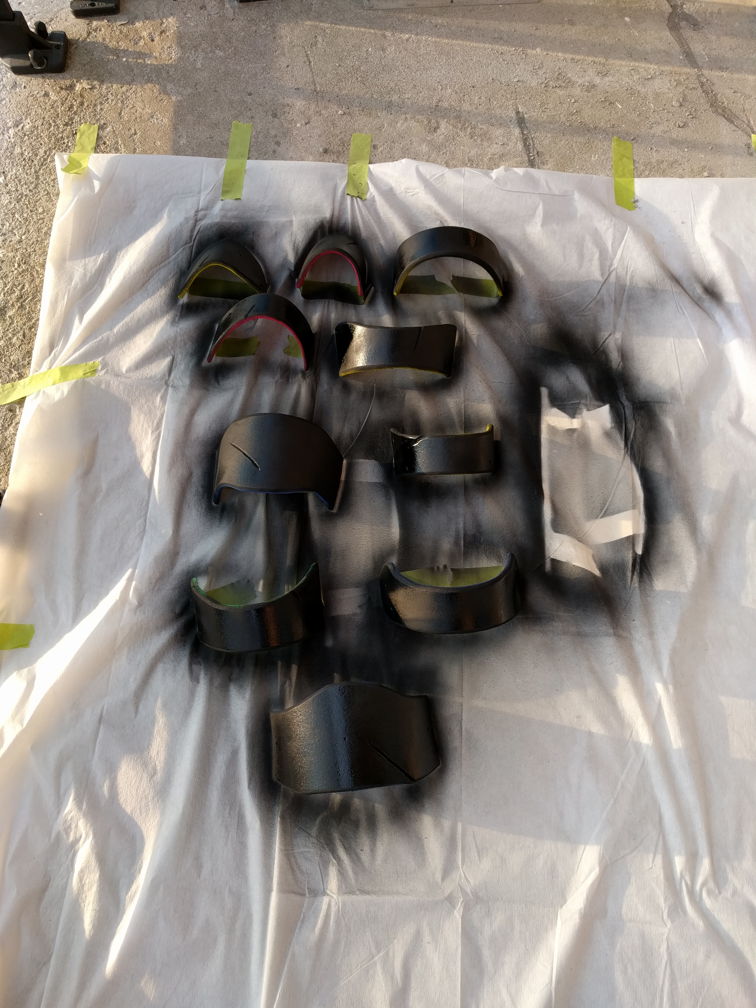
Sanding at foam give it a really undesirable texture and opens the cells of the foam. We want them closed for paint and other finishing products to take to it. One effective approach is to heat treat the foam by blasting it with a torch or a heat gun.
Heat treat the whole thing. It'll still be pretty rough, but it'll be smoother.
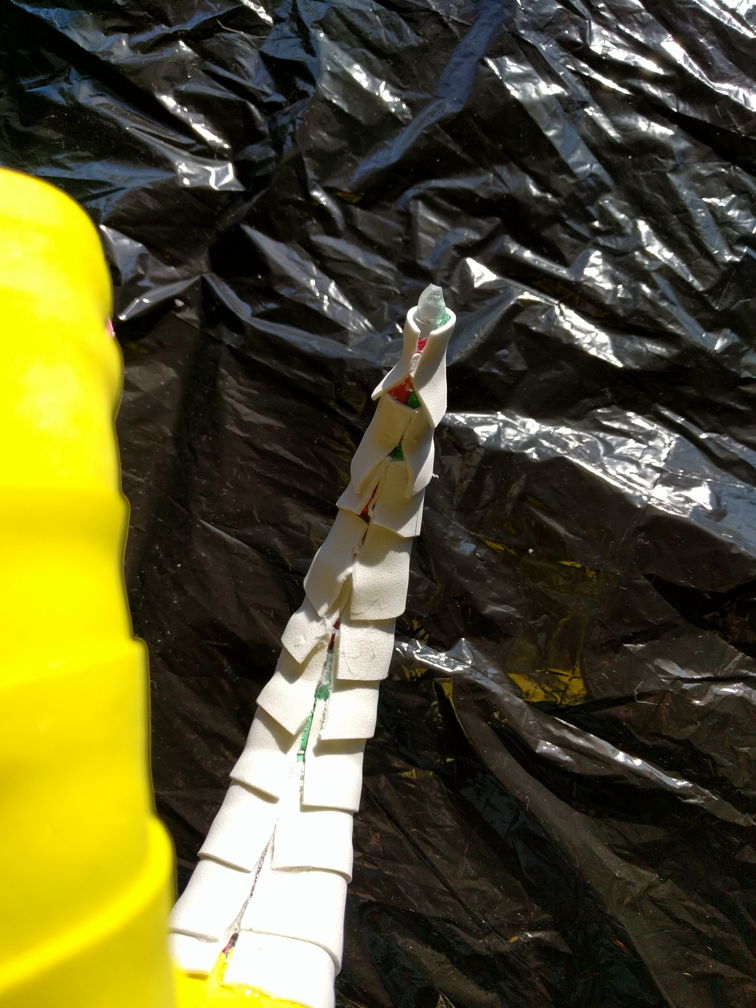
Pop those horns into the sockets. They should be a pretty tight fit. We've used contact cement for most joins here, but hot glue will suffice for this one.
Now that they're secured, we can add some extra pressure to hold them steady from the inside. Twist the coat hanger wire around with some needle-nosed pliers and cut them off. Some foam between them and your head will definitely be appreciated after.
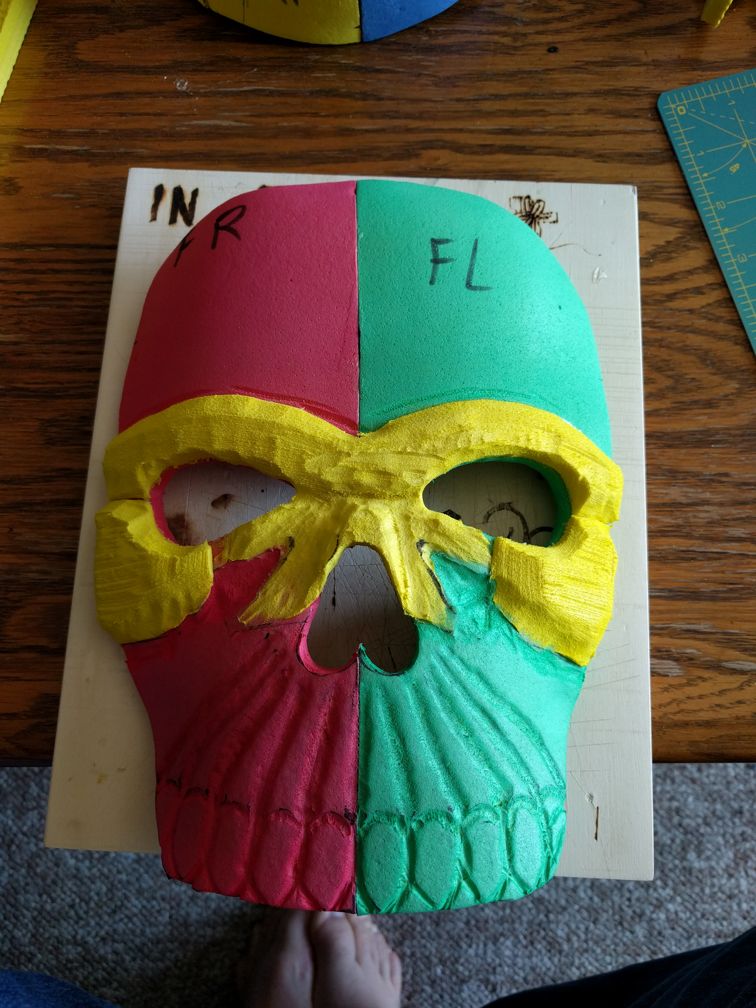
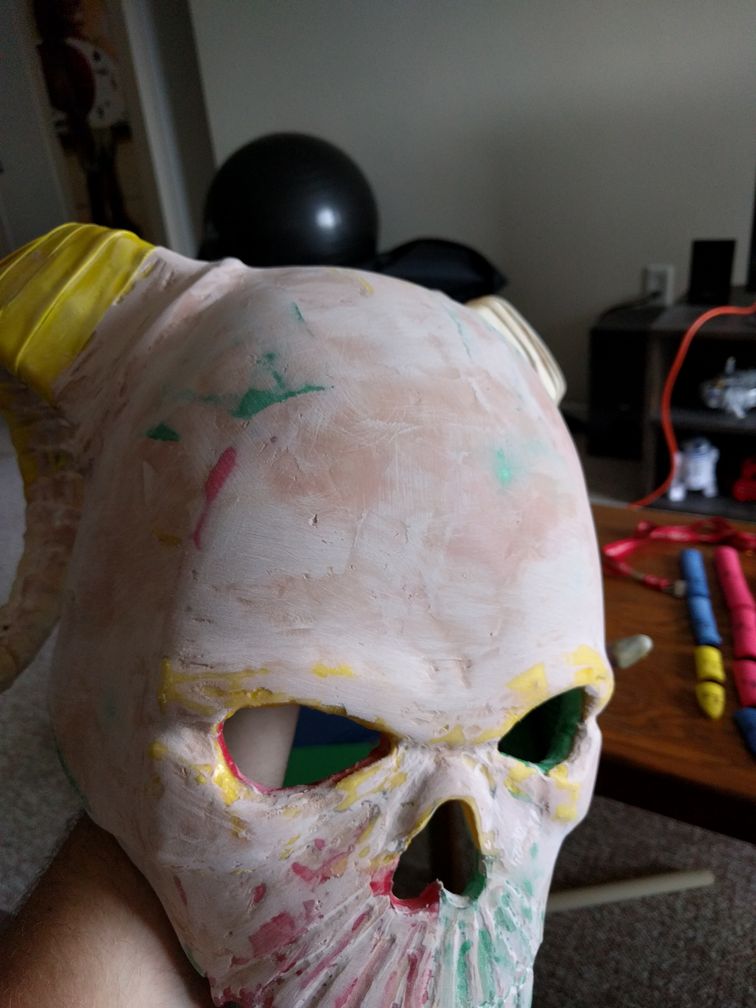
Now that the foam shaping is done, we can move to doing some finishing. First step is to give some rigidity to just the outside. I opted for some resin. Cheap resin is fine since I don't need it for a finish so much as just for a hard coat. I used fiberglass resin. Resin is really, really bad for you to breathe, so be sure to wear a proper respirator.
It's important to get pretty thorough coverage. I did two coats. Thin coats are better than thick coats. That's a recurring theme with applying anything from resin to paint. You may see that I have a few blobs here from where the coat was too thick. We can sand those down later.
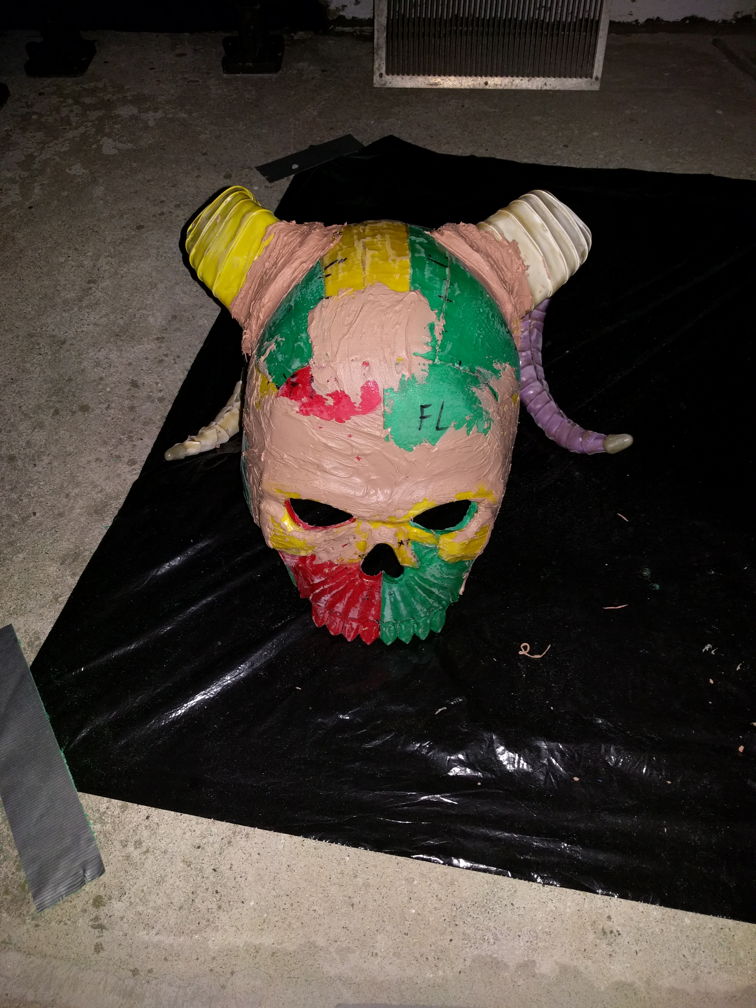
Why did we want a rigid coat on top of the foam? Why weren't we concerned about the dings and scrapes? Simple. Now we're going to load up on auto body filler. You mix up the two parts and spread it like putty. Remember what I said about thin coats? Yeah. Do that. Definitely don't go as thick as you can see I did. That took a LOT of sanding to bring down and smooth again.
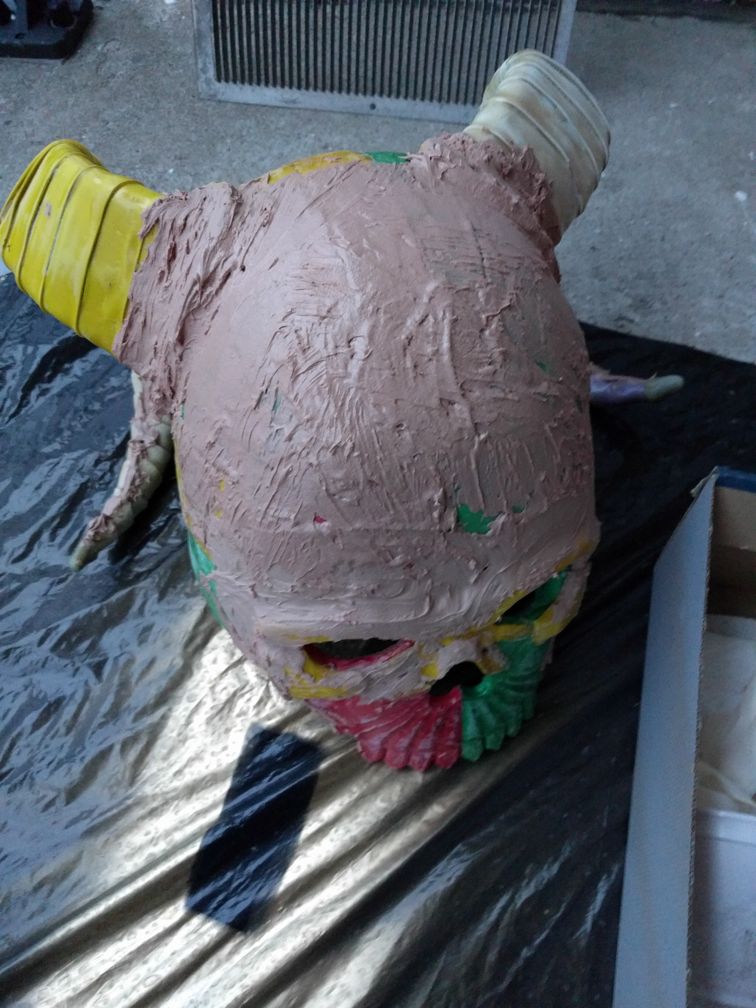
So much body filler. It's really versatile because you can spread it and sand it. This is a very good thing, because I put on way too much on and will need to sand a lot of it off. What I said about the resin goes twofold for auto body filler. It's REALLY bad to breathe in. Get that respirator out again.
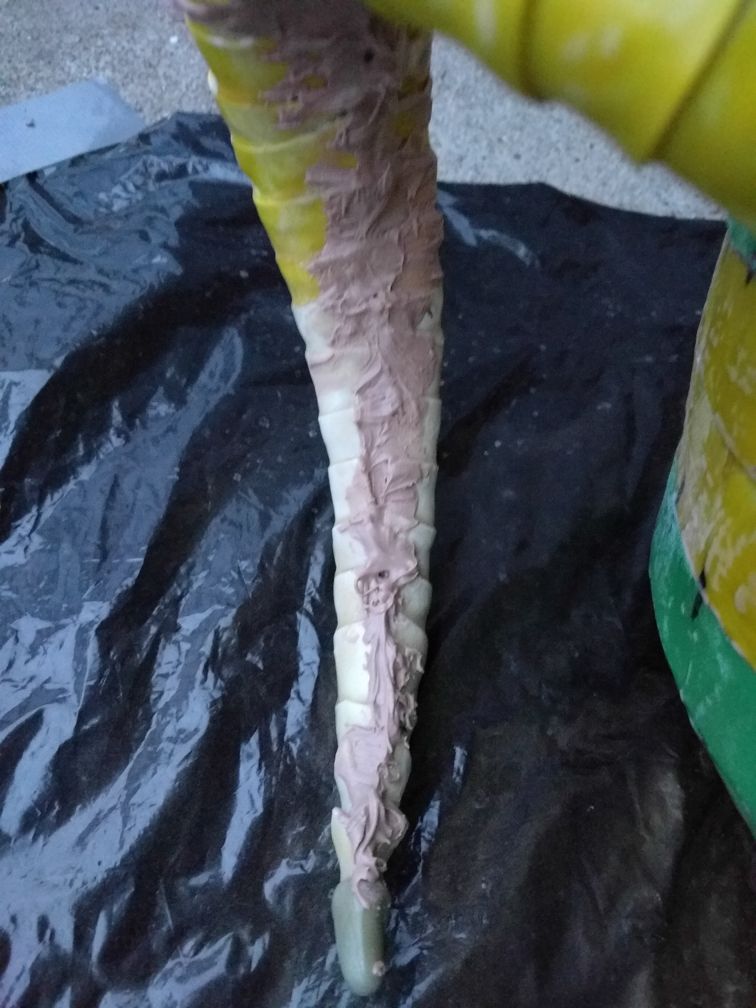
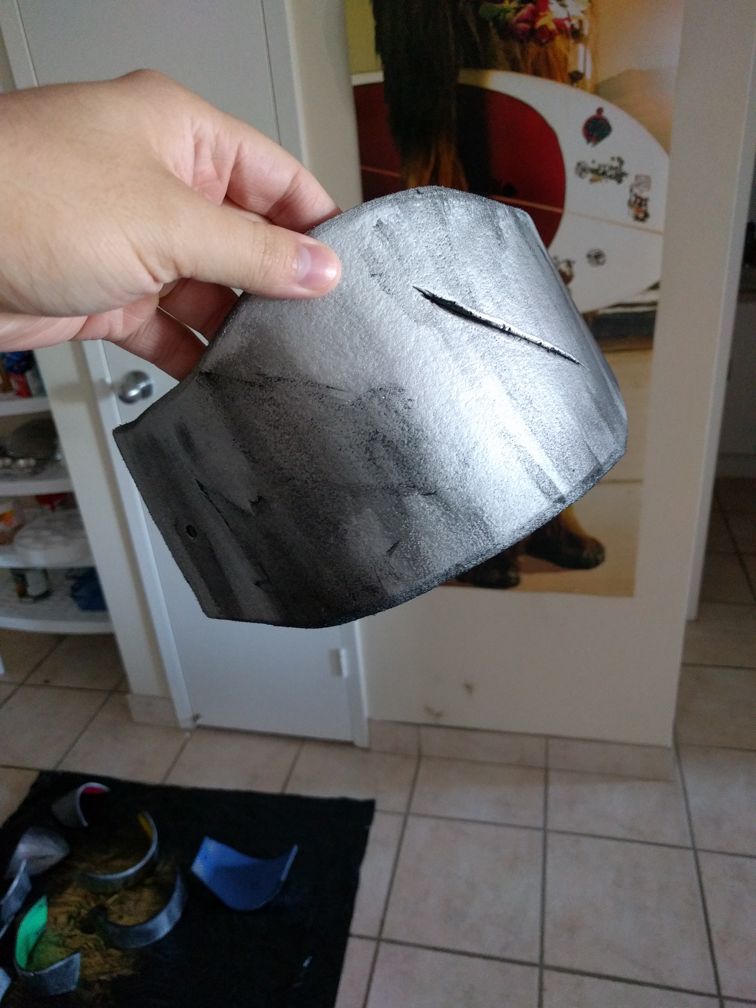
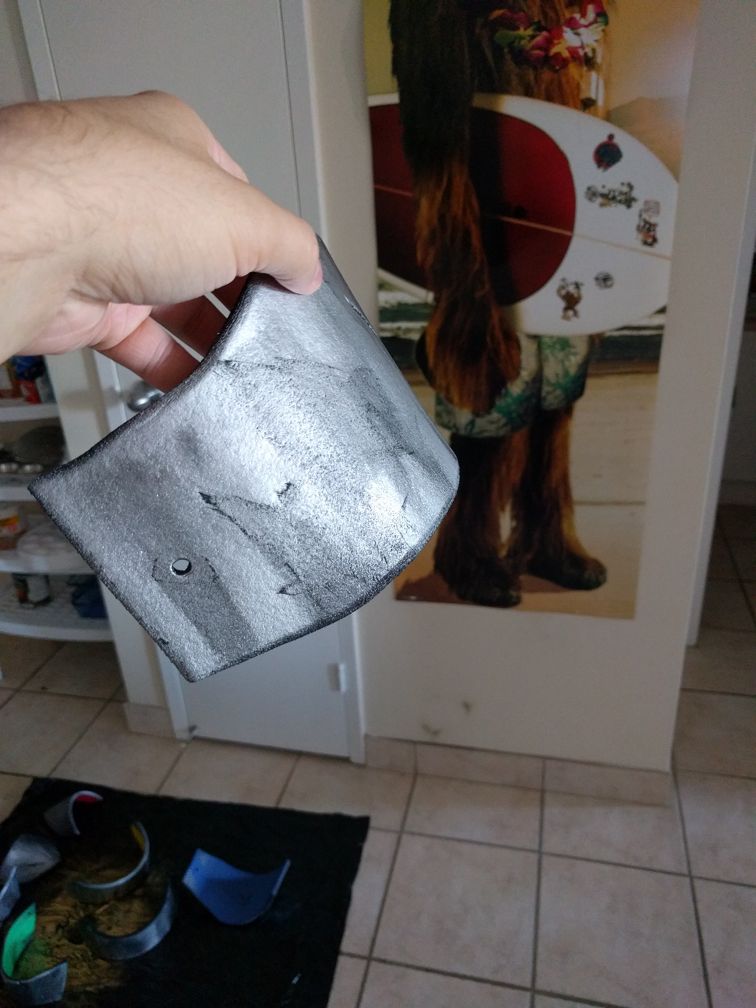
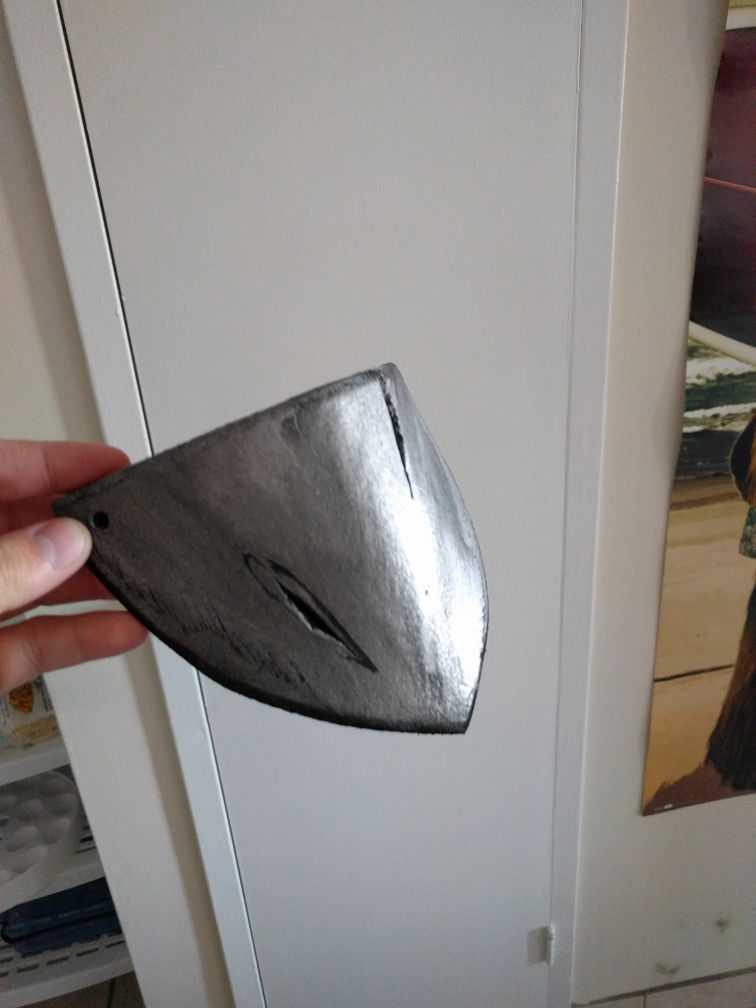
All of the fiddly little bits can be filled out with auto body filler. The advice about the thin coats goes double for smaller and more fragile parts, like the horns.
Now to pay the price for putting too much on in one coat. Lots of sanding to do before adding another coat of filler. Sanding isn't very fun, but it's the best way to get results. This is just between coats, so a high grit isn't needed yet.
Pop on a new coat of auto body filler. A flexible scraper like a business card or even a piece of foam will spread the filler more cleanly (and thinly).
Get it on the face as well. We want bondo all over as it lets us get some better detail work in.
Now it's time for more sanding.
And even more sanding.
And yet more sanding. This should smooth out a lot of the imperfections we left in.
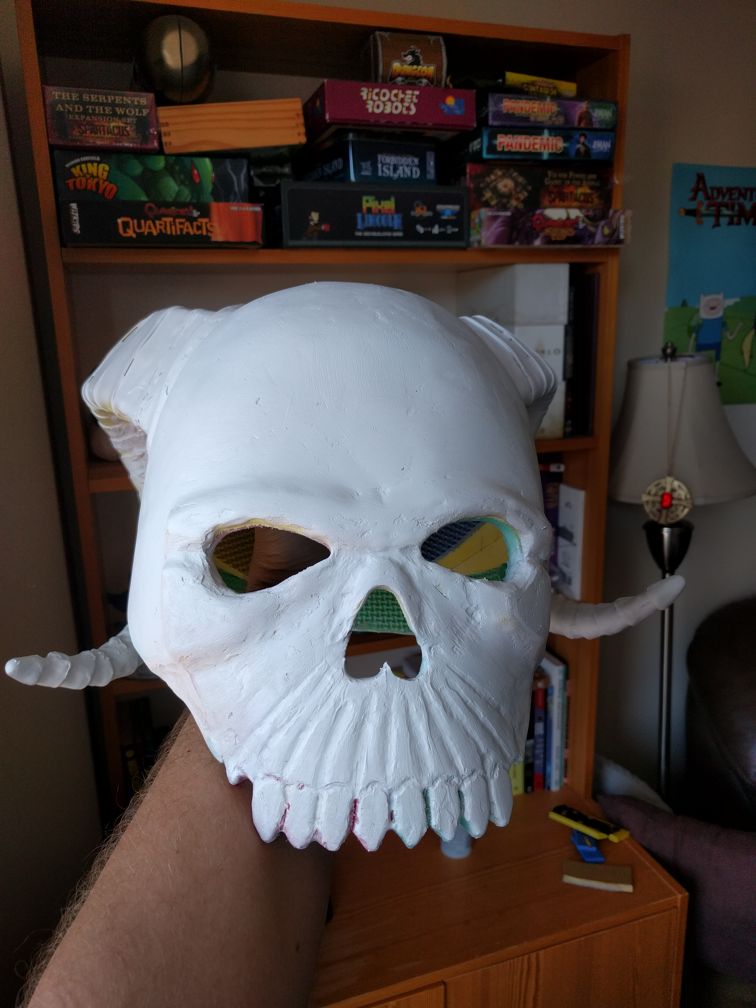
Now for priming!
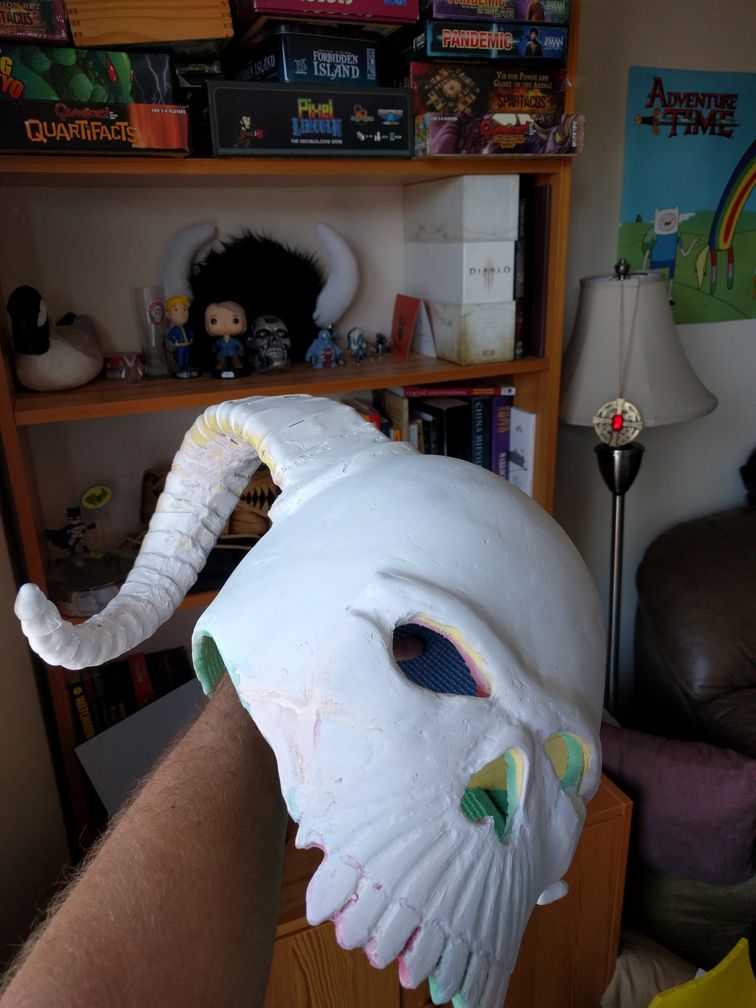
Prime everywhere. Get it in all the nooks and crannies of the outside surface.
Lots of thin coats makes the magic happen.
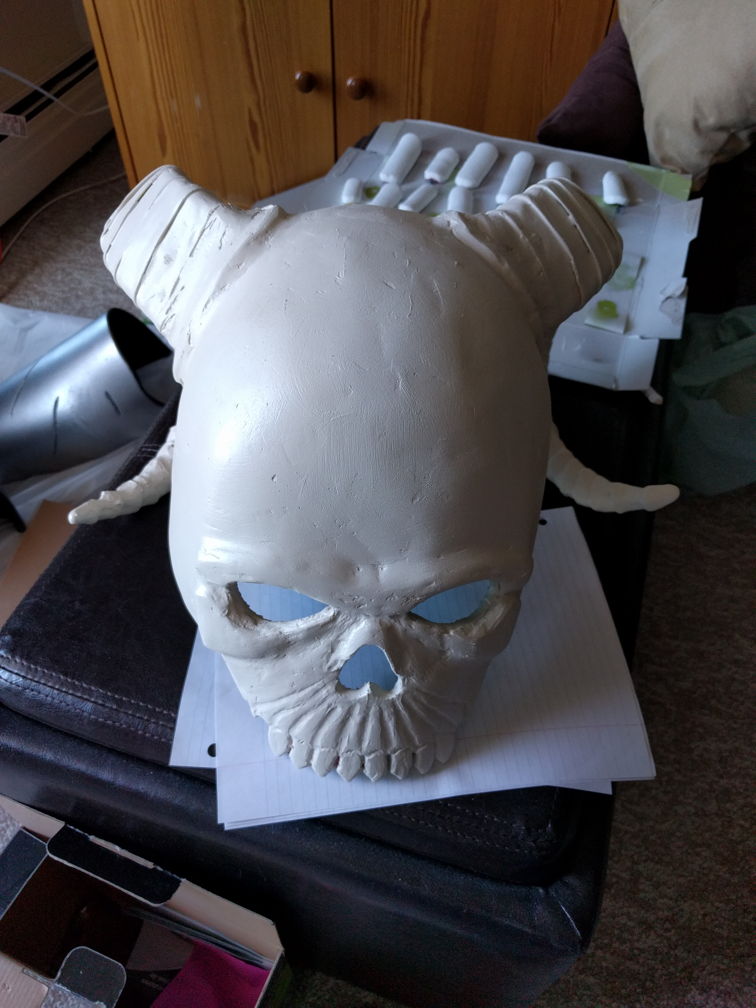
There. All primed. It's starting to look better already!

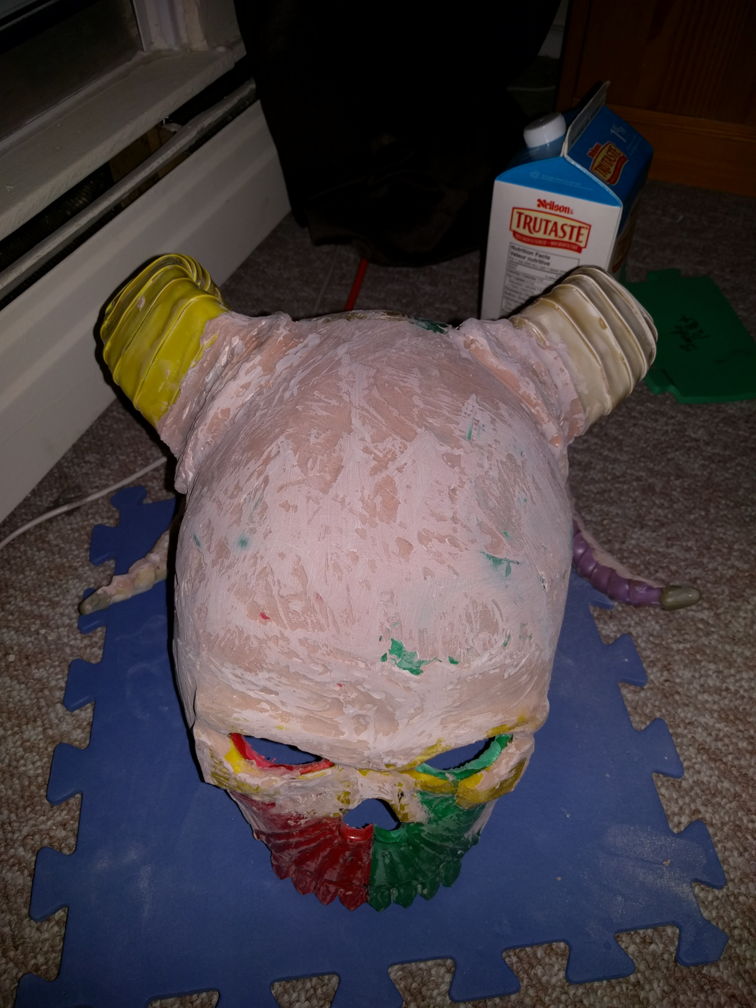
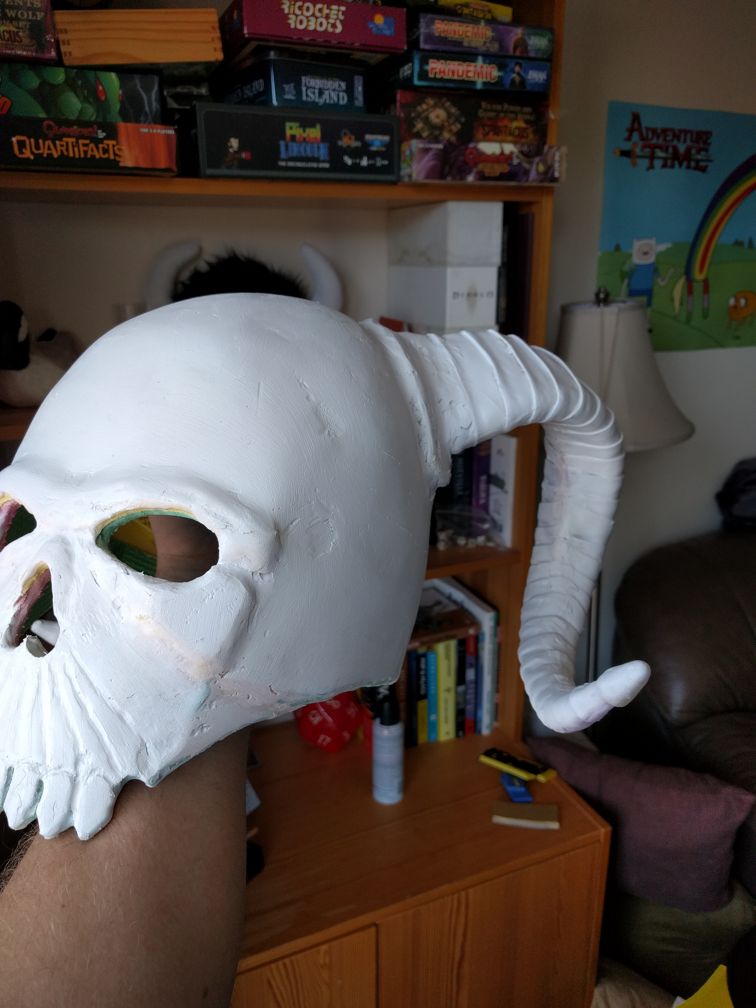
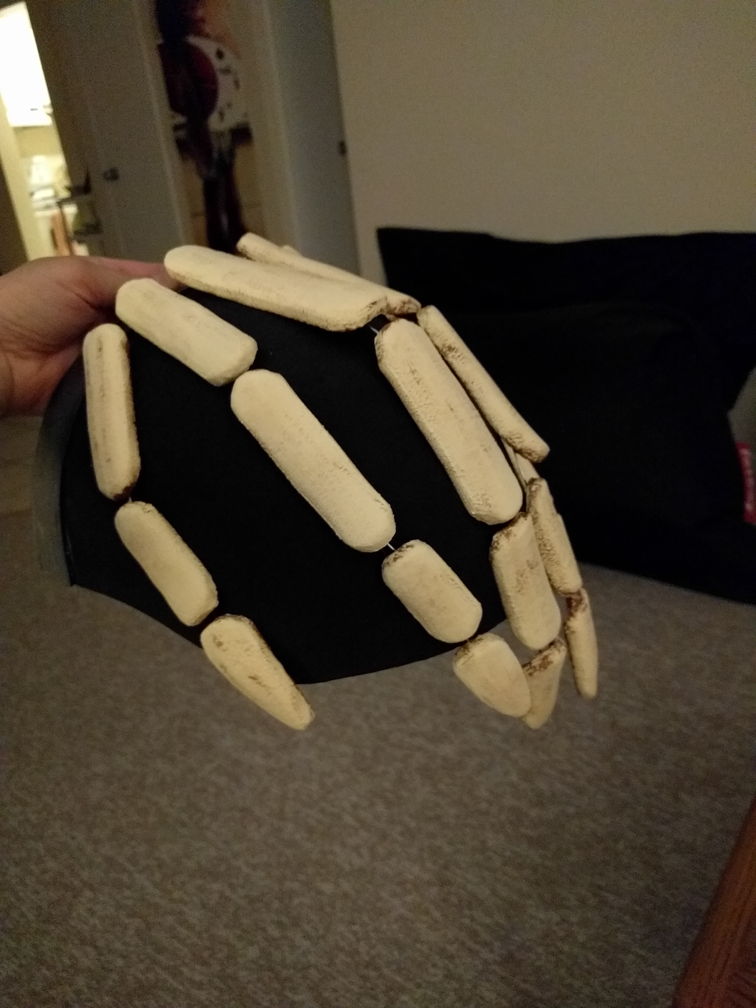
Now it's time for doing some painting and weathering. Get some black dirt on the teeth in the grooves.
After a test fit, discover that it's just a bit too snug now. Likely from the resin, filler and heat treating. Carve out some of the insides for a better fit and pop some foam on the coat hanger wire to protect your noggin.
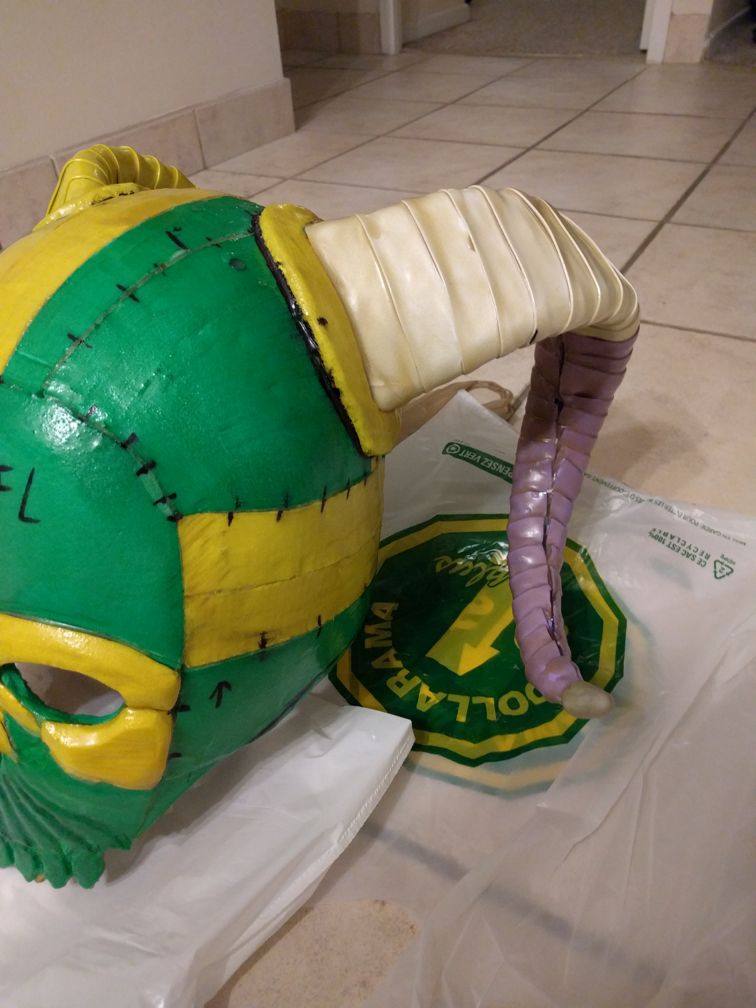
The horns are a different colour than the helm, so with some very brushy strokes, add a light brown. The brush strokes will just help the horn texture.
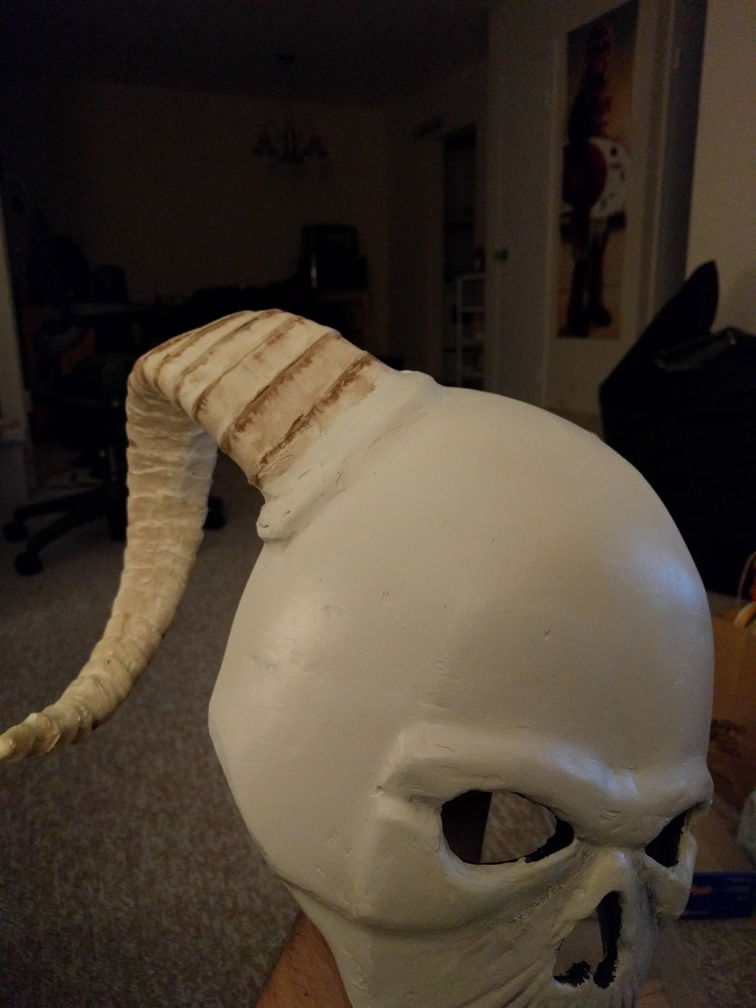
With a darker shade of brown, add some more brushy strokes to the pits under the ridges of the horns. This should give it some more character.
It's important to add that darker shade of brown very carefully. Paint really makes the piece come alive.
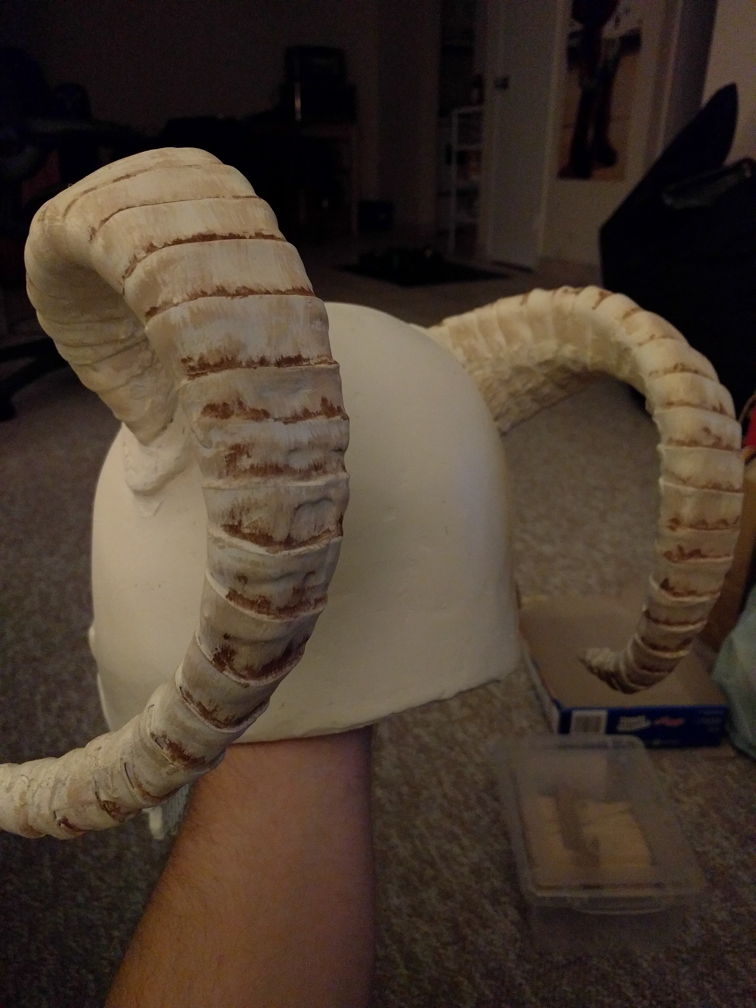
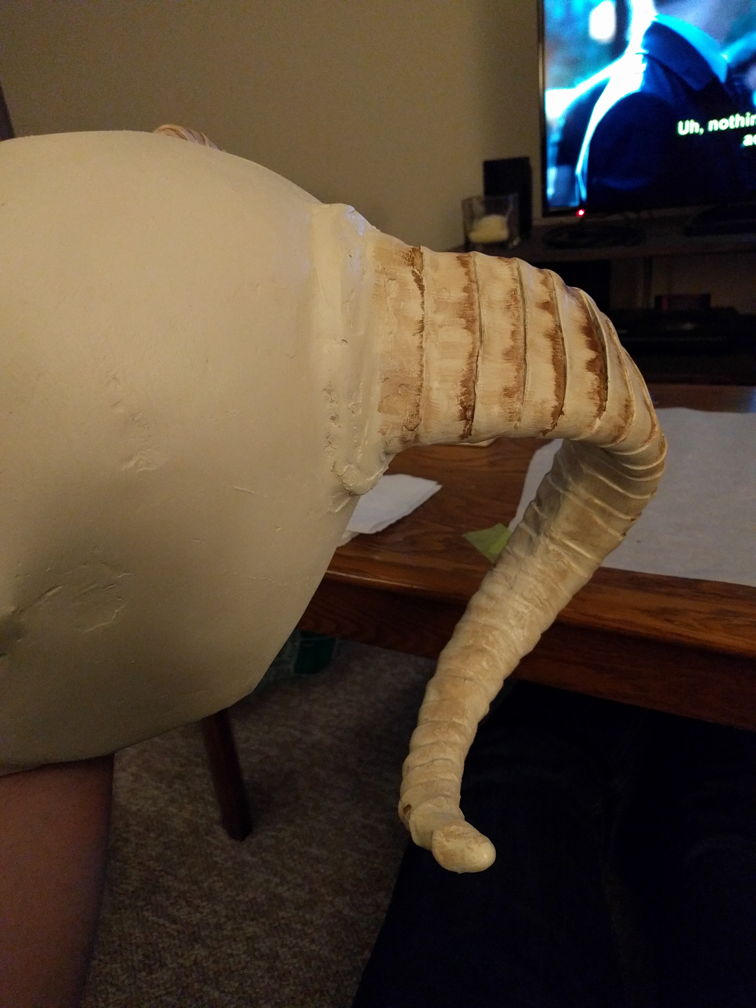
Another perspective to see the details in the horns.
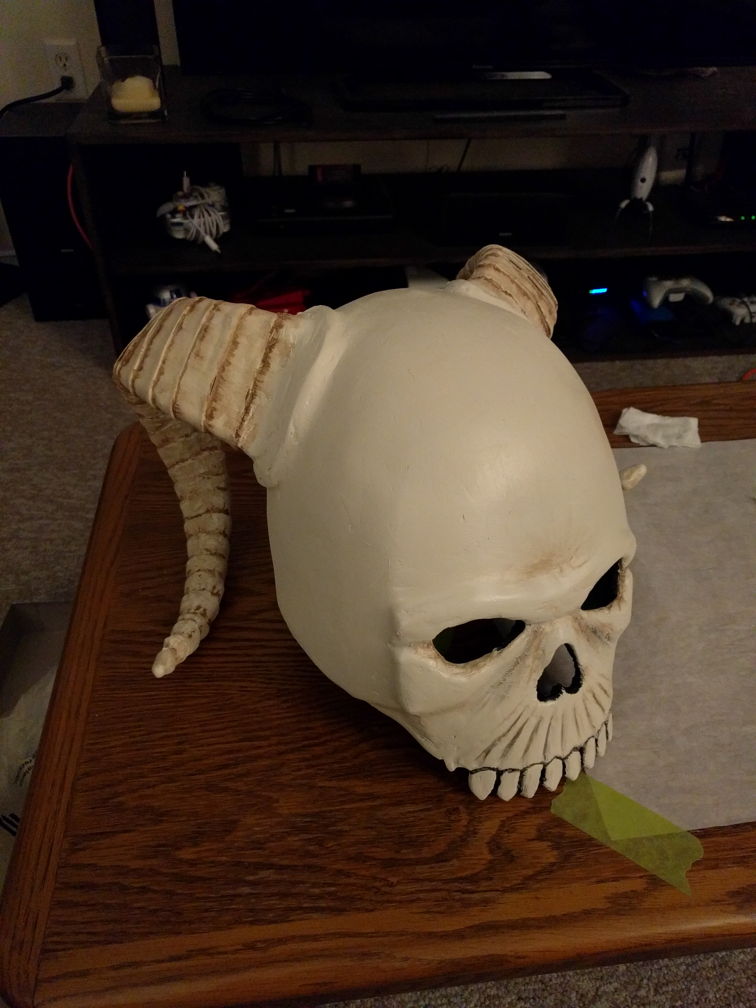
Get some of that light brown in the nooks of the face and teeth. Clean and fresh props seldom look as convincing as worn ones, and this one's made of a skull. I think it could do with more paint, but for now we will call it good enough.
Breastplate
I started with a really basic sketch. The resolution of the Diablo 2 game assets is pretty poor, so I took a lot of creative freedom with the design. Given how many types of armour there are, I feel like that's fair. It's important to note that this piece ended up the one I was least happy with. I may redo it at some point.
Rough out the shape of the front of the breastplate. Foam can be purchased in sizes large enough to make it in a single piece, but smaller pieces can also be assembled pretty easily.
Use heat to shape in the curves on the assembled plate. I don't recommend trying to do it this way if you want to make a breastplate. Trying to shape and work with one huge aggregate piece was really troublesome for getting the curves and shape that I wanted.
Do the same for the back. The neck scoop can be much higher on this side.
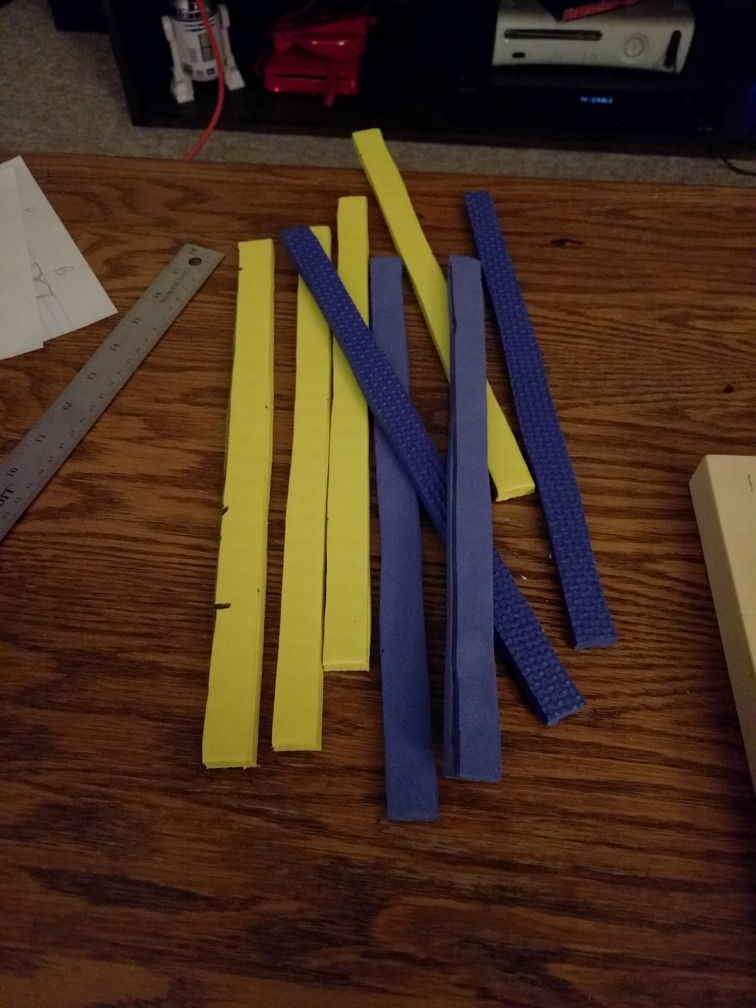
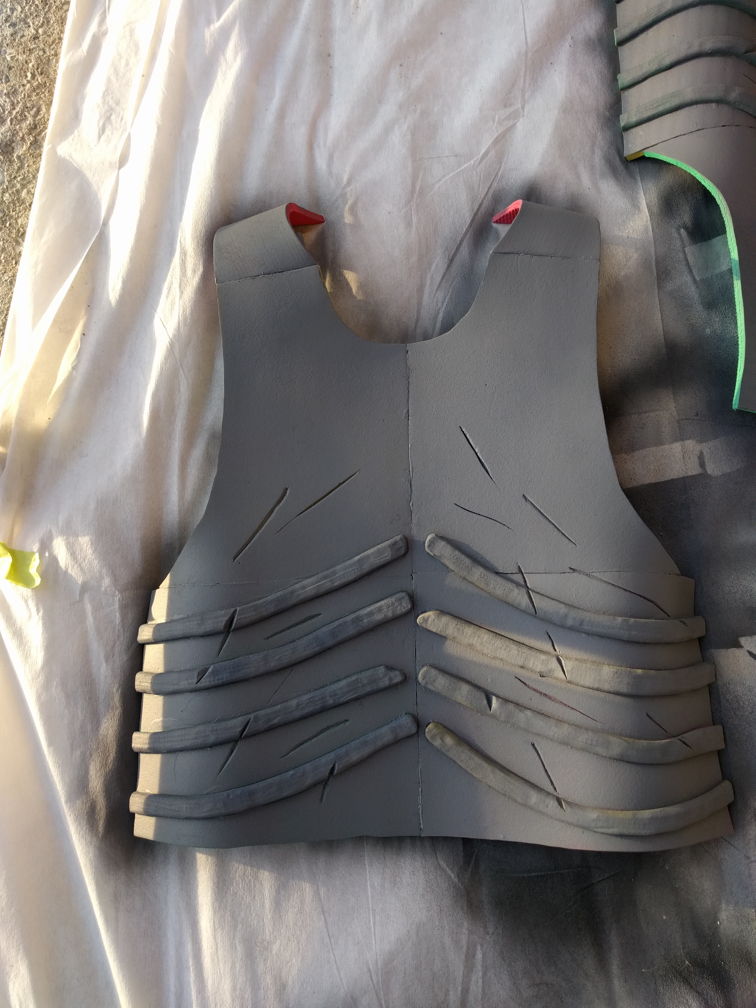
There are lots of ribs. Basic strips of foam of relatively similar size make for a good starting point.
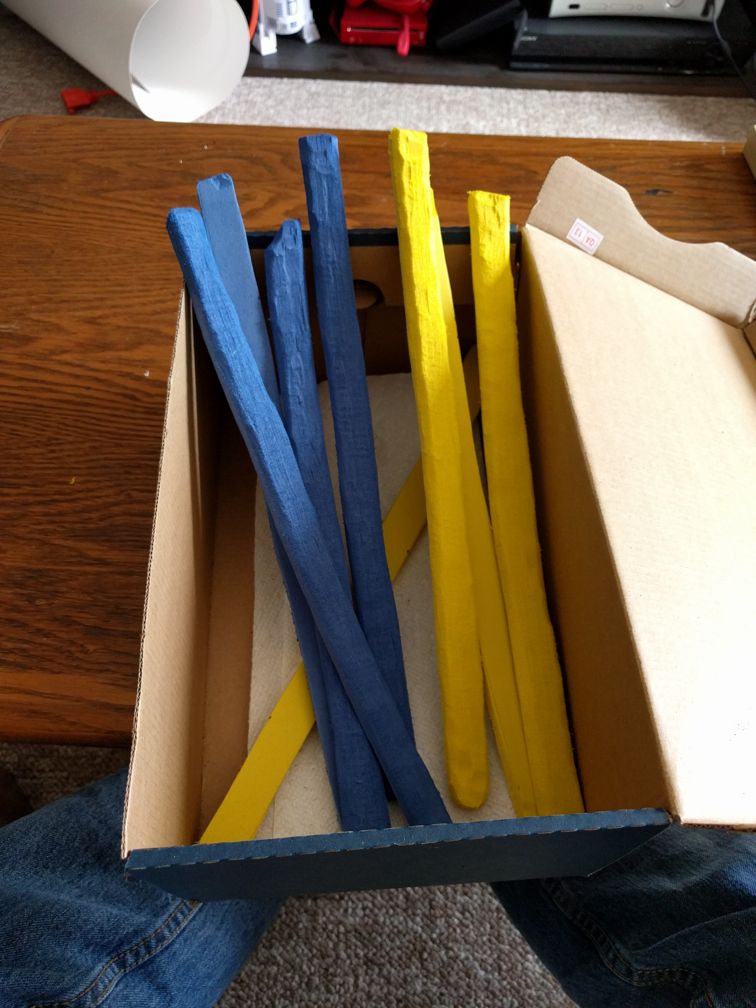
Carve out the texture and grind off the corners and edges with a rotary tool. Any slip ups will be fine since these are supposed to be 'used' bones.
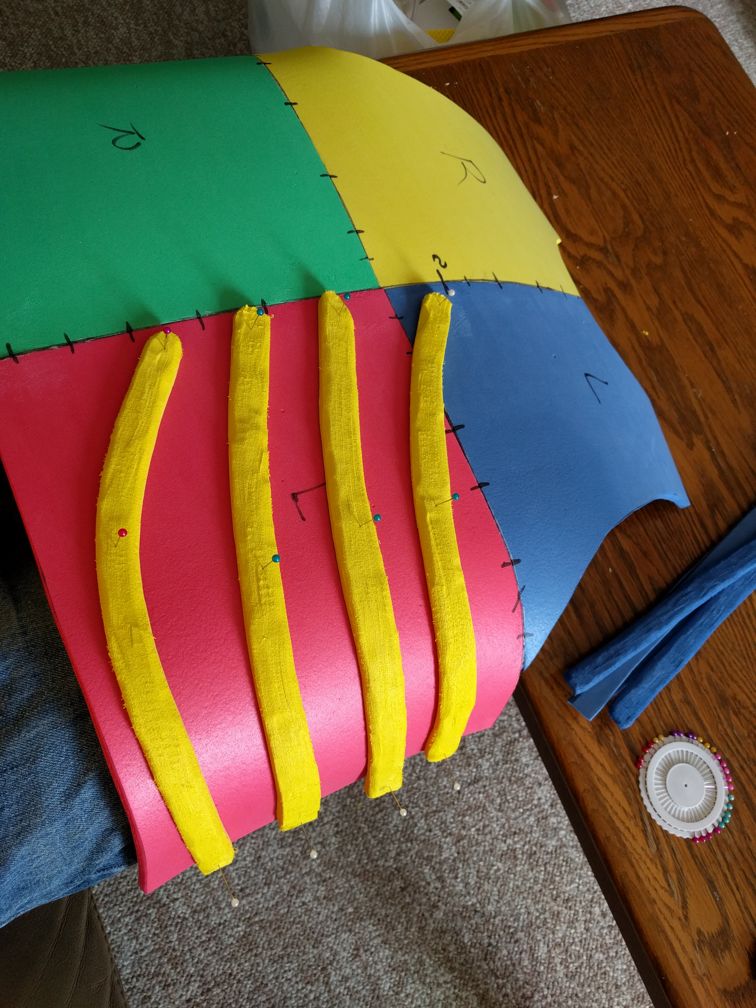
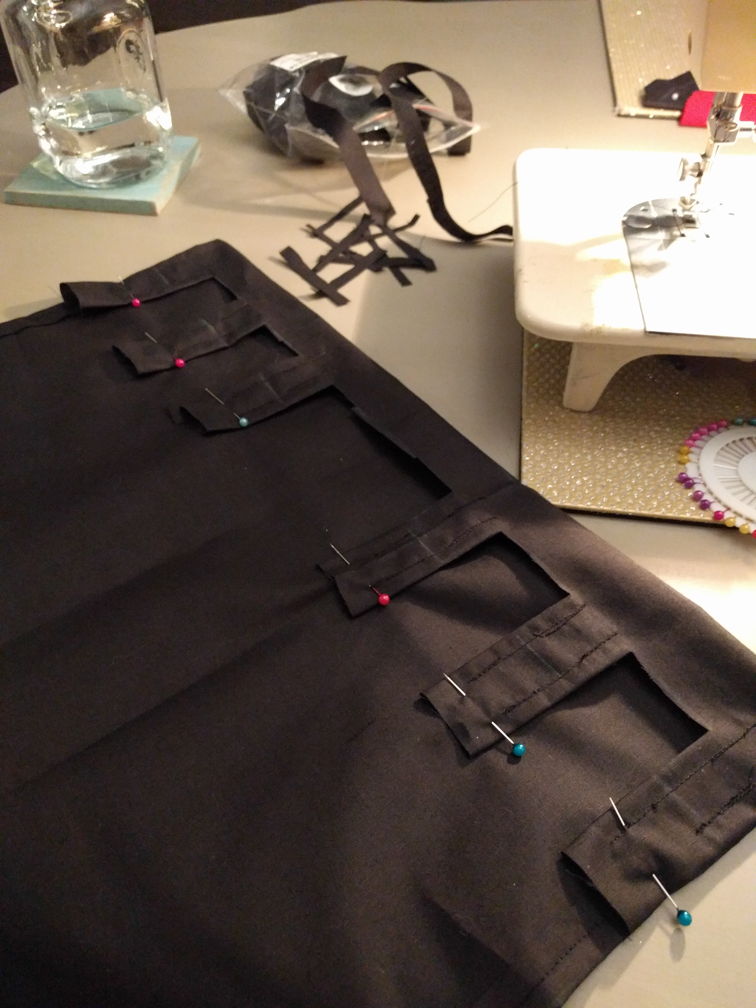
Straight pins are very useful for plotting out how the pieces will lie on the front and back plates. Pins will allow for playing with the positioning and rearranging without the permanence of glue.
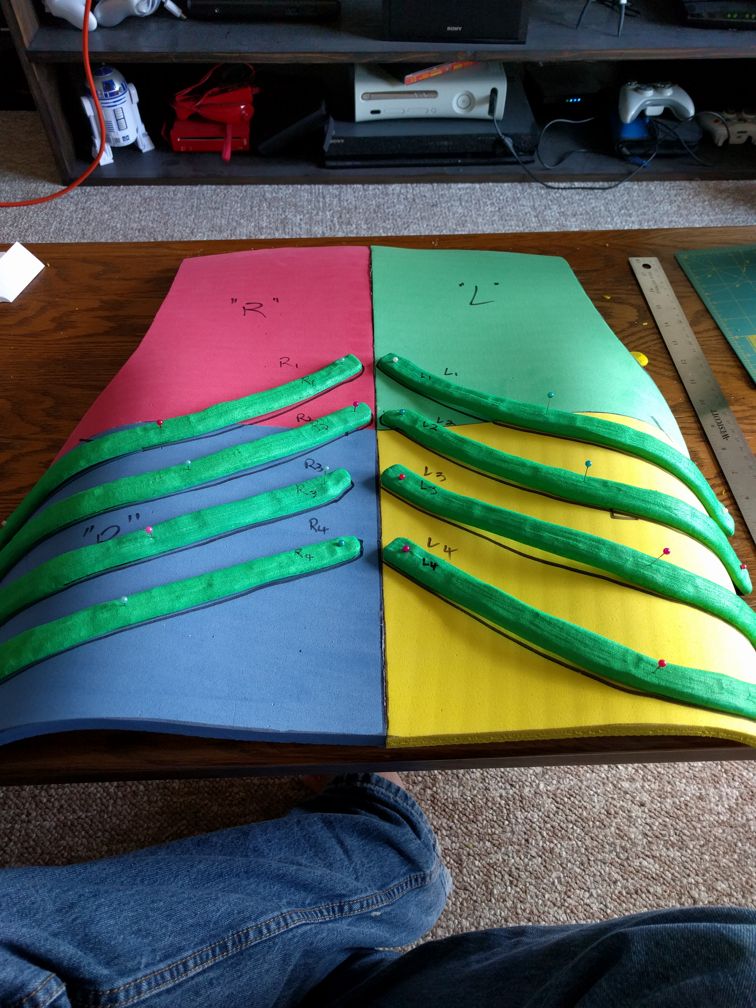
The pin holes will be easily painted over and filled later. Trace around their positions to know where to glue them later.
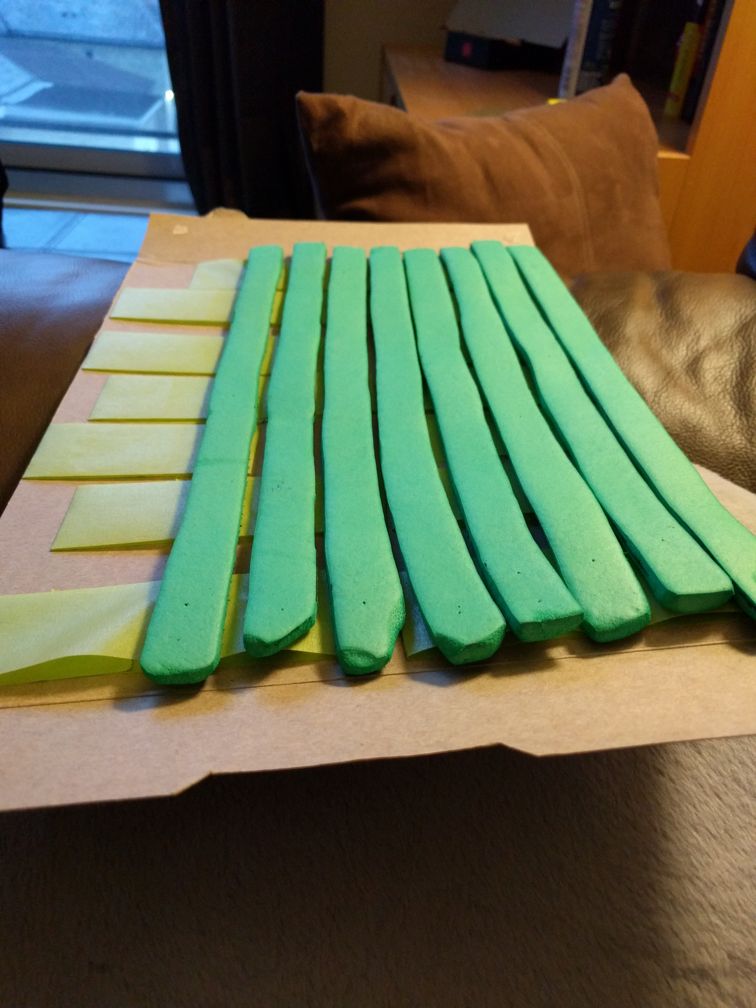
Taping down the ribs to a sheet of cardboard will allow for easier application of contact cement to the ribs. Apply to both the marked areas of the breastplate and the ribs. A few light coats might be needed.
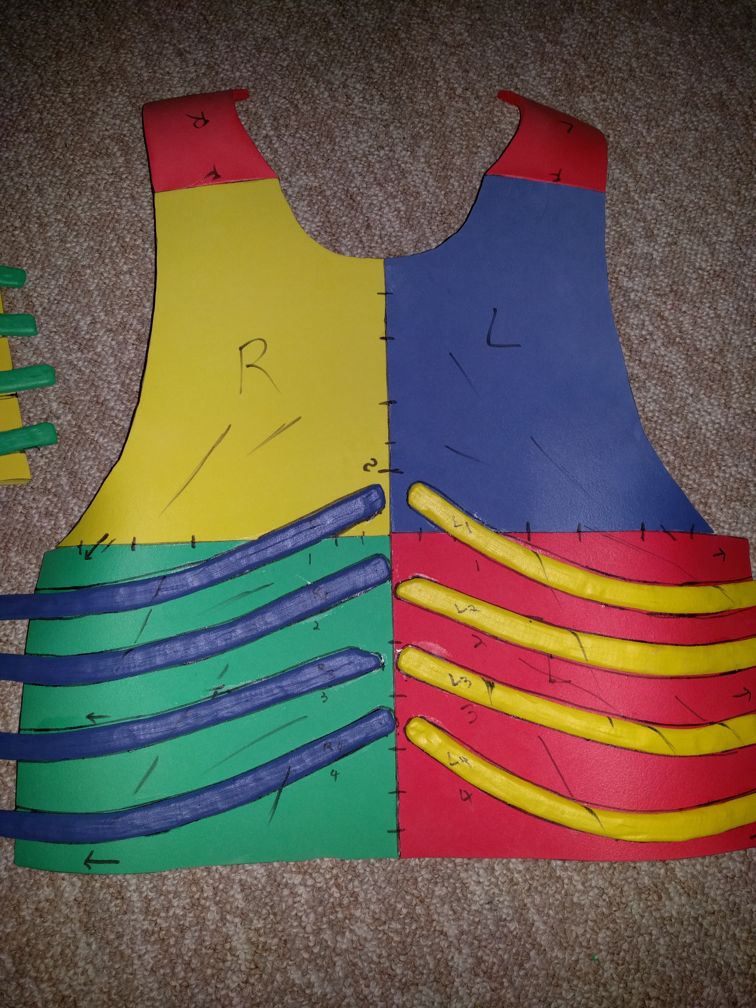
Carefully glue down those ribs to the chest plate.
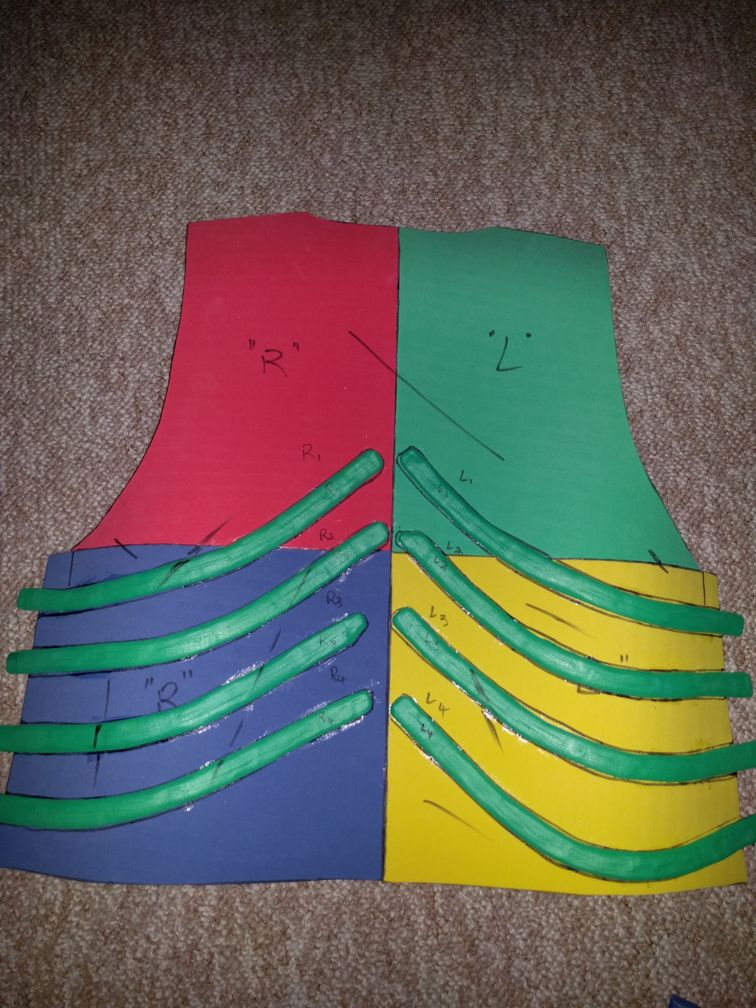
Glue down the ribs on the back too. With a marker, mark out some gashes for battle damage.
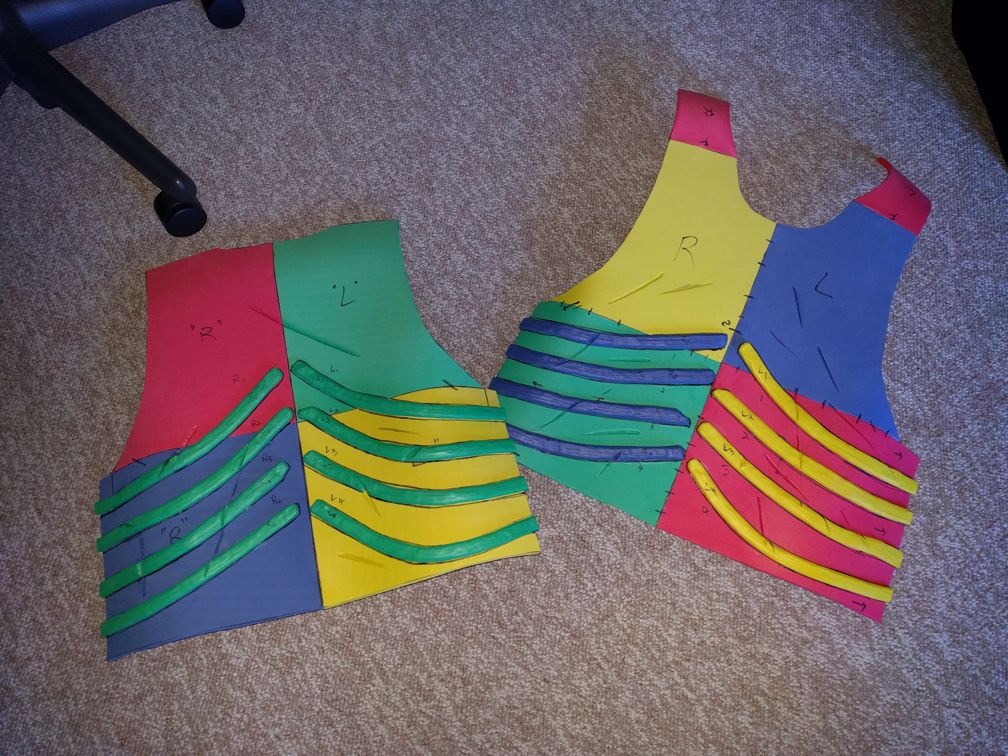
Use a hot knife to carve in the damage that was marked. Use a heat gun to seal the foam now that the shape is final.
Use a spray rubber like Plasti-dip to coat the outward face of the heat treated foam.
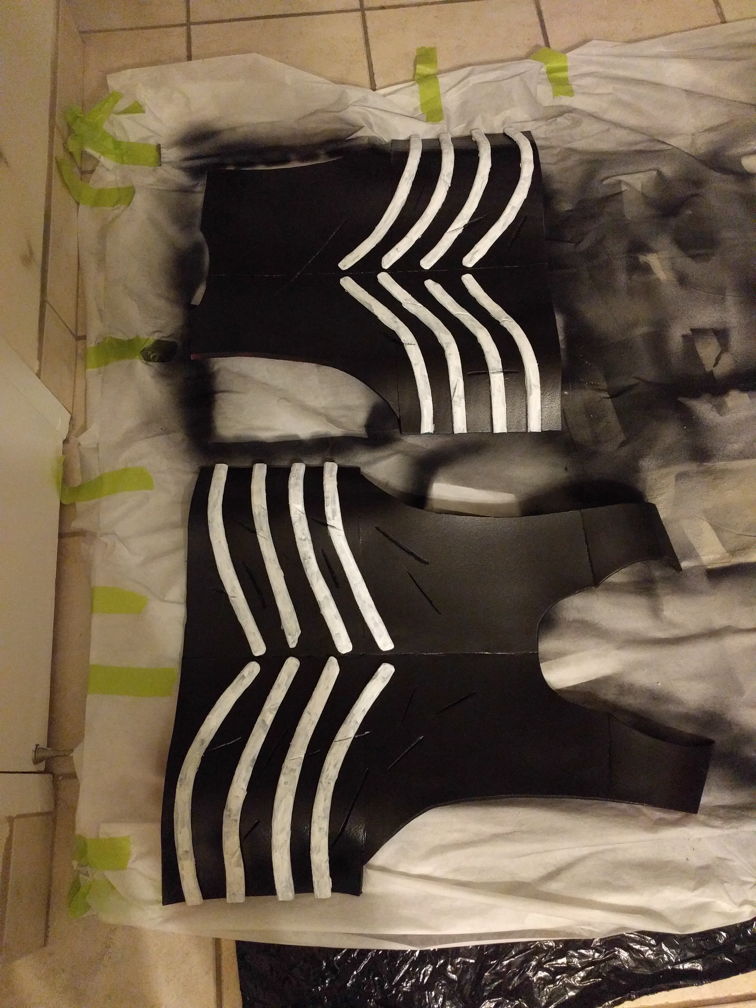
Apply some black metallic paint to the chest and back plates. the ribs can either be masked, or included and then painted over in many coats of white and ivory. Finish the base coat with ivory on the ribs.
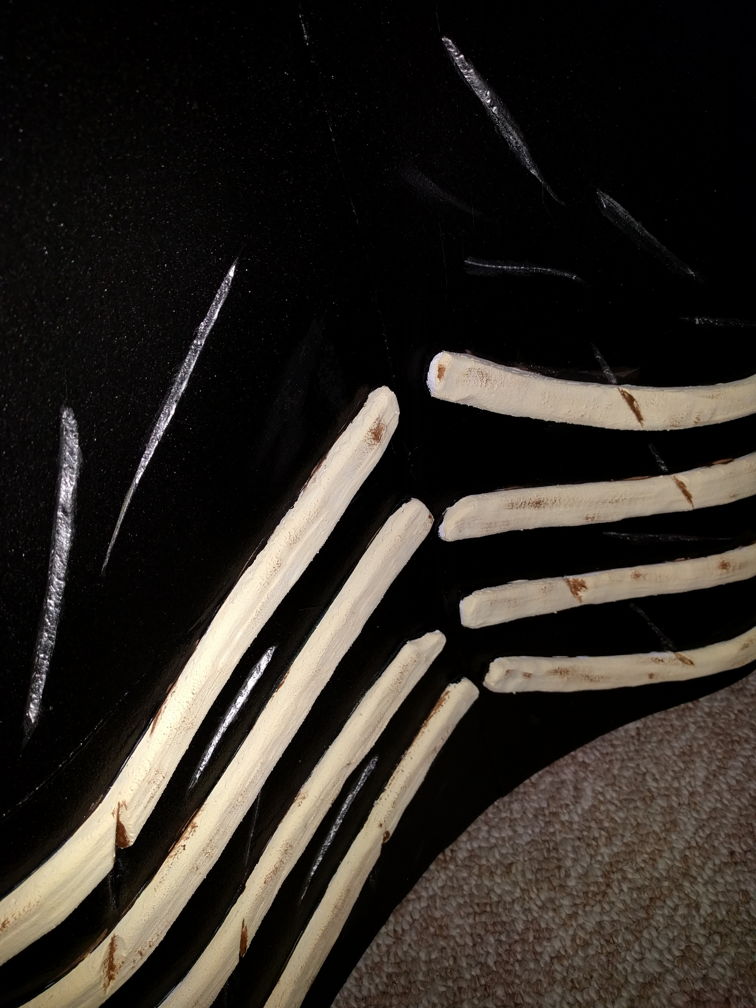
Use silver to get in the nooks and crannies of the damage. This should hint that there is silver metal under the black topcoat.
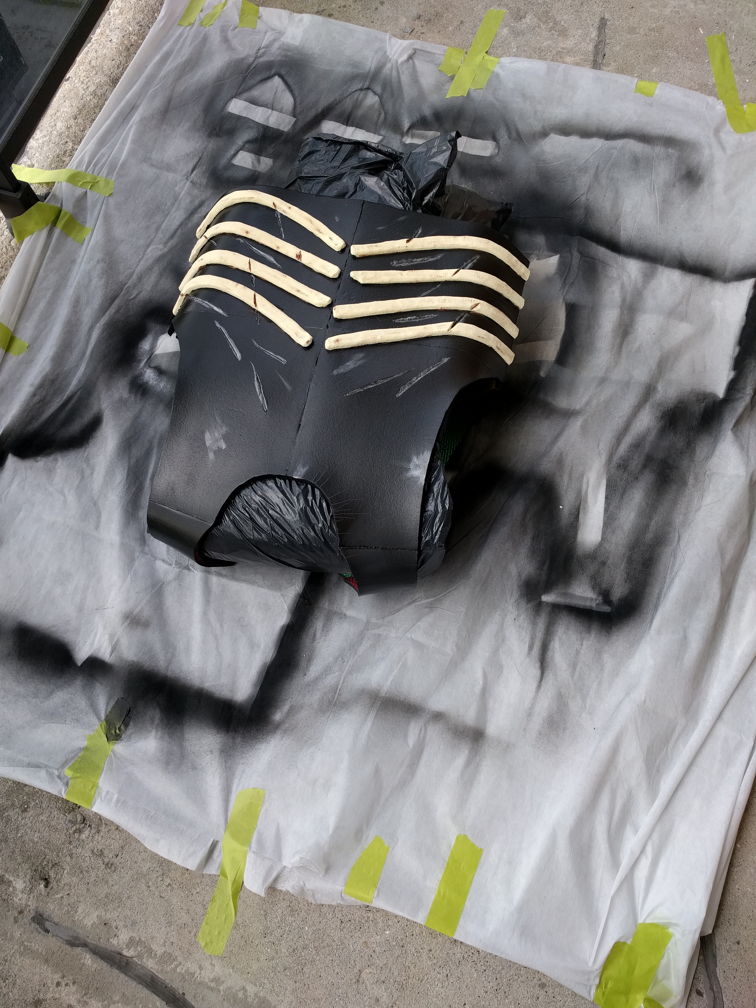
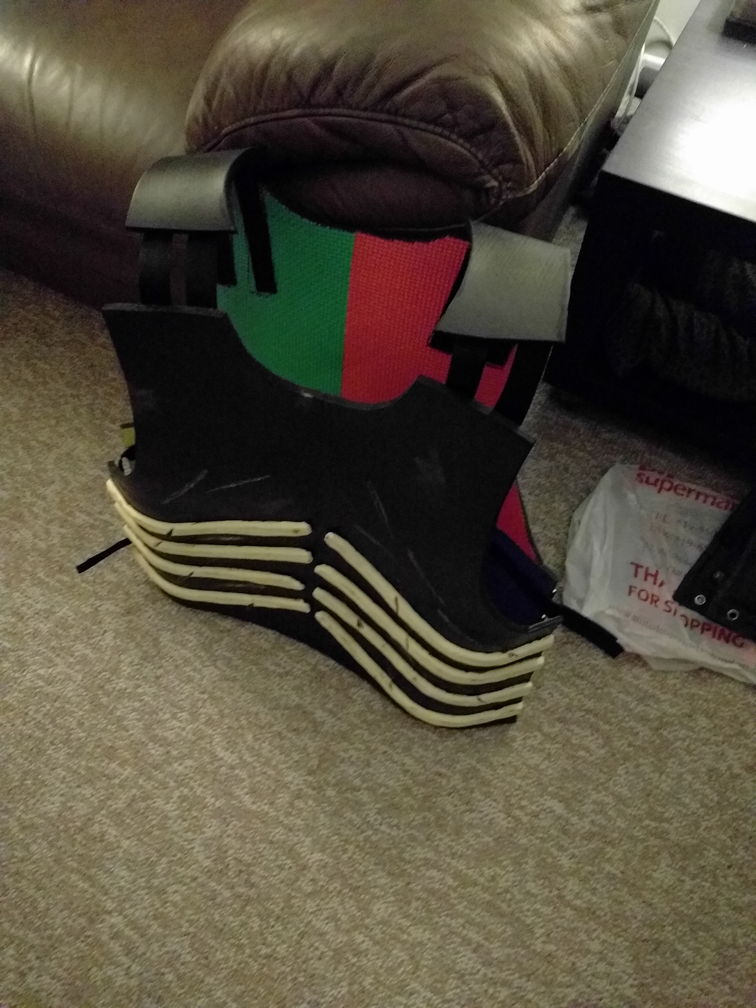
Add a clear coat to the breastplate once the painting is done. Notice the foam shoulder parts. This lead to a lot of crinkling and cracking in the paint that meant the breastplate did not fit correctly.
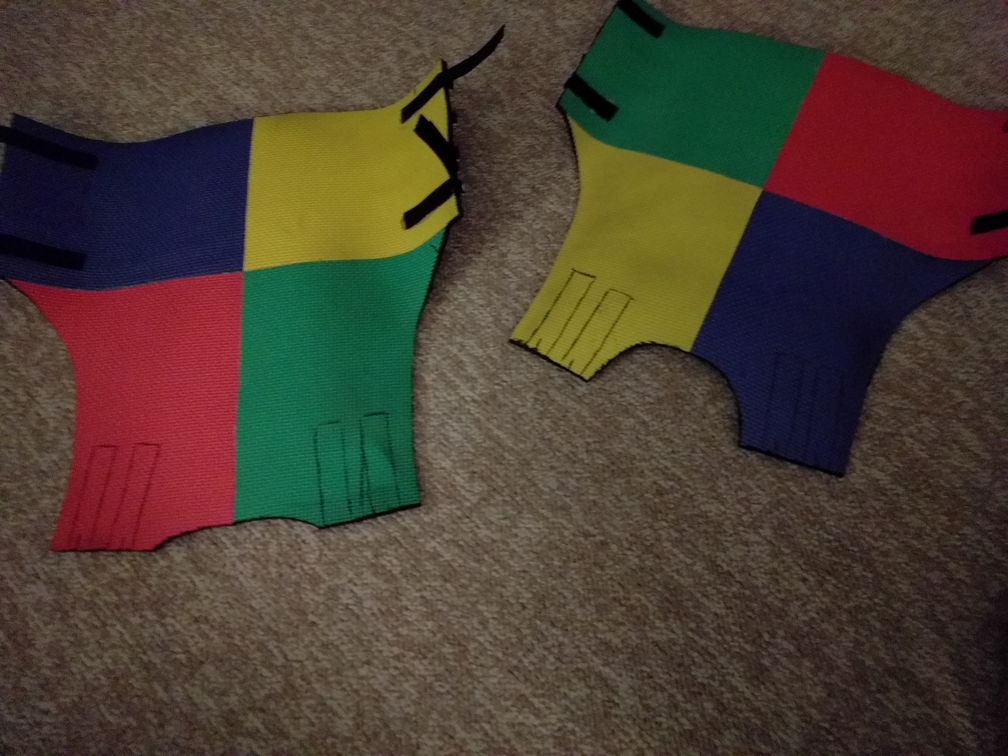
Plan out the alternate strapping since foam over the shoulders isn't going to work. Rough up the foam where the straps should go and affix the straps (with velcro on them) to the foam with hot glue.
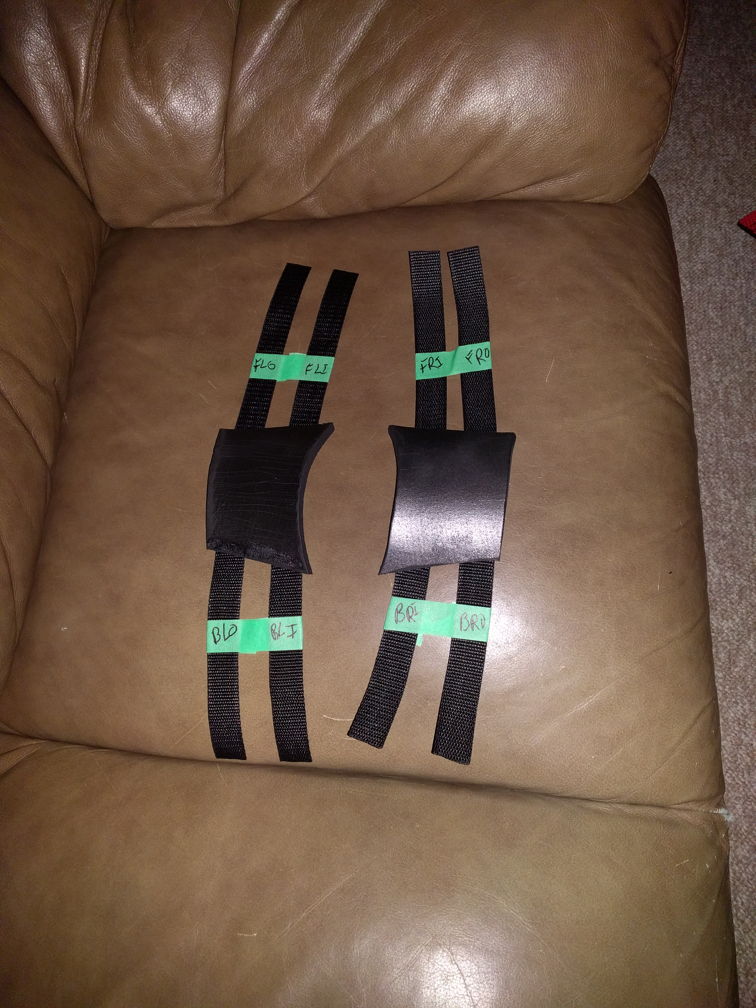
Glue down the straps to the shoulder pieces to fill the gap over the shoulders. They will be mostly hidden by the pauldrons.
Attach the shoulder straps to the base plates. Much more comfortable!
Pauldrons
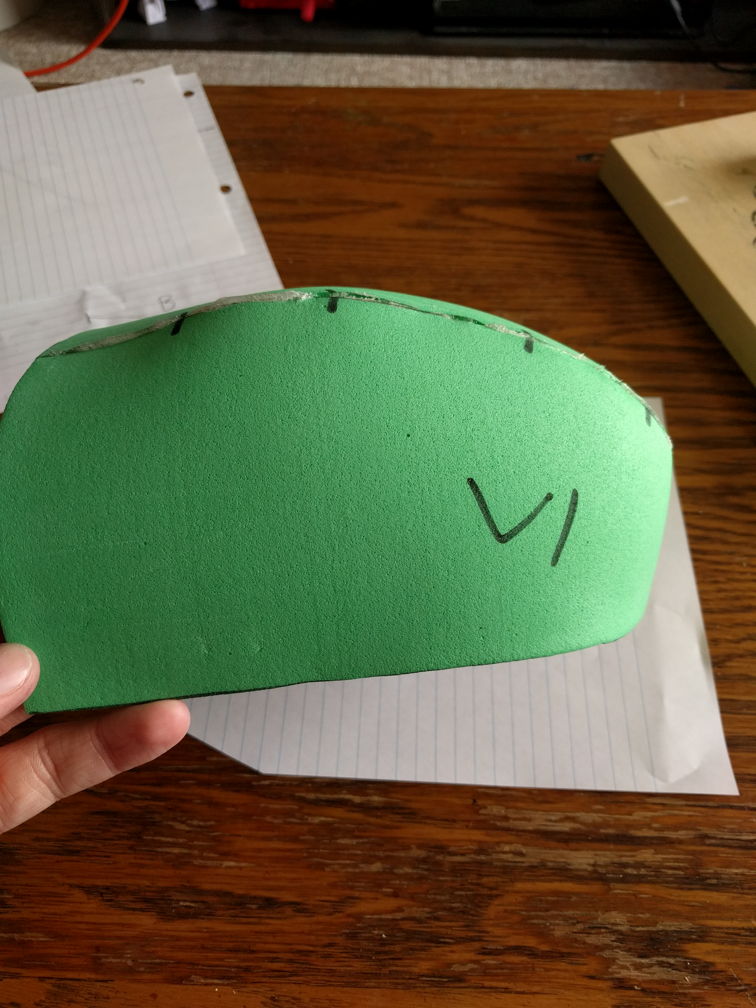
I discovered that pauldrons are tricky to make. This was the first version I patterned and made. It was tiny and bad.
Plan for the first was bad? Take the plan and modify it after tracing it. Give it a deeper cup and a smoother curve.
Second shoulder attempt. These need to be big enough to handle a big ol' hand on one side and a skull with a horn on it on the other side. This version is big, but the curve at the end is all bad.
Trace and clean up again! The angled bottom is planned to be cleaned up after the fact. It's ok to leave some excess to clean up later.
Any time there are multiples of a piece needed, it's worth testing it first. This was a quick test of v3 that I decided I was happy with.
Chop out those pieces for both pauldrons.
Tape was fine for the prototype, but contact cement gives a much better seam.
Give the shoulder some trim to bulk it out with a little detail.
Do it to both sides. They should be roughly symmetrical.

Get some sweet paint in. Base coat to match the chest piece, and silver to match the rest of the armour.
The pauldrons will not hold their shape very nicely without a little bit of help. Add a thick wire like a coat hanger wire that has been bent to the desired shape. This worked just OK. Affixing it to the foam better would have been advised.
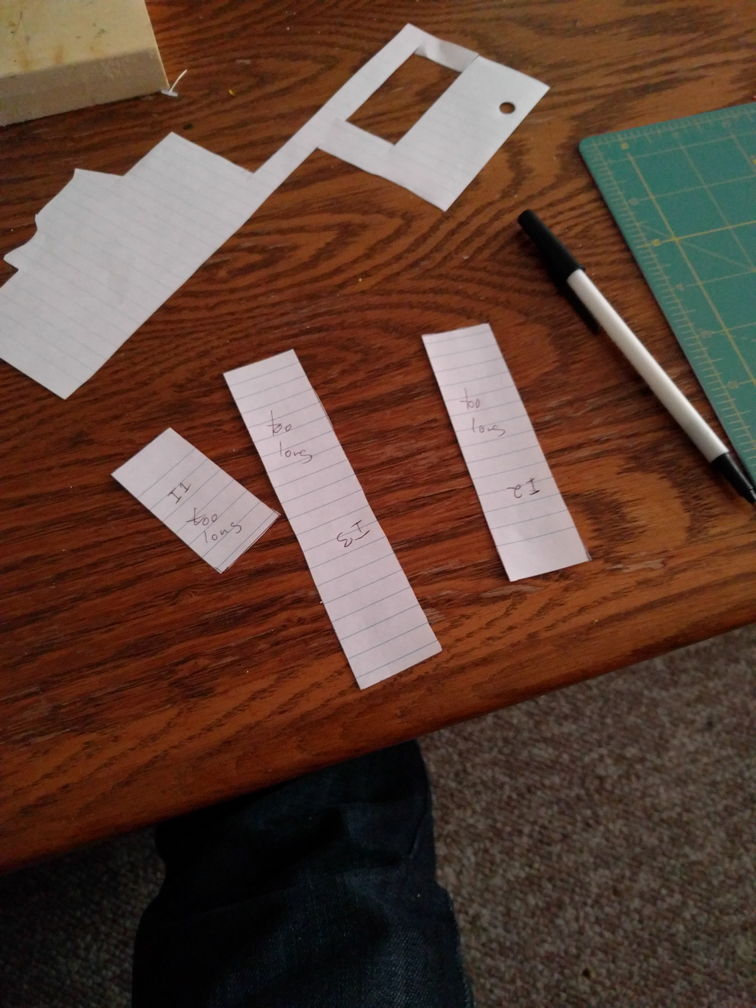
Time to start on the pauldron decorations. For the hand, cut out some paper phalanges to test out sizing what will fit on the pauldron. I wanted the tips of the fingers to just barely hang over the edge of the pauldron. Be sure to label everything.
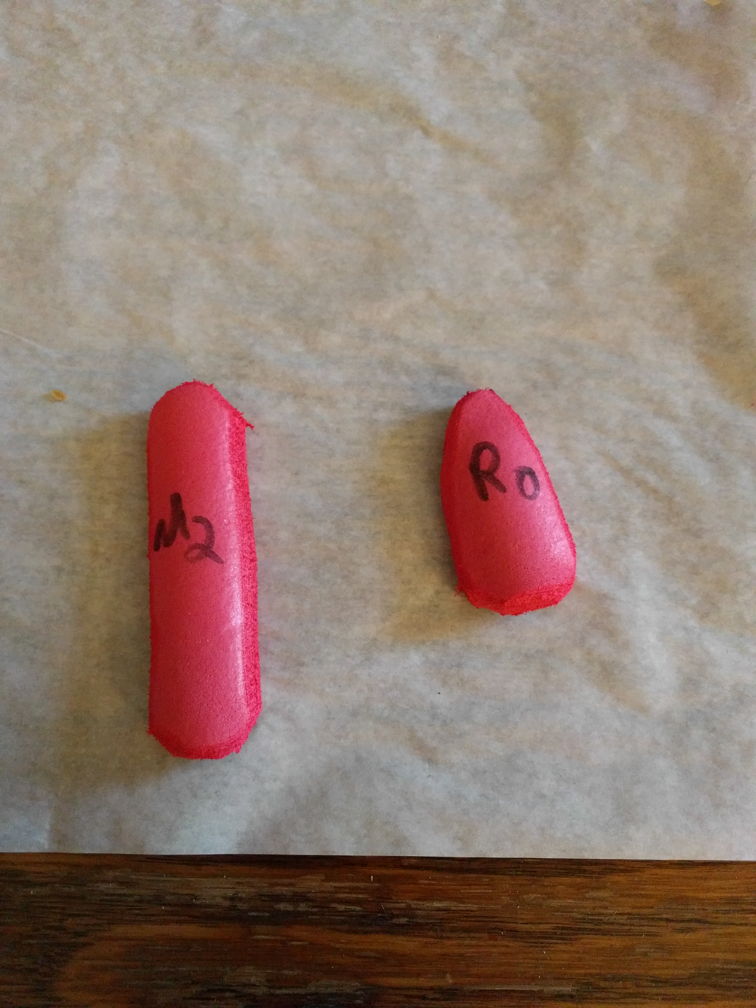
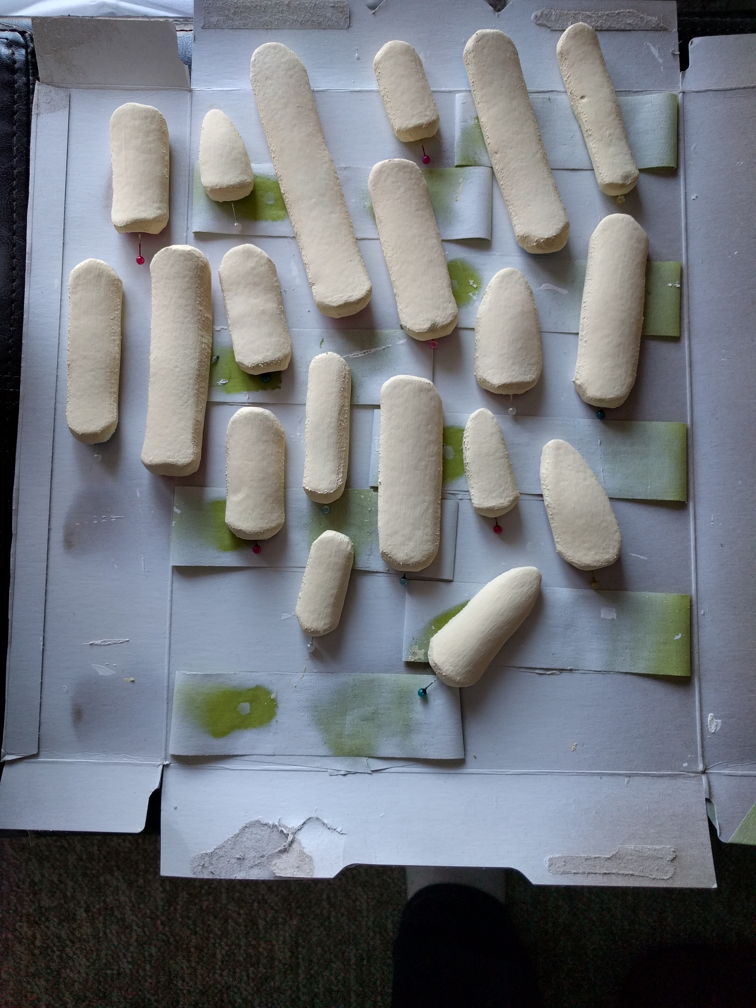
With the sizing determined, chop out the foam pieces (there are a lot of them, so keep those labels consistent), and then sand, heat, and shape them.

The phalanges are easier to paint before they are assembled into a hand. Prime them with white.
Next add the ivory colours to the bones. The ivory was hand painted on, so the straight pins provided a handhold to avoid putting fingerprints on the fingers.
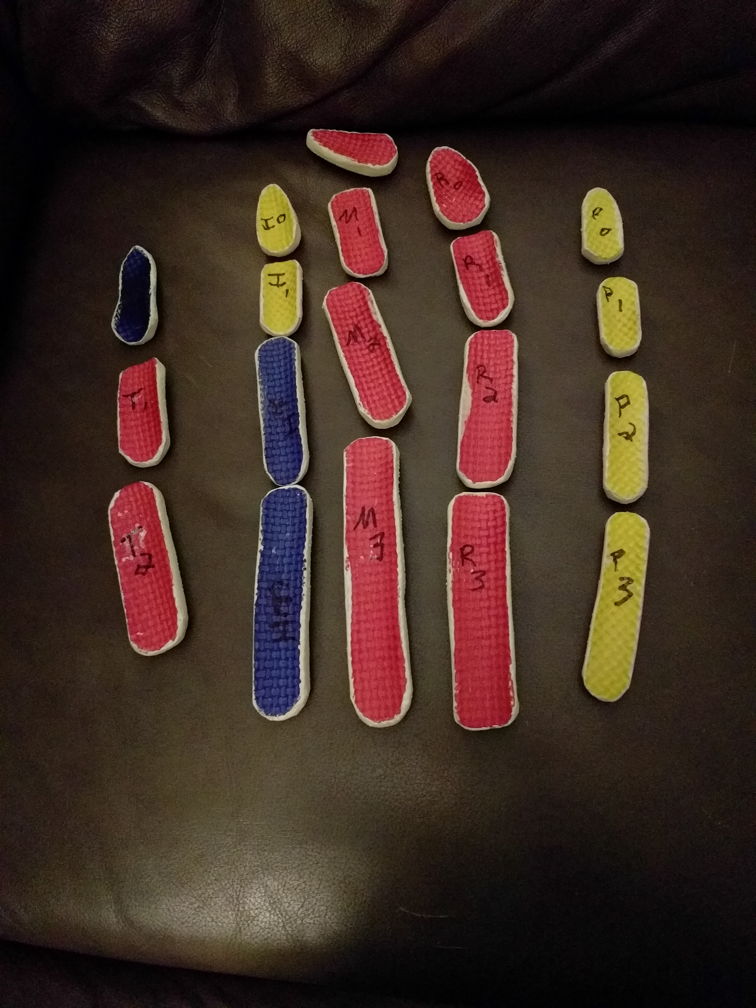
Lay everything out in the shape it's supposed to be in. This is why labels are so important.

Hot glue a wire to the back of the phalanges. A twist in the wire prevents them from sliding around on the wire.
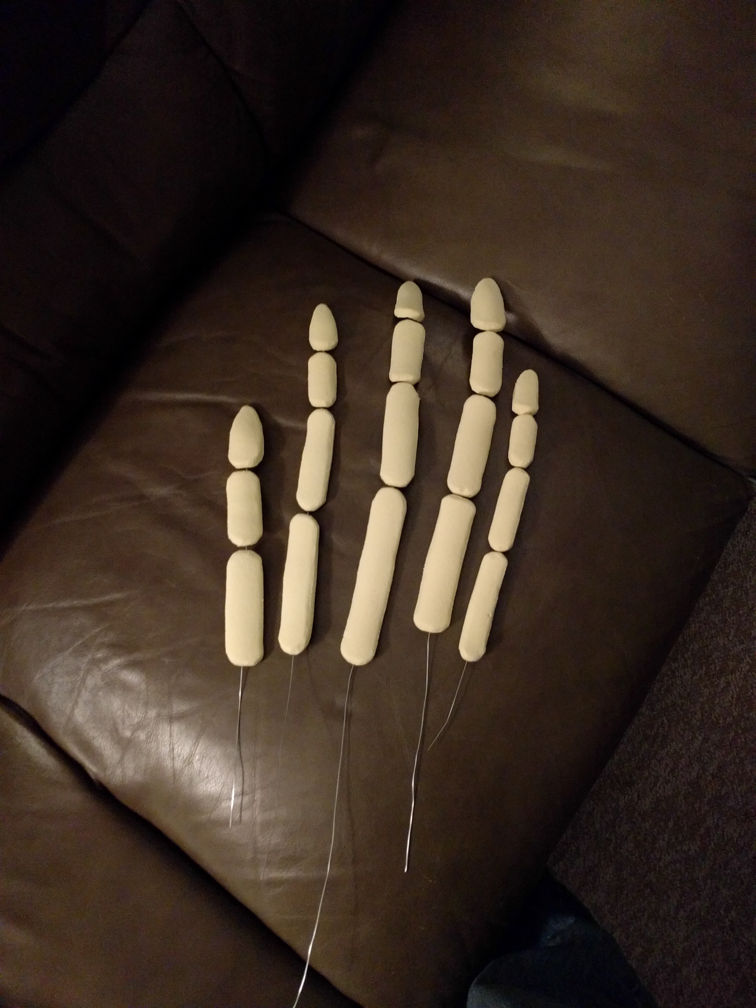
Do that to all of the pieces of all of the fingers. This should result in 5 'strands'.
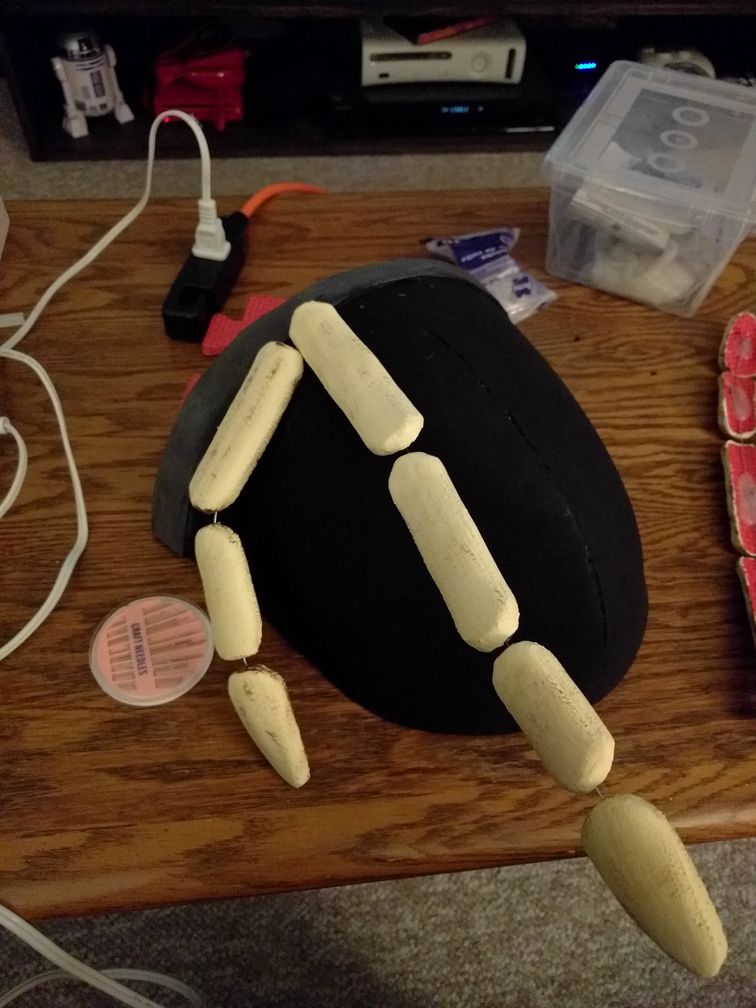
Use the excess wire at the base of the fingers to poke through the foam at the top of the pauldron in the desired position. The wire is thick enough that glue should not be needed to hold the fingers in place. Hot glue on the underside to ancor the wires is a good idea though.
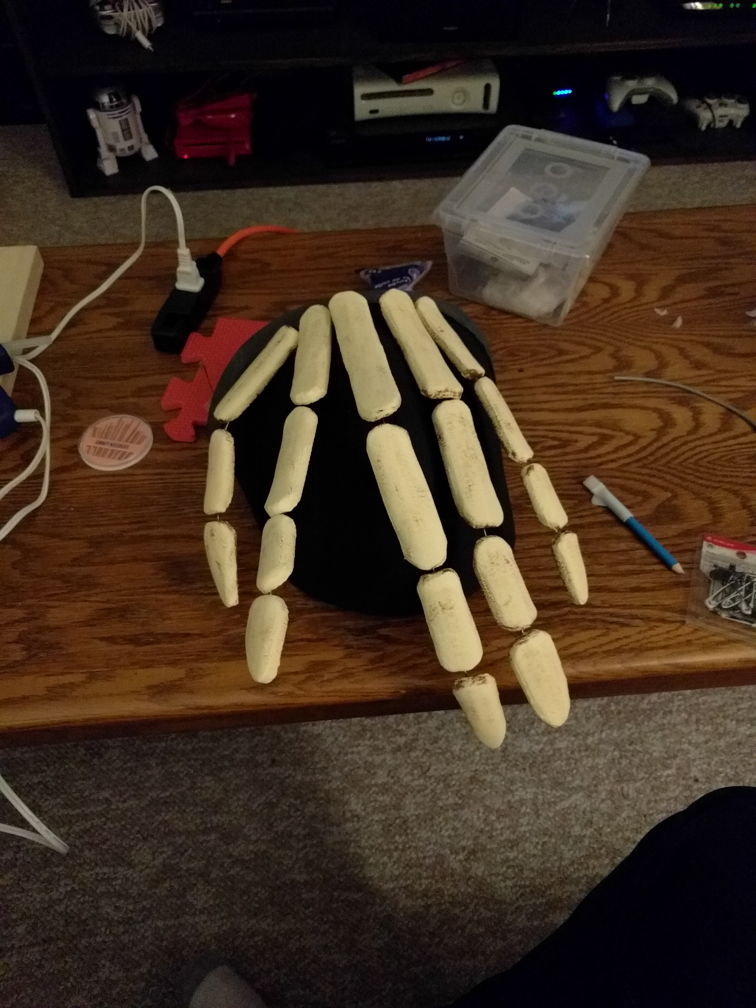
Continue threading more fingers on and bending them to where they should be.
Get all of the fingers bent firmly into their positions.
Look at it from different angles. Are the fingers spaced out nicely enough? We'll say yes and move on to the skull for the other shoulder.
The skull on the other side should be convincing, but doesn't need to be anatomically correct. There's a horn coming out of the forehead, but that can be added later. I'll preface this section with: Don't do this the way I did. It was a bad idea and not safe.
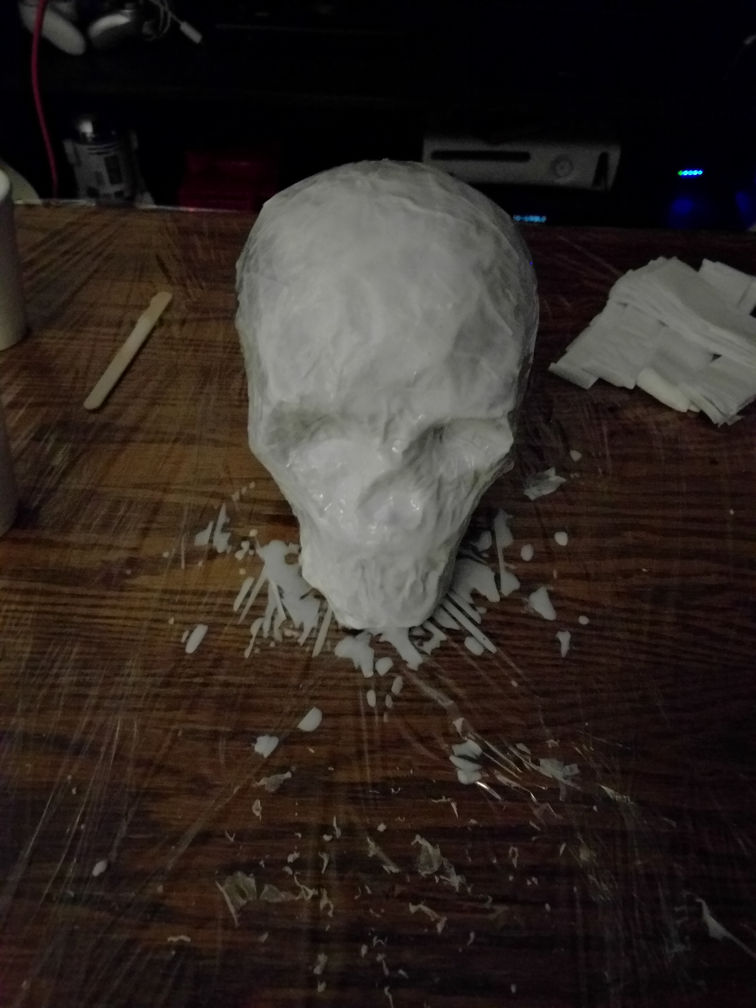
This is paper mache on top of masking tape, on top of cling wrap, on top of a greased up (probably ceramic) skull ornament.
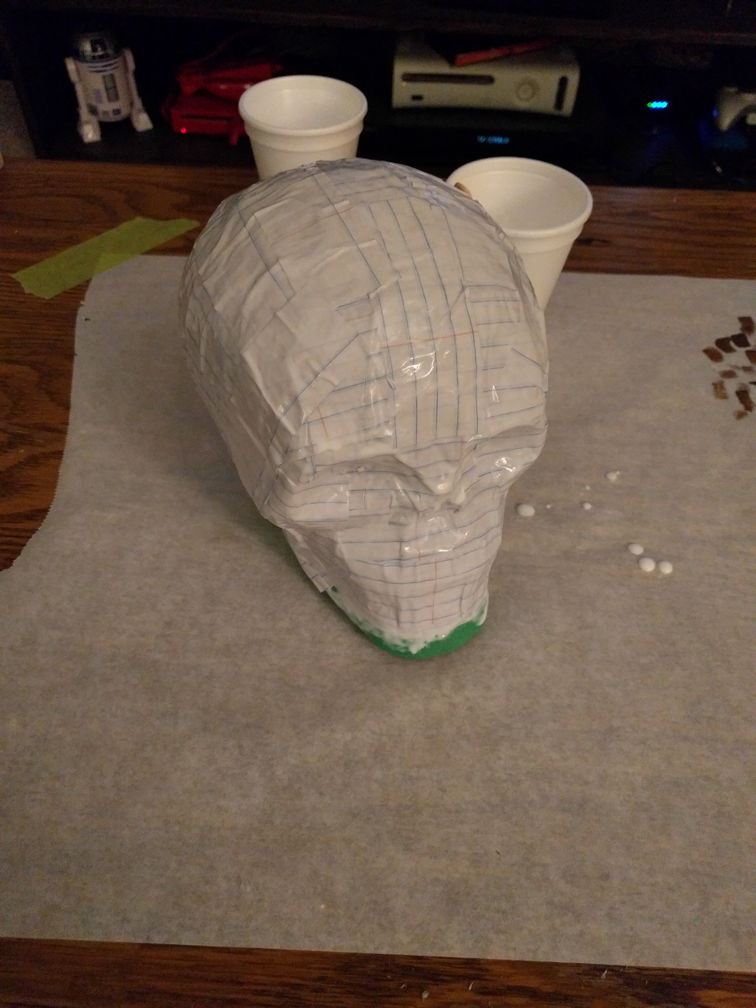
Once several coats of white glue paper mache are on the model, add a few layers with a horn on it. The horn can just be a regular paper cone, but it needs the reinforcement that paper mache provides.
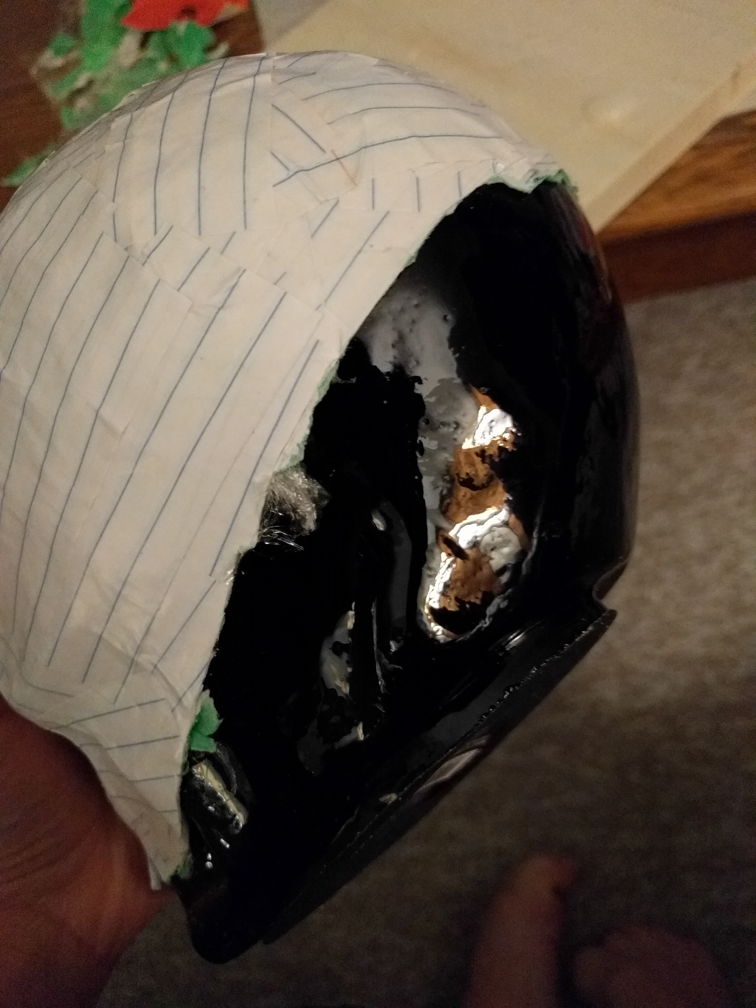
Clean up the edge of the paper mache with a sharp knife. Discover at this point that a huge mistake was made. This is a glass ornament. Worse: it is a cheap glass ornament. All attempts to liberate the skull from the ornament nicely have failed. Time for the emergency backup plan.
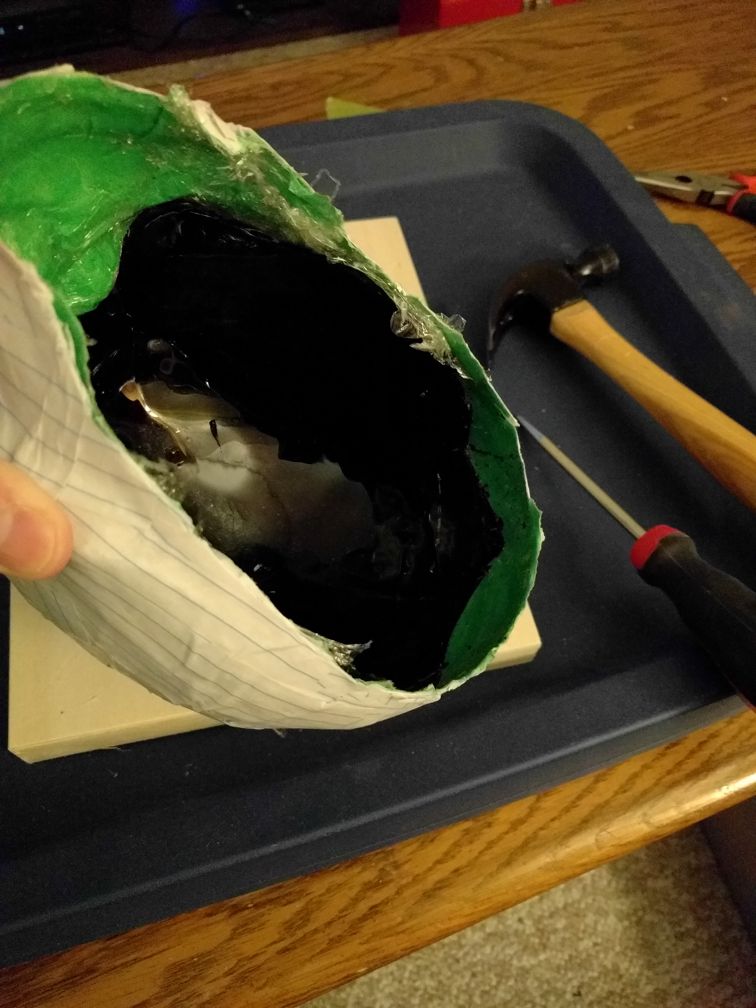
With the help of a towel to control the shrapnel, goggles to protect my eyes, and gloves to protect my hands, I set about smashing the insides of the glass skull with a hammer. This was a terrible idea. The glass stuck fast to the skull and meant that I had to pry chunks of broken glass off of the skull.
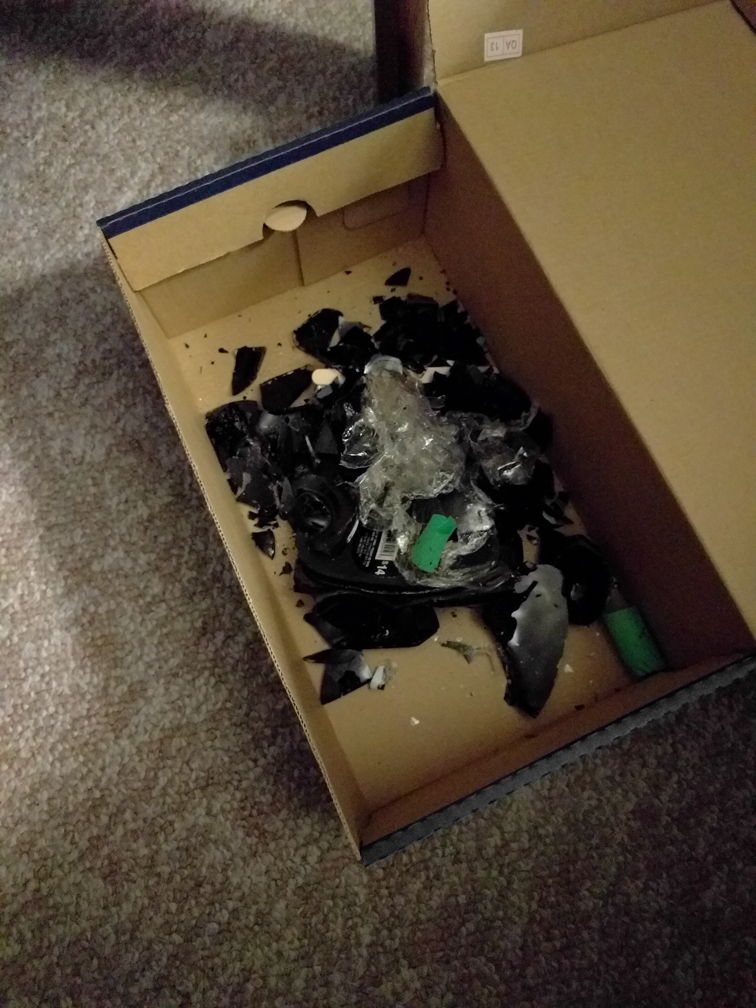
Not only was this a bad idea, there was nowhere for me to do this other than my living room. Broken glass was contained almost entirely to the box, but notice the carpet in the background. Vacuuming was very important but even with several passes I missed a piece and 'found' it in my foot later. I mean it: this was dumb. The time crunch to get the costume done should not have been enough of an excuse for this. Don't do it.
All glass gone from the skull.

Now it's ready for paint and to be glued onto the pauldron!
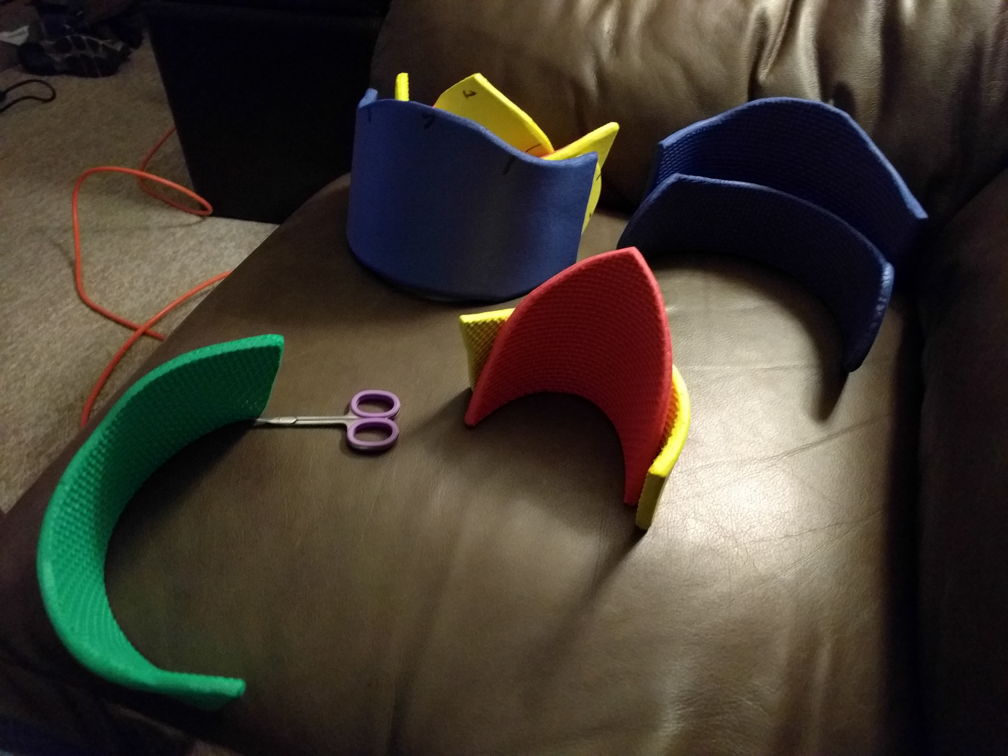
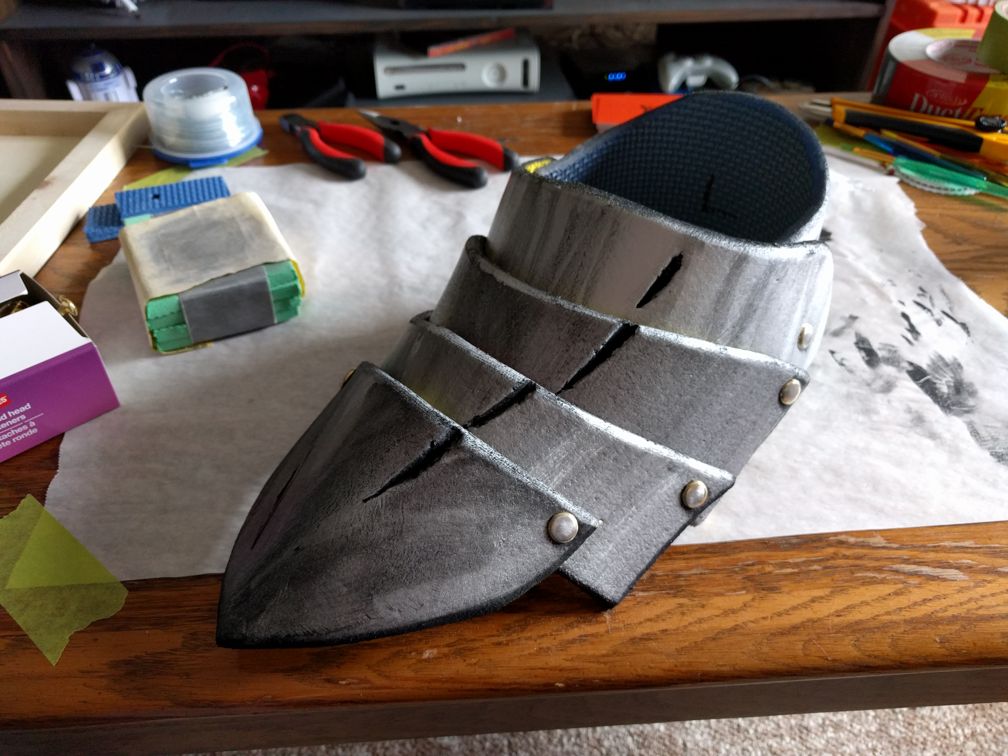
Greaves and Sabatons

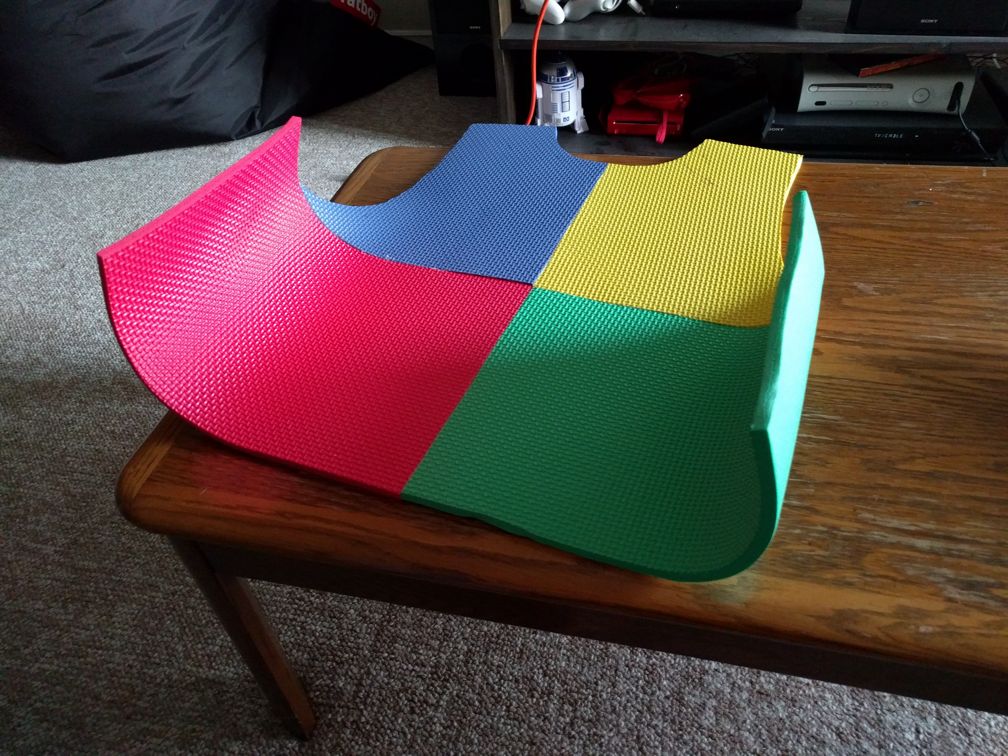
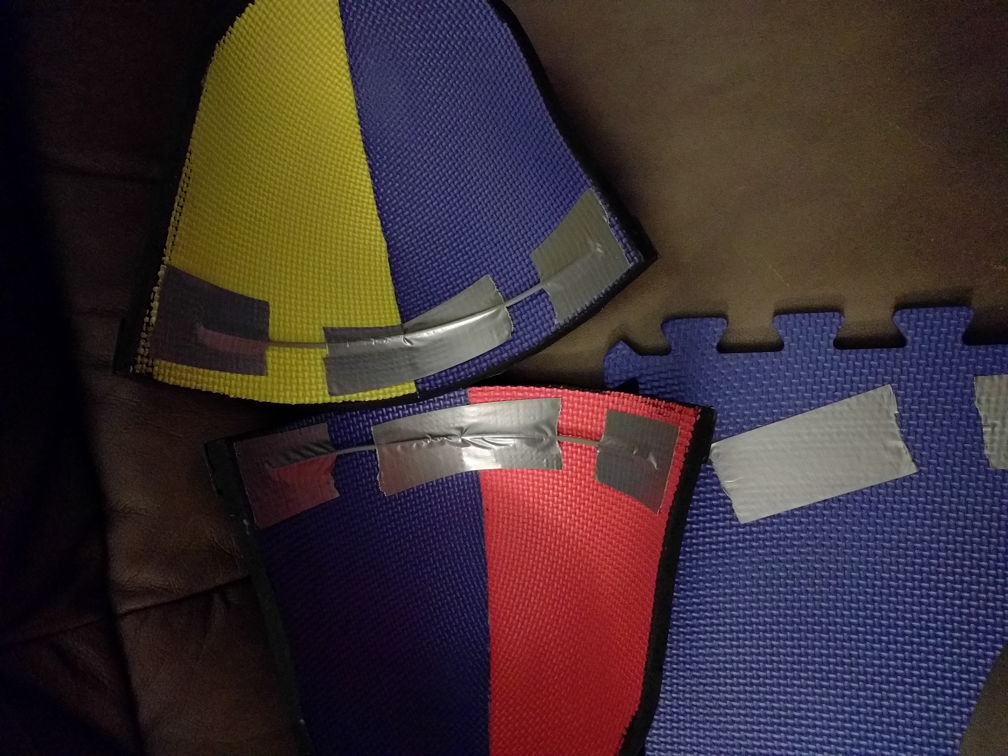
Diablo's art style is gothic, so why not make some gothic sabatons (plated boots) for our costume? Start off with a paper patern with many overlapping 'plates' that it can be pinned directly to an old shoe. This pattern and method will mean that you can wear comfortable runners or something under the boot for long walks or wanders around a convention floor.
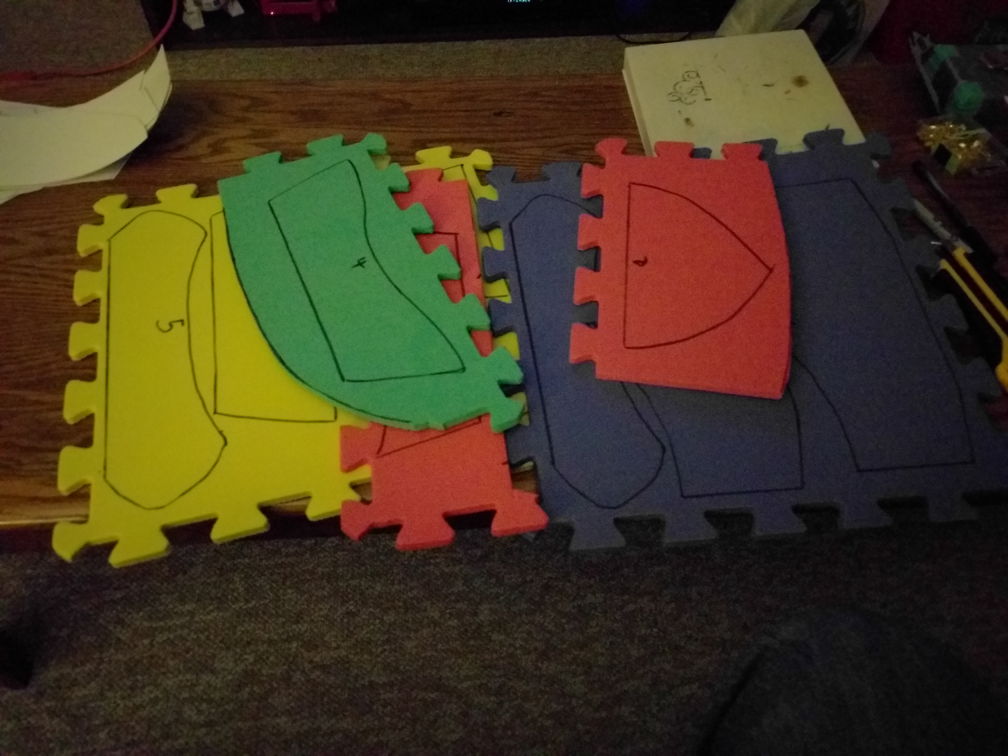
Once the pattern is finalized, it can be traced onto foam. Lots of foam. This is more EVA foam which is commonly used in floor mats. Number all those pieces so they can be tracked!
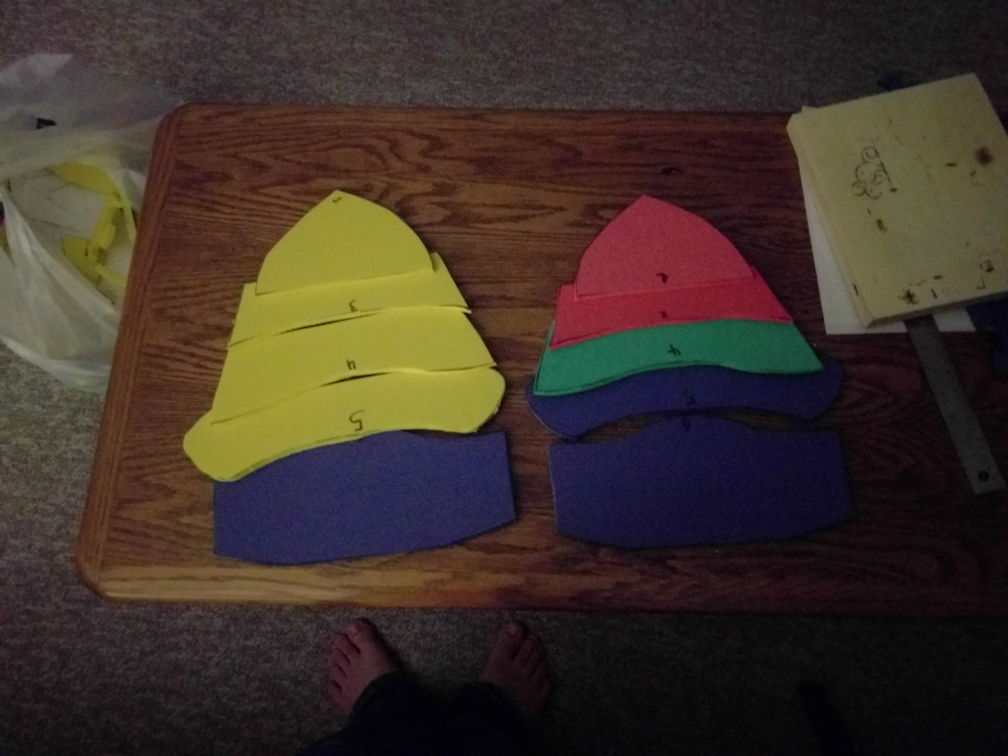
Cut out all of those foam pieces. It'll take a while. A sharp knife or a hot knife (like one you can get with a wood burner kit) will do the trick.
Use that trusty rotary tool to clean up all of the edges. The flat side is the good side, so focus on making that side the presentable one. The back can be ground down a little bit to remove the hard edge, but don't lose sleep over it not being perfect.
Heat all of the foam pieces and give them some curvature. EVA foam will hold most complex curves that are made while it's hot. Sometimes heating up the sanded edges can make the little foam burrs stand out. A small pair of scissors can clean them up pretty handily.
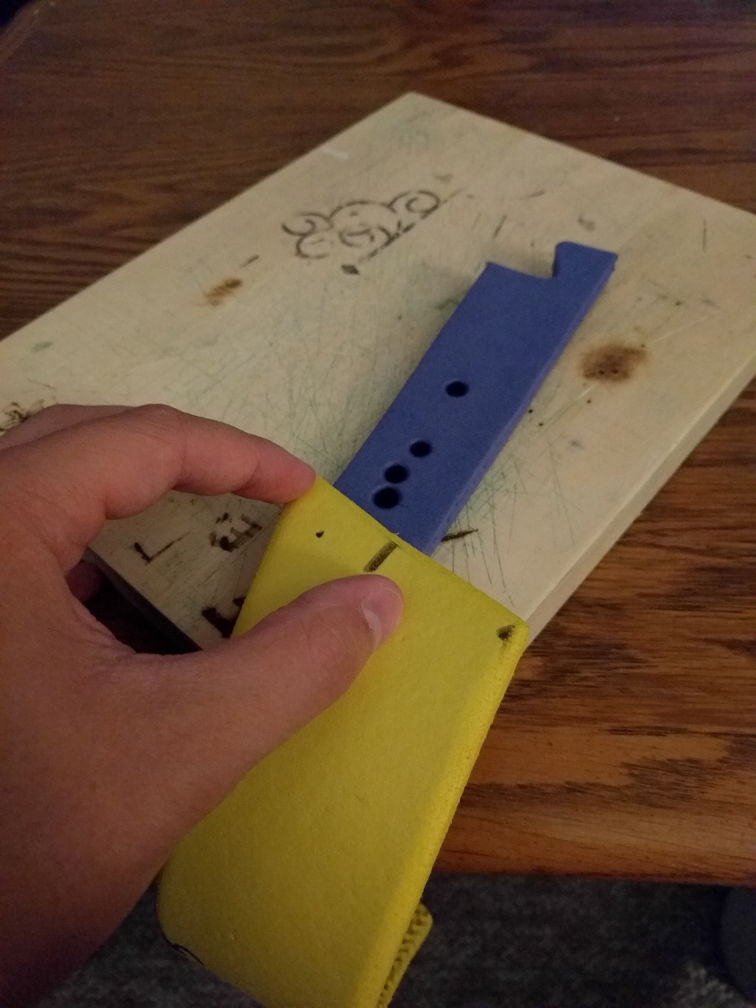
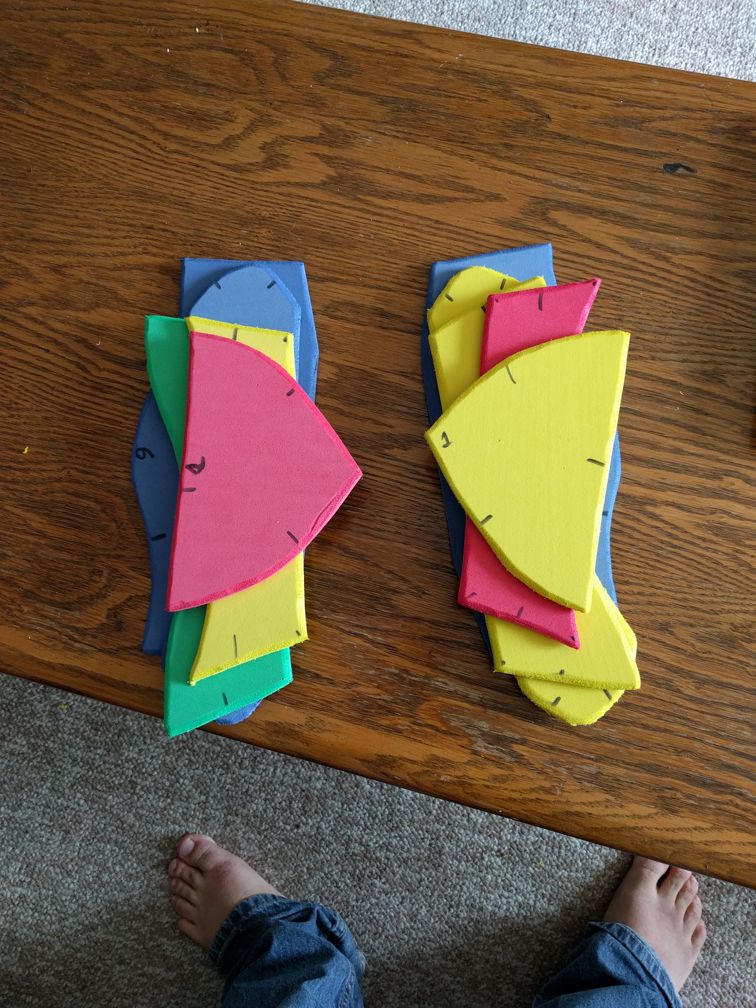
Bust out a soldering iron. Hot tools are really good for foam. A soldering iron melts a very clean hole of a pretty good size into foam. Hold it steady and push it straight in at a 90 degree angle, because that soldering iron can do some serious damage to those foam plates.
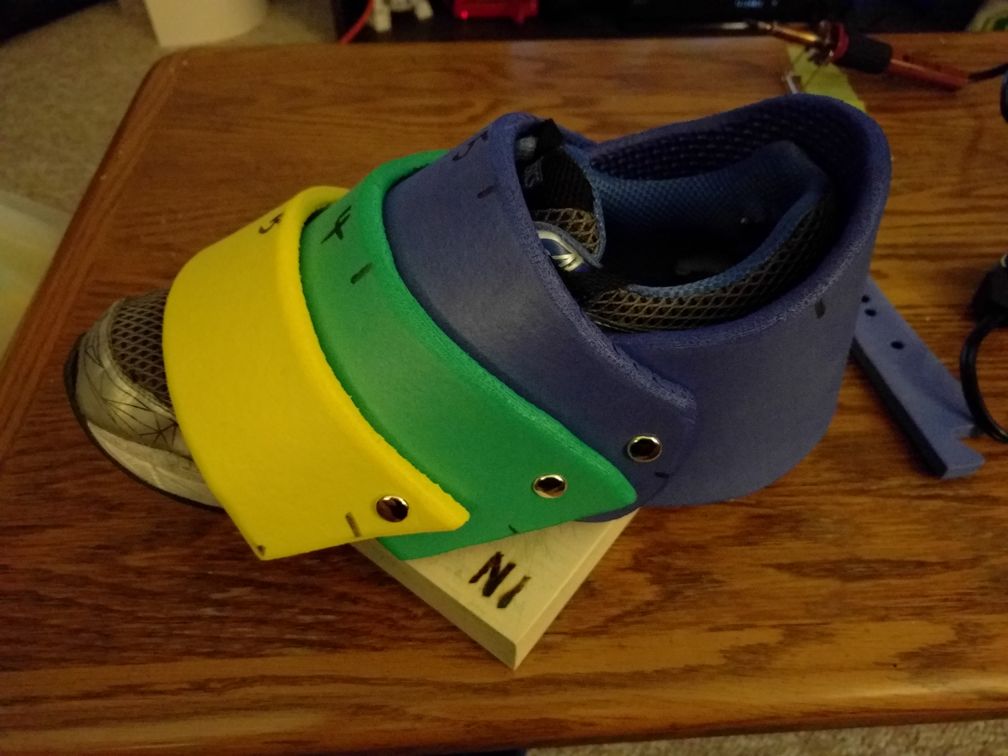
Some brass paper fasteners (the knobs with long flaps at the back) make for exceptional fake rivets. They will also fit very nicely in the holes! Start putting the plates together using the fake rivets instead of with glue.
There, that's a bit wide, but that can be solved with strapping later.
Do it to both sides. Hopefully the labels for left and right were preserved this whole way.
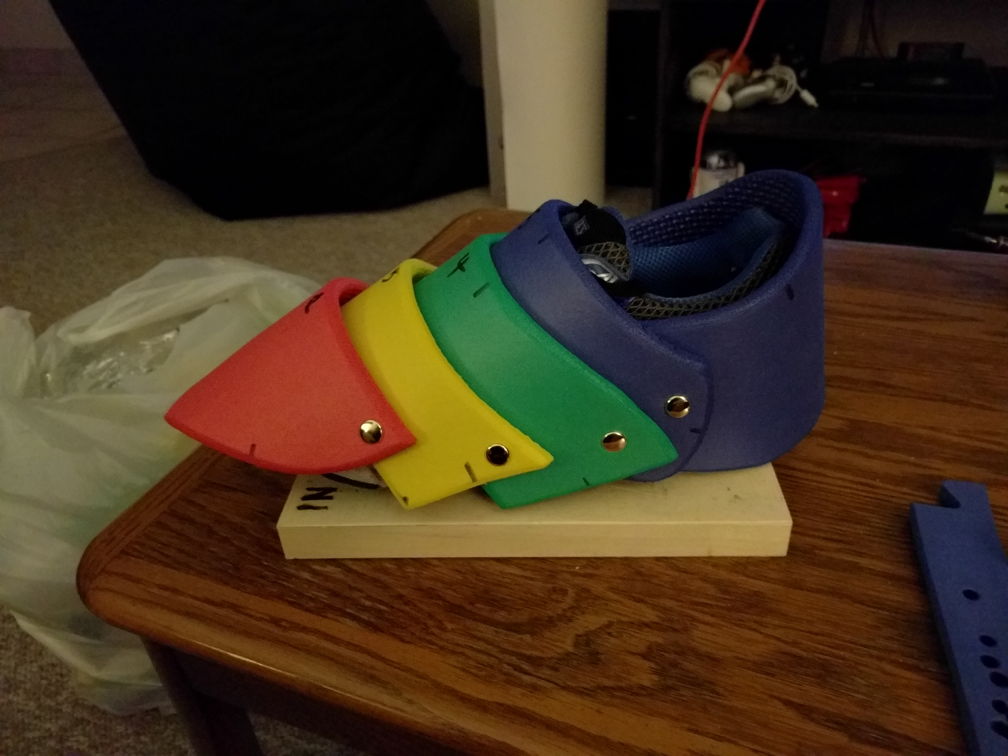
This is where the rivets really pay off! Look at how well the sabaton articulates!
Disassemble the sabatons and tape the pieces down to a tarp or something. It's time to paint! You can spot some gashes and chips in the foam here. That's actually intentional. I took that soldering iron from before and put some scrapes and cuts in wherever I thought it would make sense.
Prime them with black. Black is best as an undercoat for silvery metallic finishes. Multiple thin coats will work best. Once the pieces are all primed, paint them with some metallic paint. I used metallic auto paint because it provides pretty good metallics in spray cans. I don't have any pictures of the silver.
The edges may not get fully painted with the silver. Fortunately these are for boots and painting on some black grime is totally acceptable to mask any rainbow colours that are hiding underneath.
The silver leaves the plates looking a little too pristine. Get some black paint, thin it out with some water, and smear it on your pretty piece. Wipe off the excess with a paper towel. This is a very common type of weathering to get sunken details darker and to bring out the dimension of the surface.
Do it some more. Each piece needs to get weathered in this way.
There are a lot of pieces. Do them all. The dents and cuts especially need to get some grit and dirt stuck in their deeper parts.
After all the pieces are weathered, they can be reassembled. The brass rivets stood out too much at this point, so feel free to sand off the 'brass' coating on the silvery metallic base.

A downside with getting cheap floor mat foam is that it's multicoloured. After weathering the piece, I noticed that in the light you can see the bright foam colours reflected in the silvery paint! This is a cool effect, but not really what I wanted, so I blacked out the undersides further down.
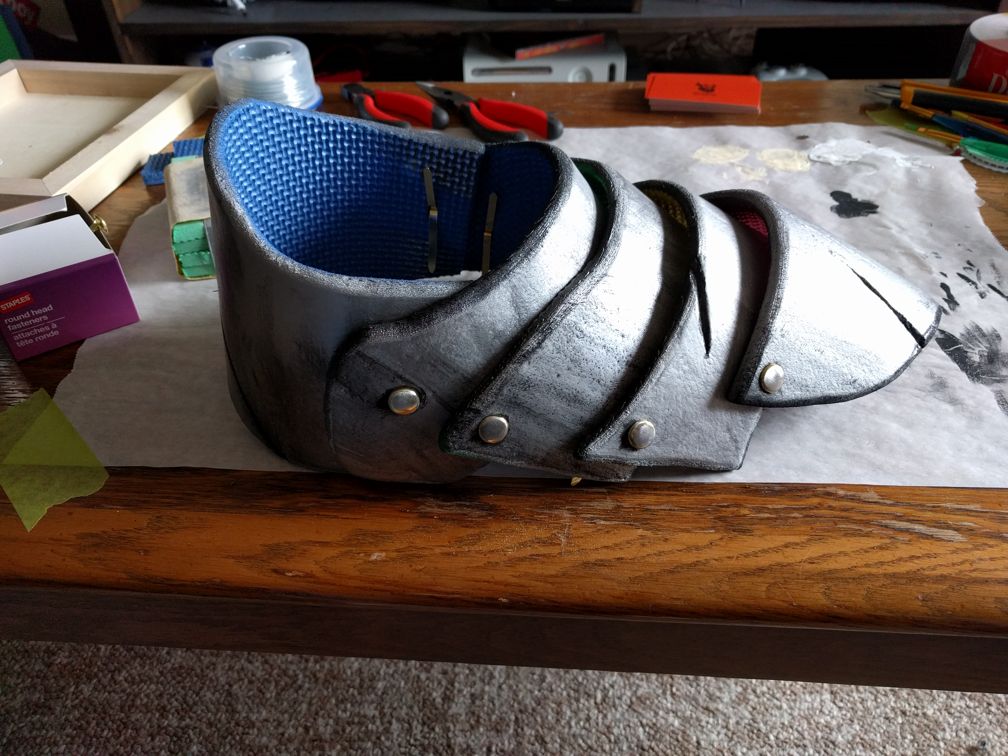
There. No more rainbow. When the weathering is complete, clear coat the piece with a matt clear spray finish.
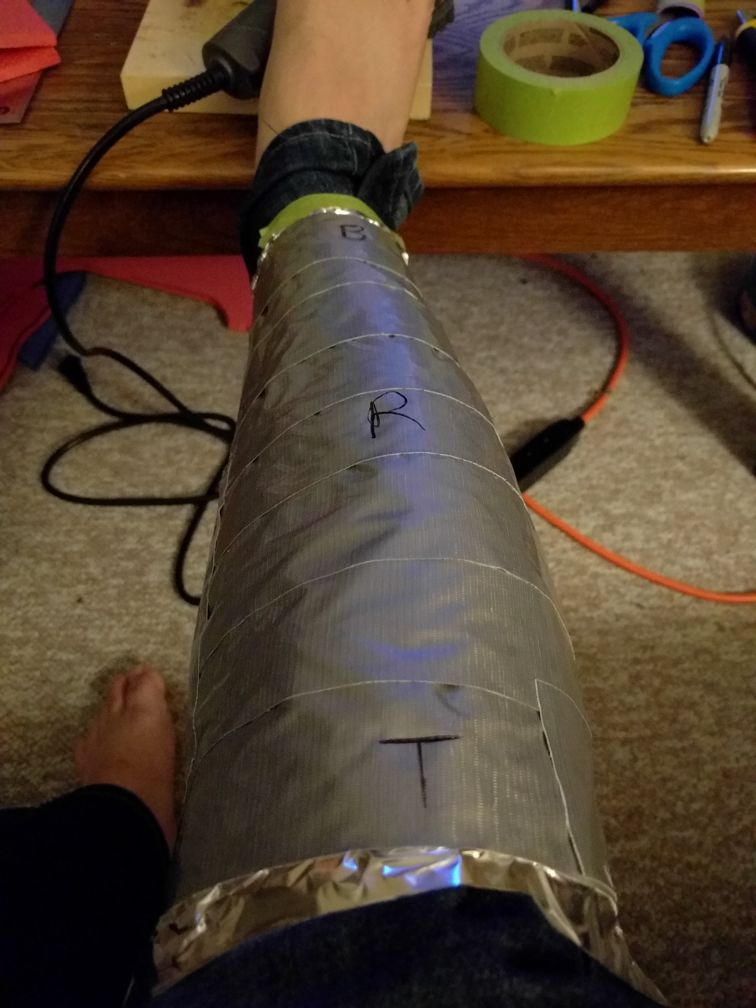
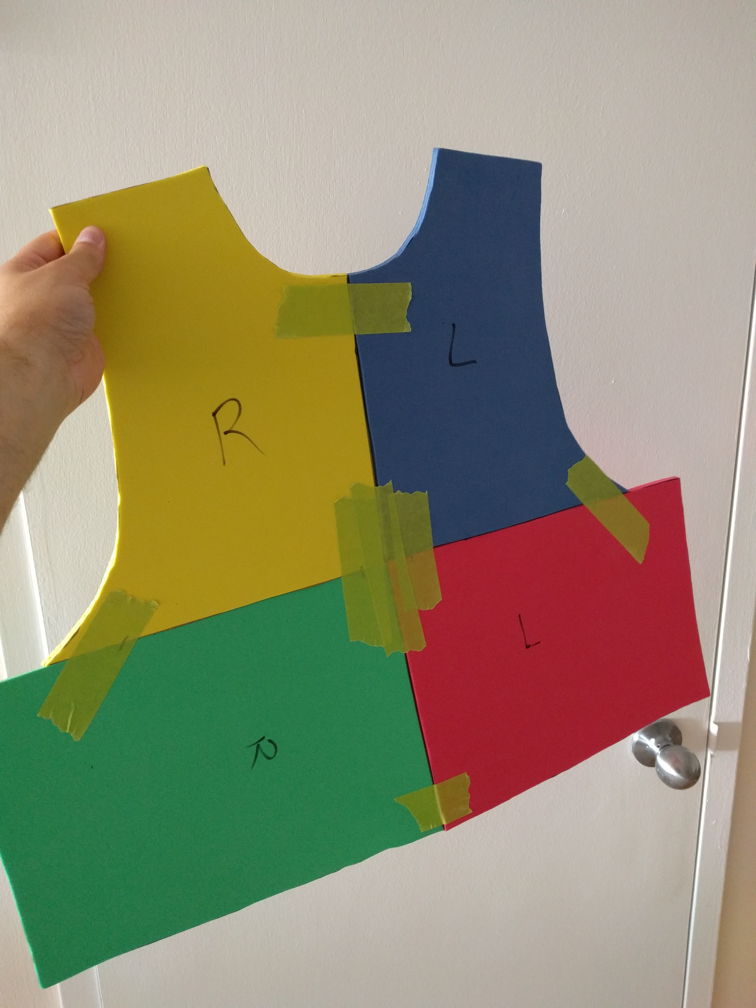
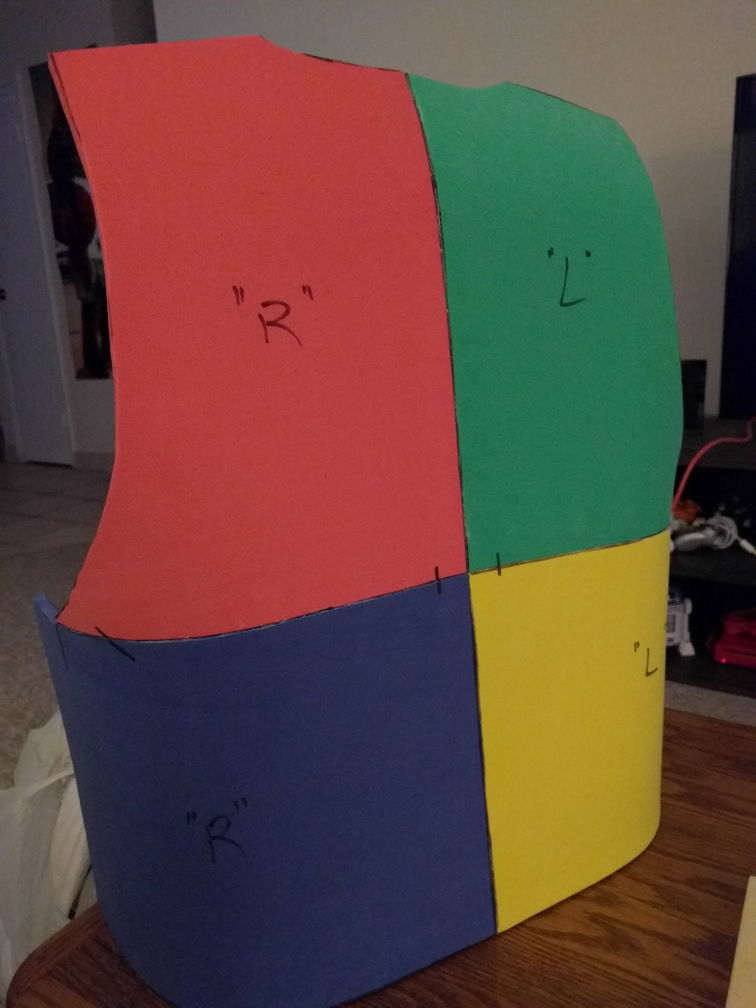
With sabatons done, we need something to protect the shins. That's where these greaves come in. First step is to pattern them. I could have made a tube, but that wouldn't have had any curve to conform to my leg at all and wouldn't have looked quite right.

Besides, look how much fun it is to cover your leg in aluminum foil and then duct tape it all up! This will give a form fitting pattern. Normally you need a friend to help with this, but since it was my leg, I could manage on my own. Marking out the rough lines of the pattern while it's still on really helps sort out the shape later.
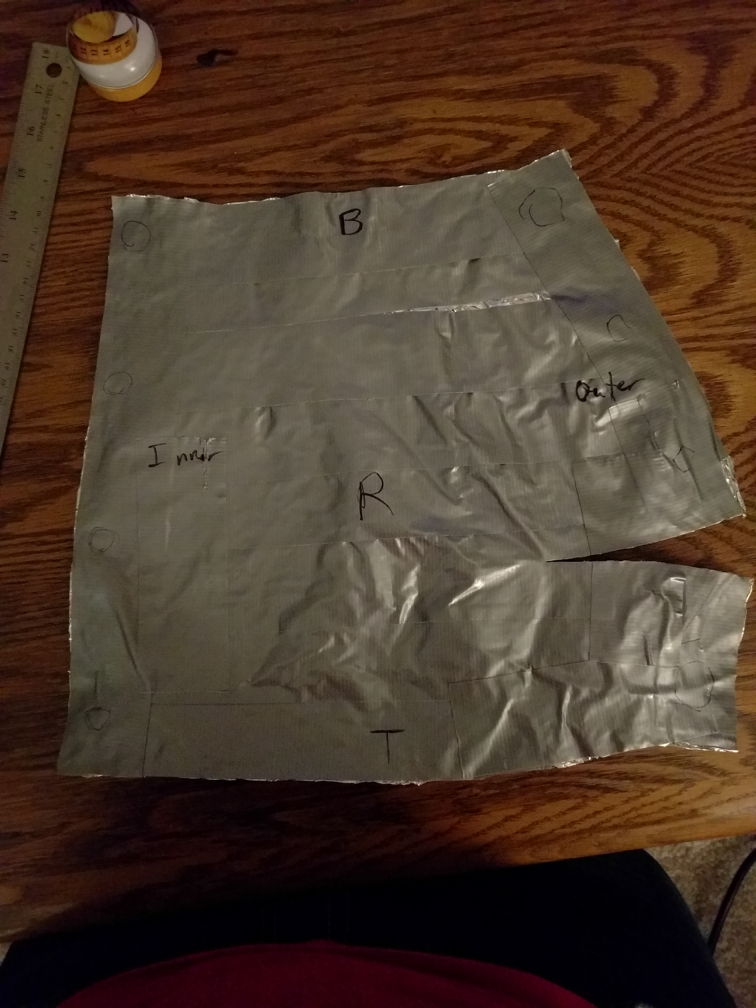
Carefully cut the pattern off and trim the edges. Any area with a bubble or big round bulge can be 'darted'. Cut from the center of the bulge to the outside edge of the pattern. When the foam is connected back together the bulge can be recreated by reattaching along the seam.
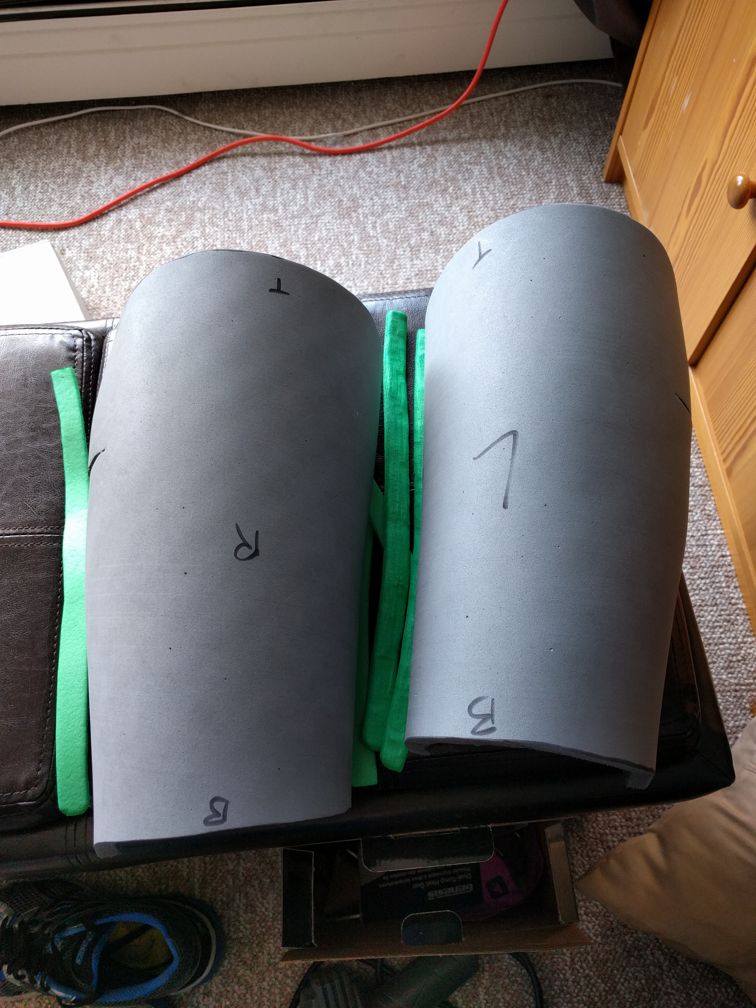
Cut two of those pieces out. If your legs aren't symmetrical then you better pattern both legs. From there you can heat shape them back to the shape of your calves and shins and then glue them together with more contact cement.
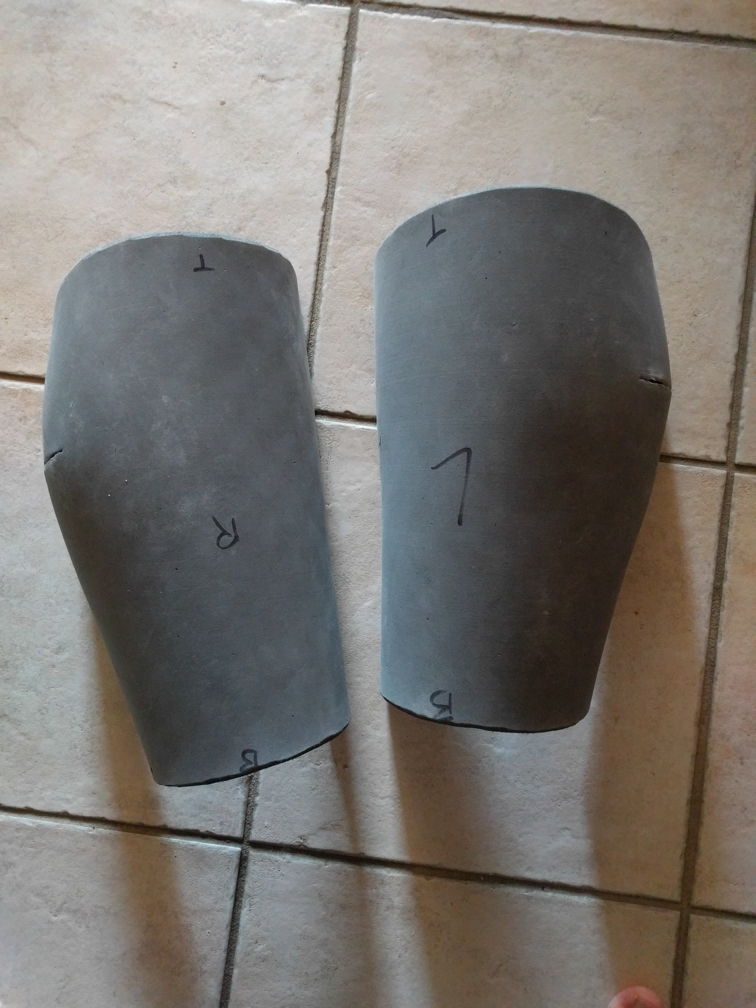
Use a rotary tool to clean up those edges again. Round them all over.
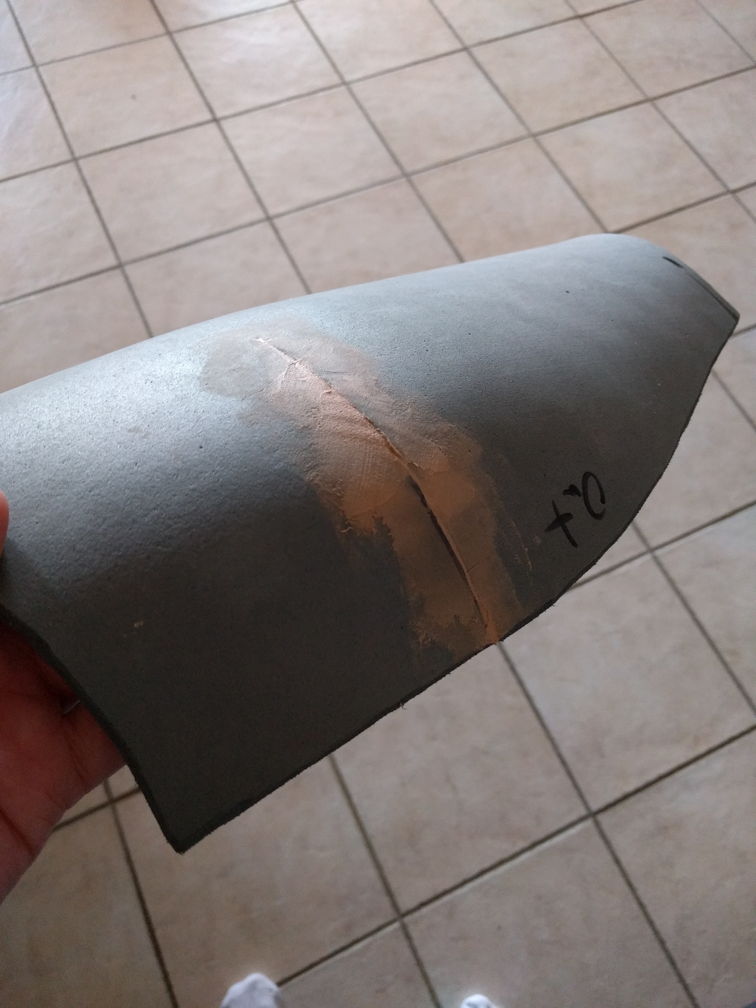
These seams didn't turn out all that great, so we use more auto body filler to smooth them out.
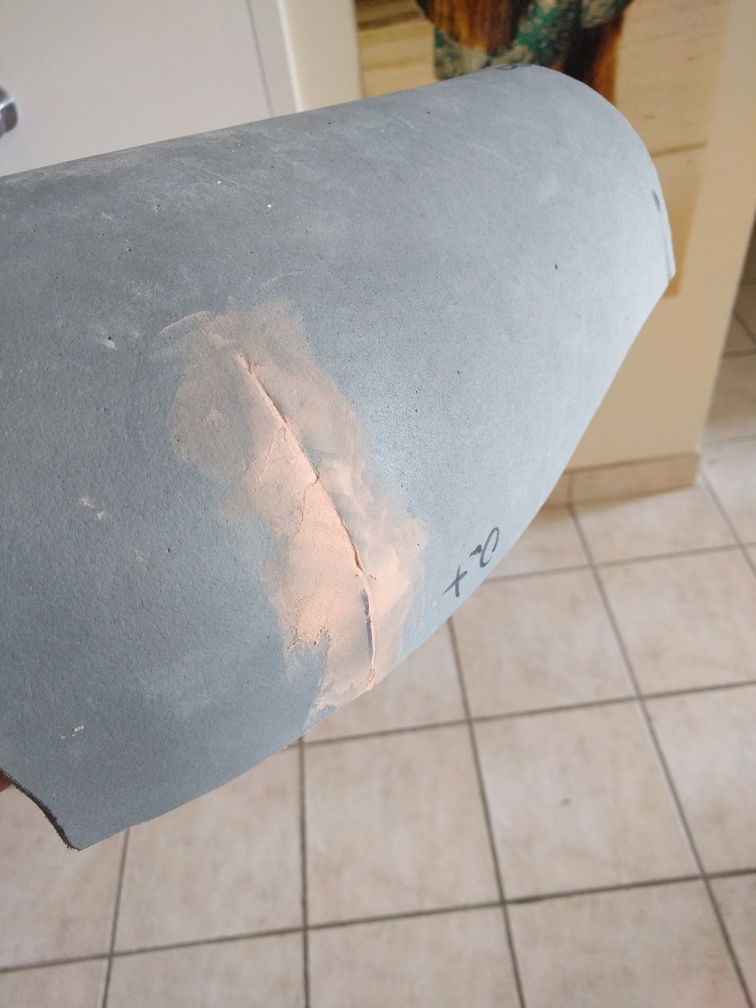
Do both sides
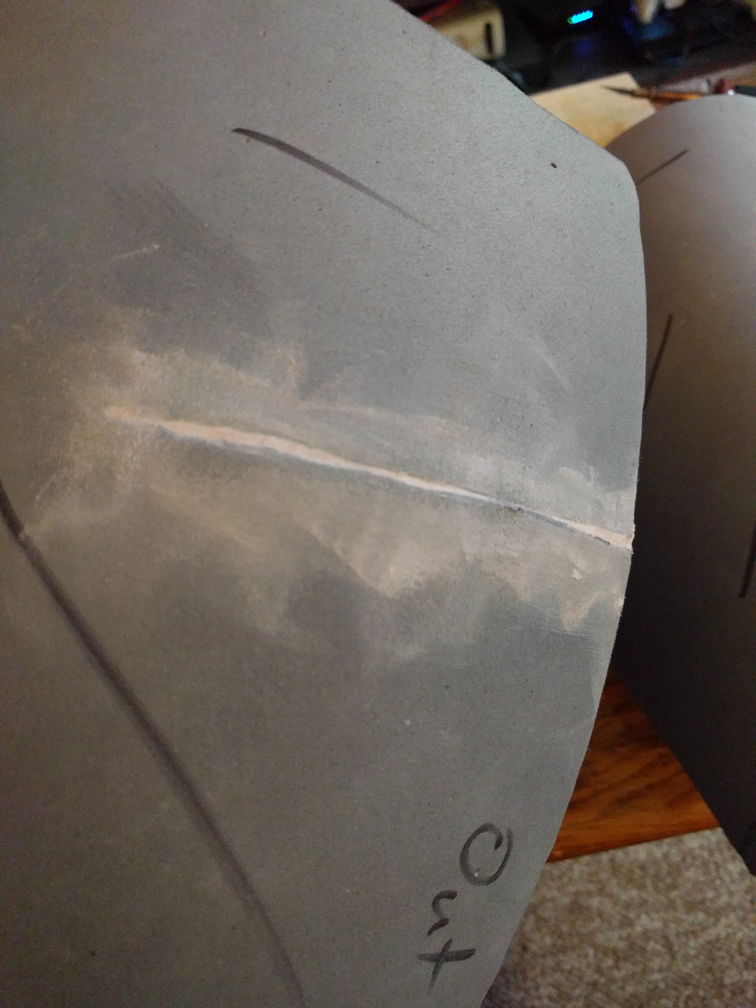
Foam and filler can both be sanded, so be sure to sand it back down to the finish that you want. Wear a respirator.
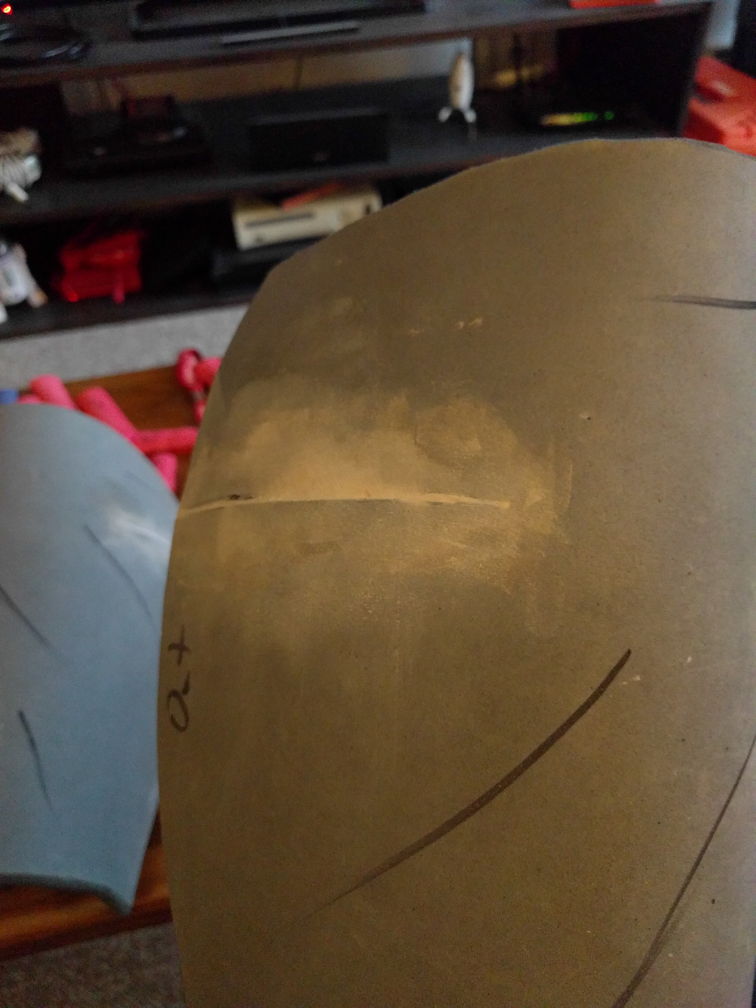
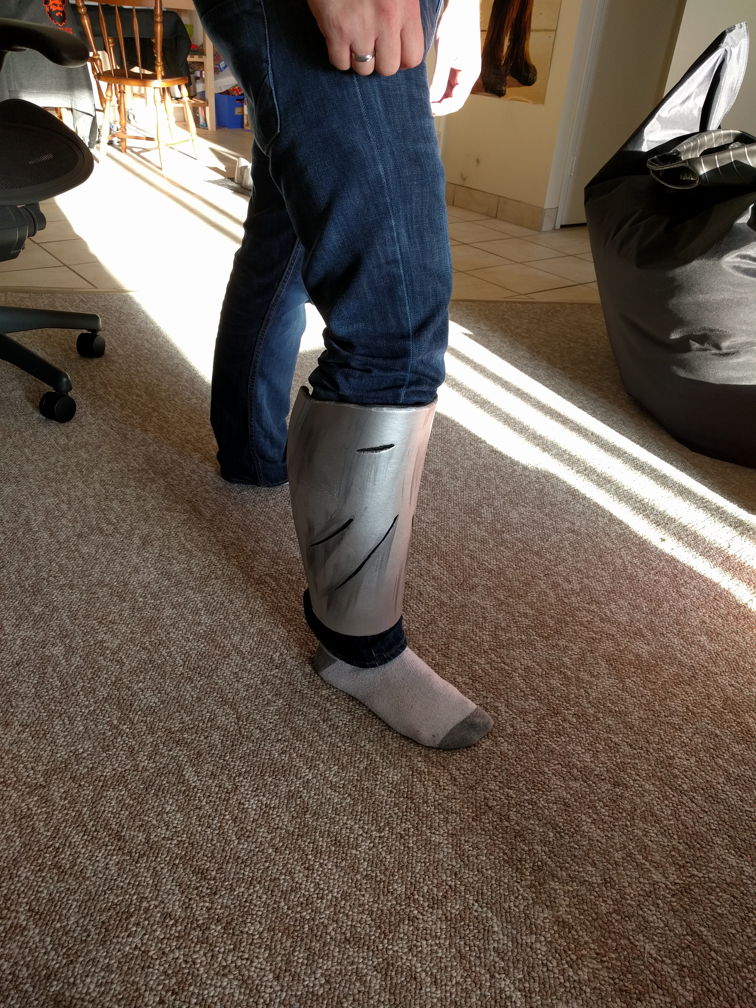
Take a marker and slash on some more places where the greaves could have suffered slices and cuts. Get those carved in with a hot or sharp (or both) knife.
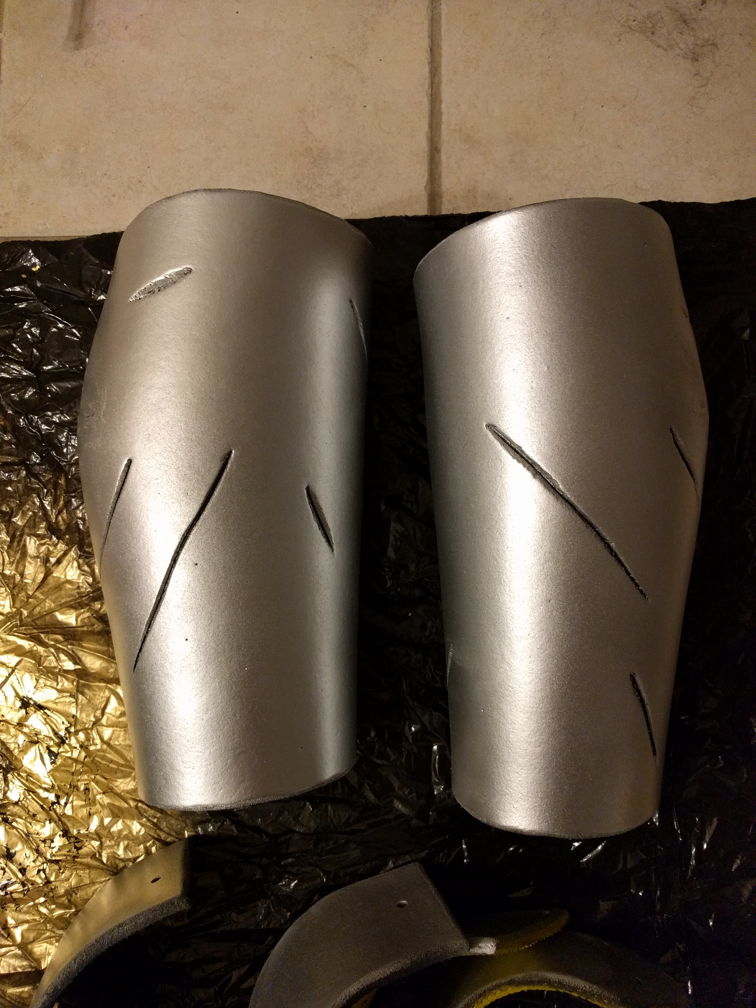
Get those pieces primed and painted, but don't forget to heat seal them first.
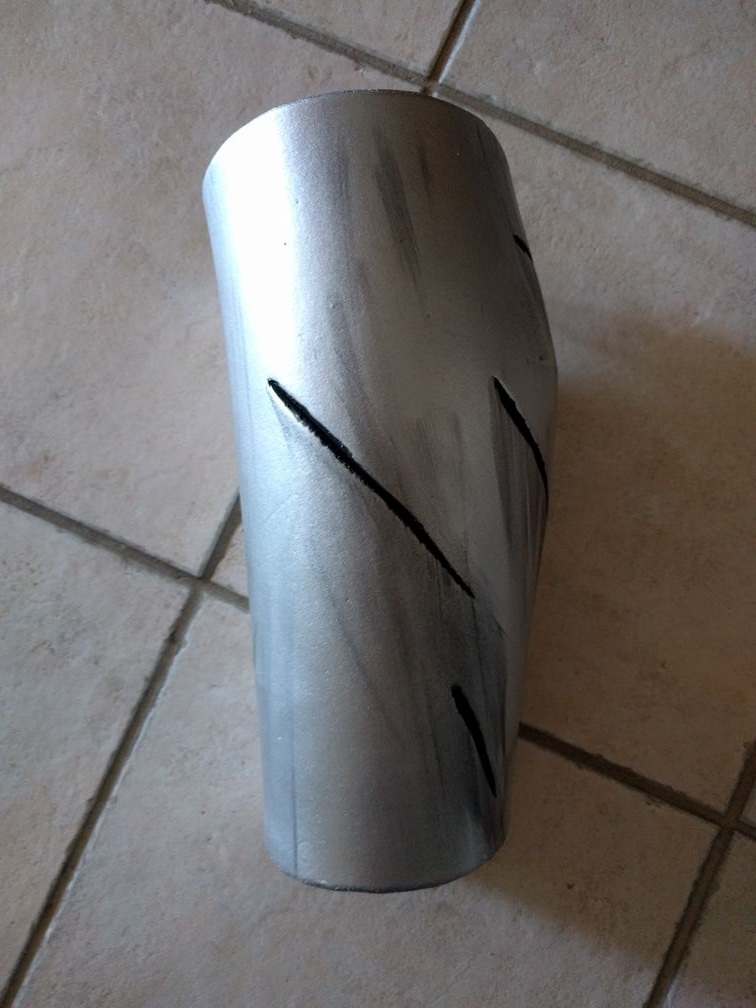
Use some black paint that has been thinned to weather the greaves. Wipe them down where the metallics should shine through but let it sit in the crevices and battle damage.
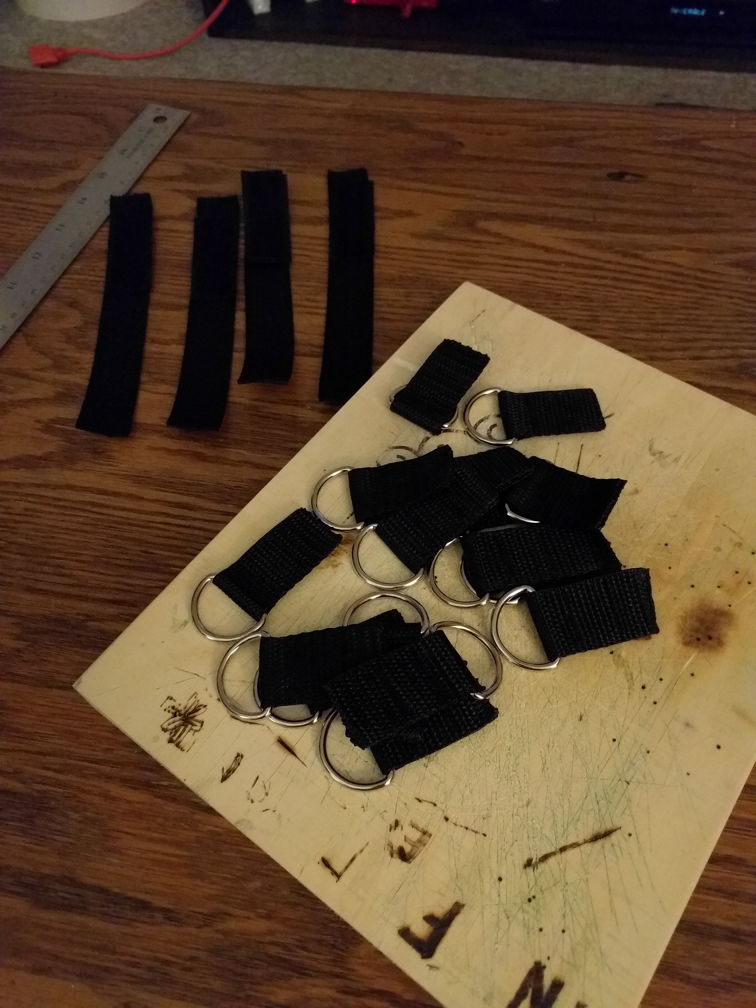
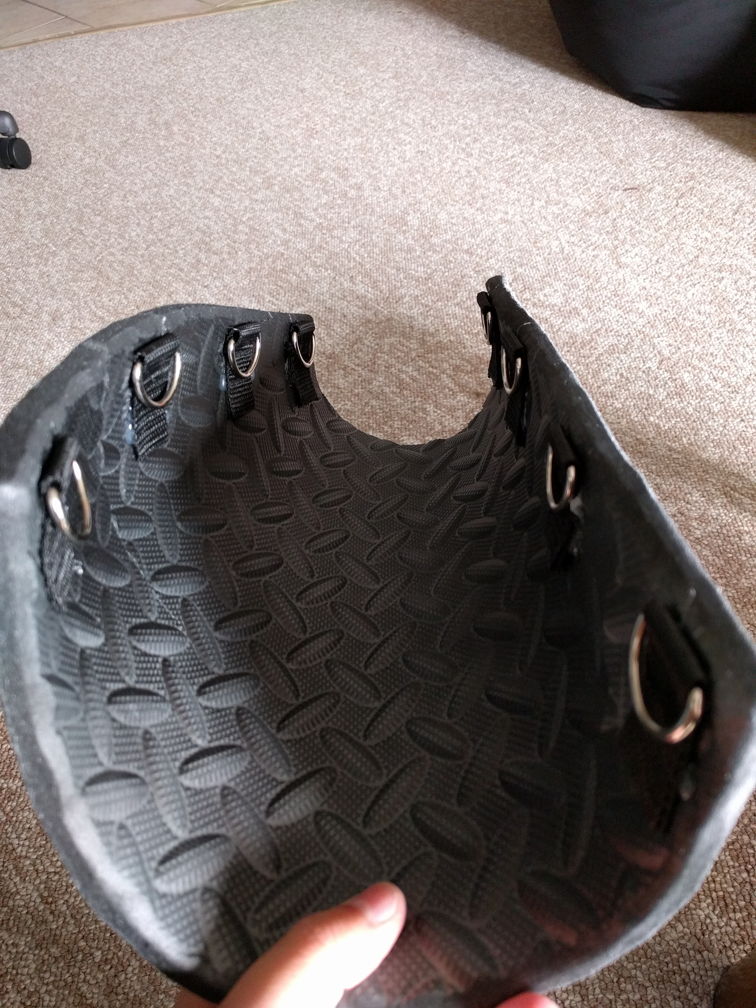
For strapping, I didn't want to go with buckles, so I went with ones that could be laced up from the back. Use some D-rings, some nylon webbing and some sewing to rig up 16 little D-rings with handles.
These hoops can be hot glued down to the piece after the surface of the foam has been roughed up with sand paper or a knife.
Try it on and lace it up!
Belt
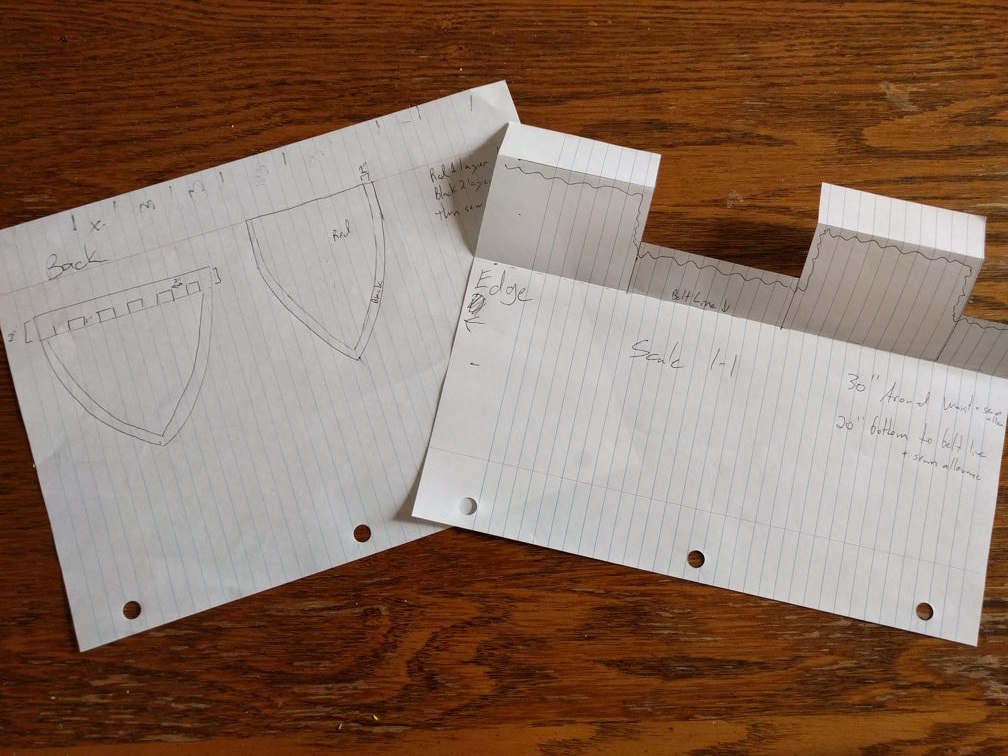
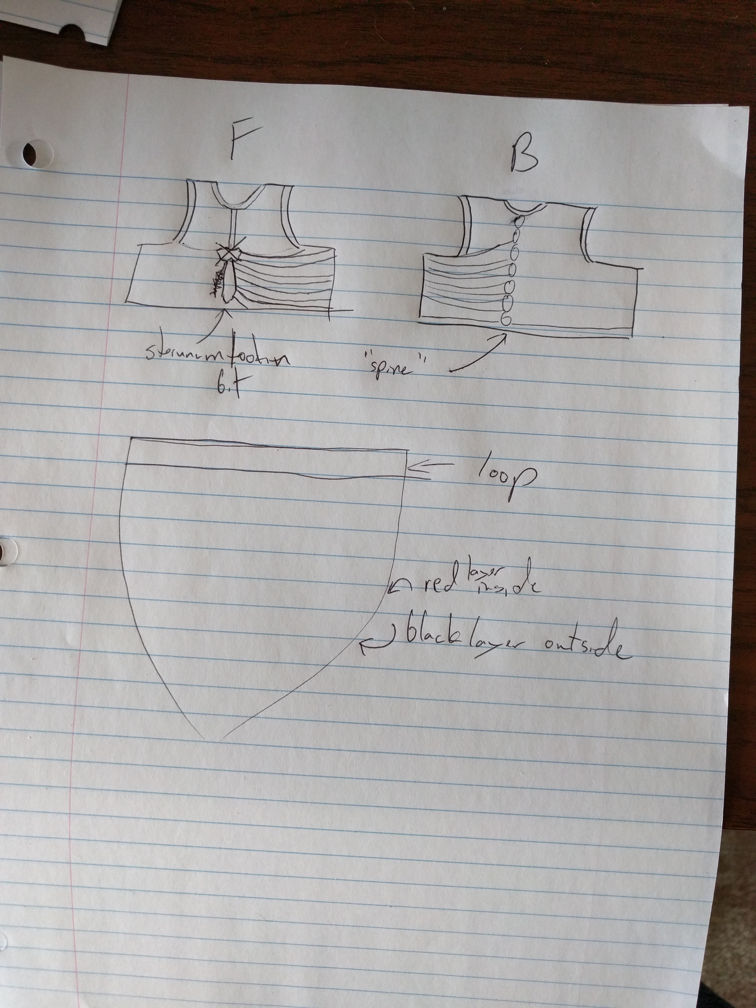
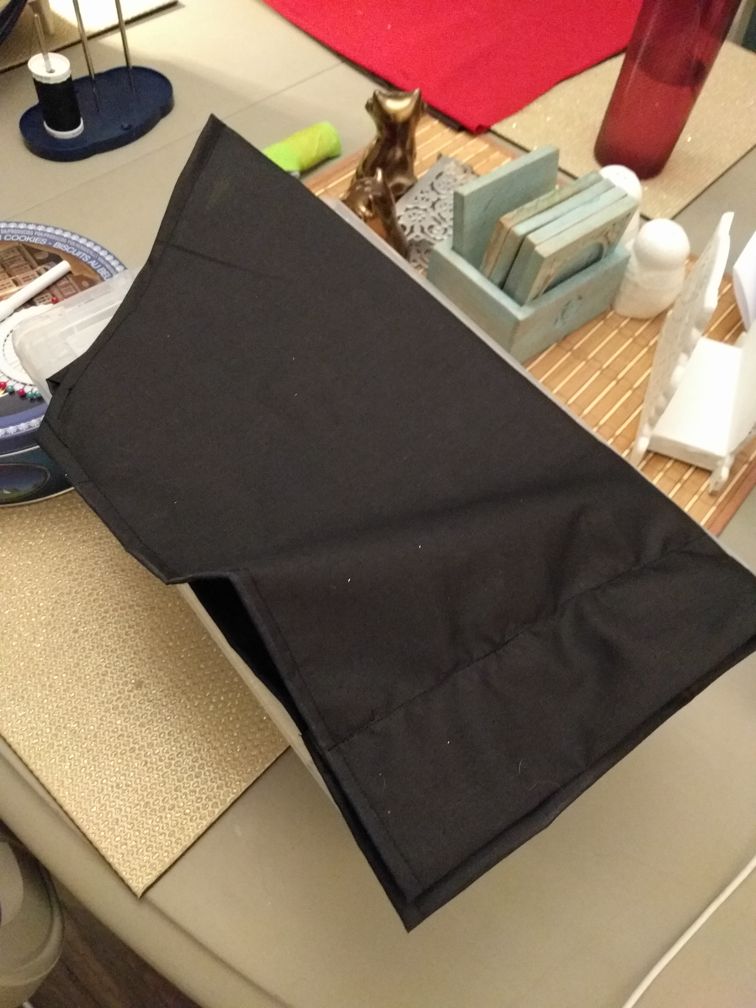
Belts are a big deal in Diablo 2. They hold all your potions and bits. I knew I wanted to attach the Necromancer's butt-cape/loin-cloth thing to the belt while also making it sturdy enough to support some trinkets later on if I want them. Start off with a paper pattern for the front and back cape-y bits. I both sketched them out and did some tests of how I wanted the belt loops to work on paper.
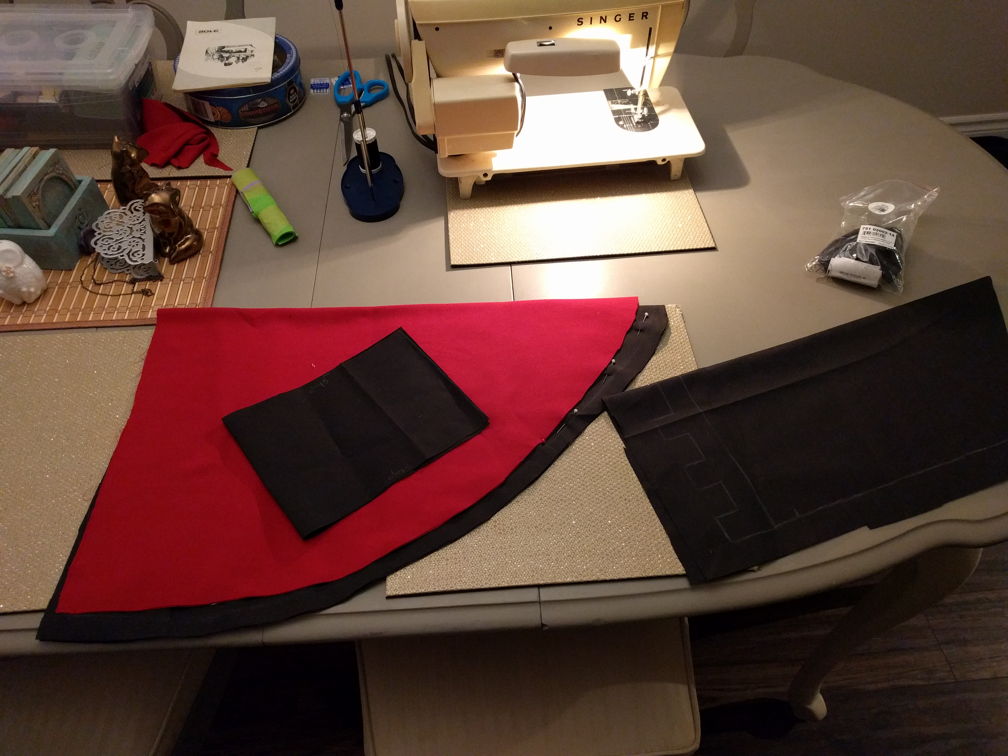
Use a chalk pencil or something to sketch out the pattern and cut out the fabric. Pin it to shape for consistency, but remember to leave a seam allowance.
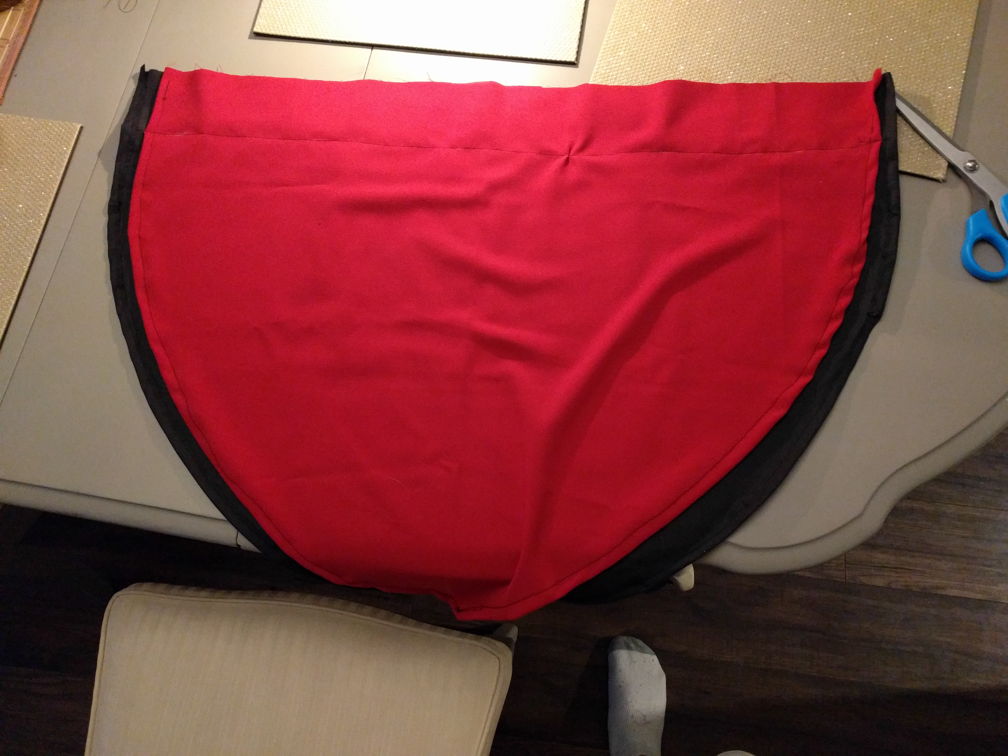
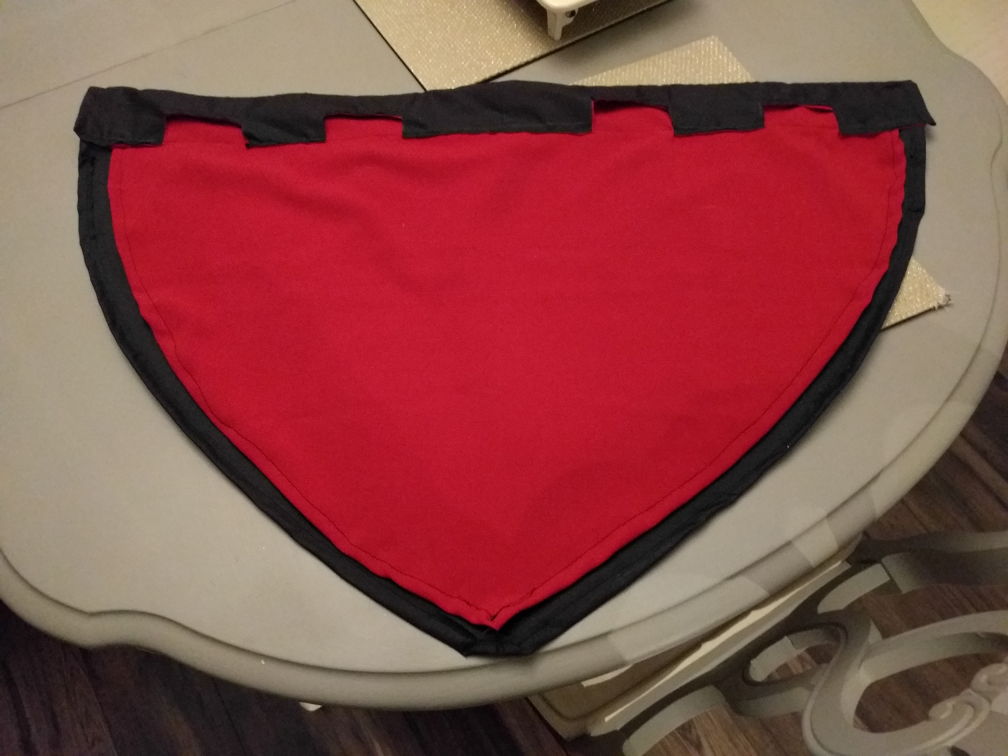
The back cape is black on the outside and red on the inside. Hem up the pieces of cloth and sew them together.
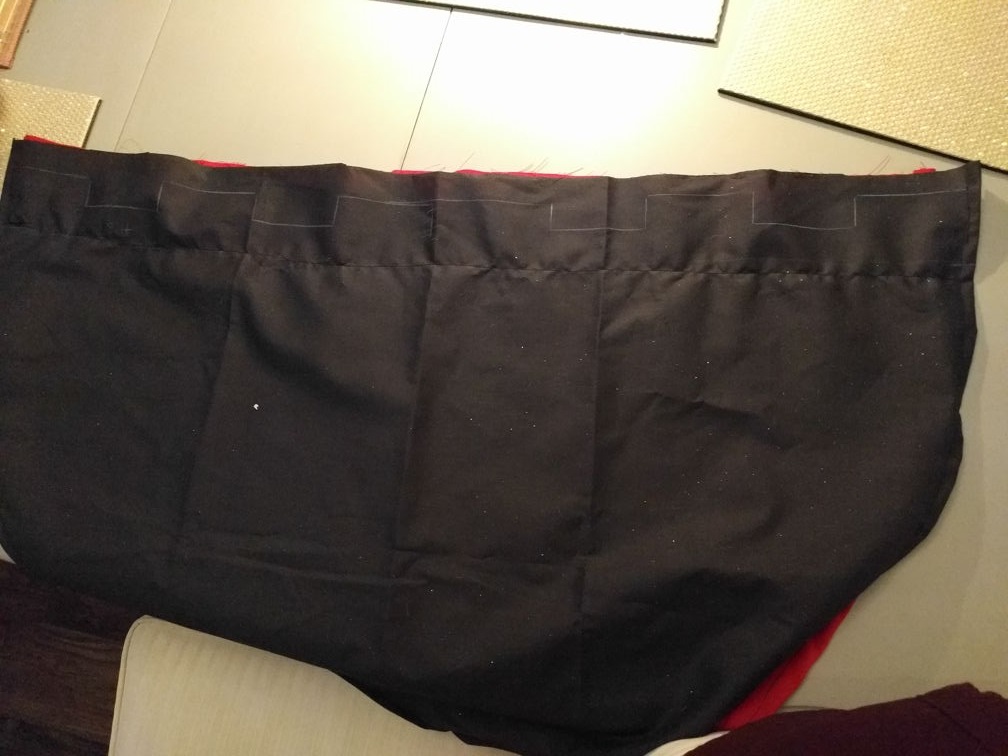
Use a chalk pencil or something to sketch out the plan for belt loops. These loops fold partially over to conceal the nylon strapping that will go through the loops. A leather belt would be stronger, but also thicker and heavier.
Loops all done on the back part. It should be apparent at this point that sewing is not my forte. Part of doing this costume was to get me to learn a bunch of new things. Sewing is something I'd done a little of before, but I'd never done a proper project.
Do up the belt loops for the front and back. Hemming edges will help the piece last longer.
The front cape bit is very small and angular. Here's a view of it folded over to see the angles.
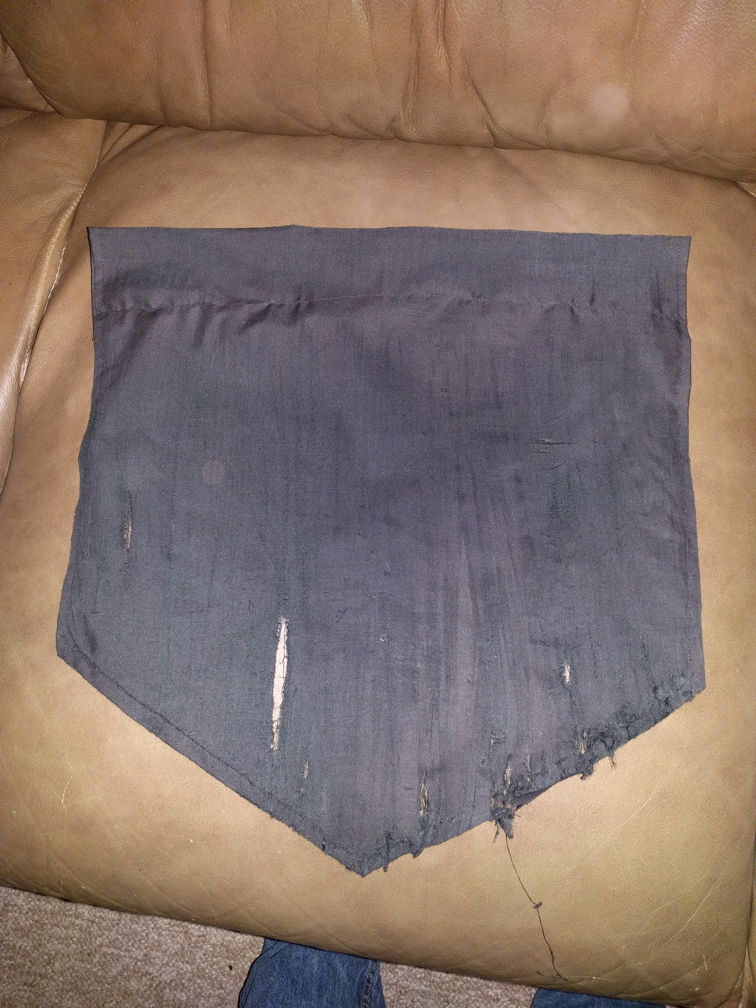
Weathering fabric is pretty different from weathering foam parts. Paint can still be used (but should be thin), but sand paper and other rough or sharp surfaces should be used to damage the fabric and make it look like it has seen battle.
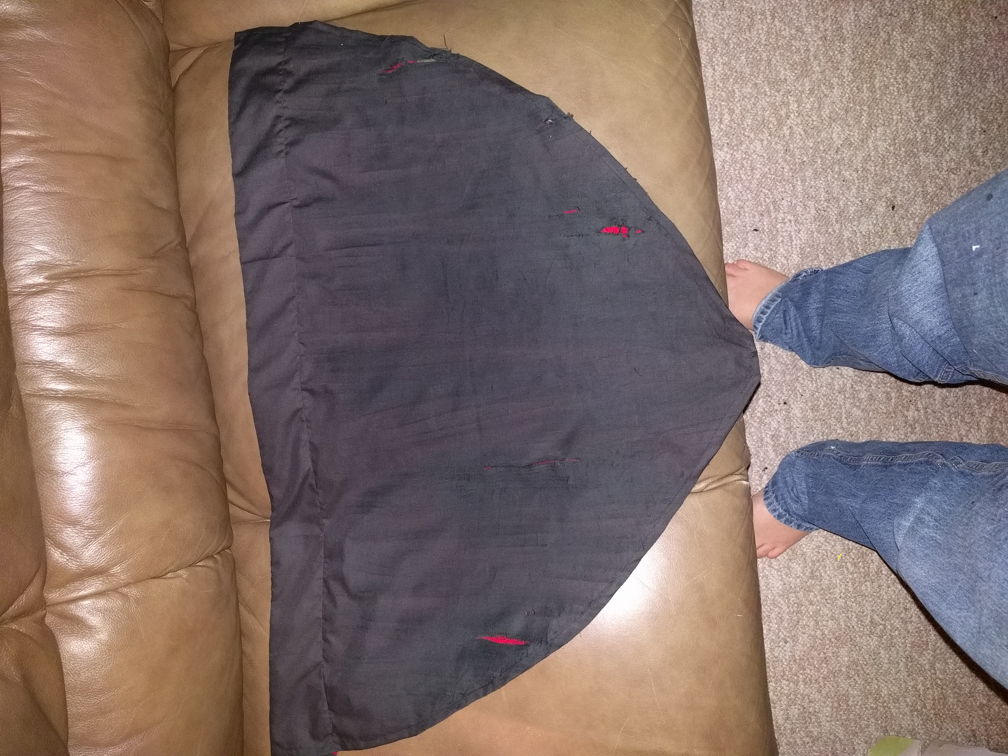
Do it to the back too. Different fabrics will weather differently, but this can just contribute to the effect. The red peeking through the black looks pretty great to me!
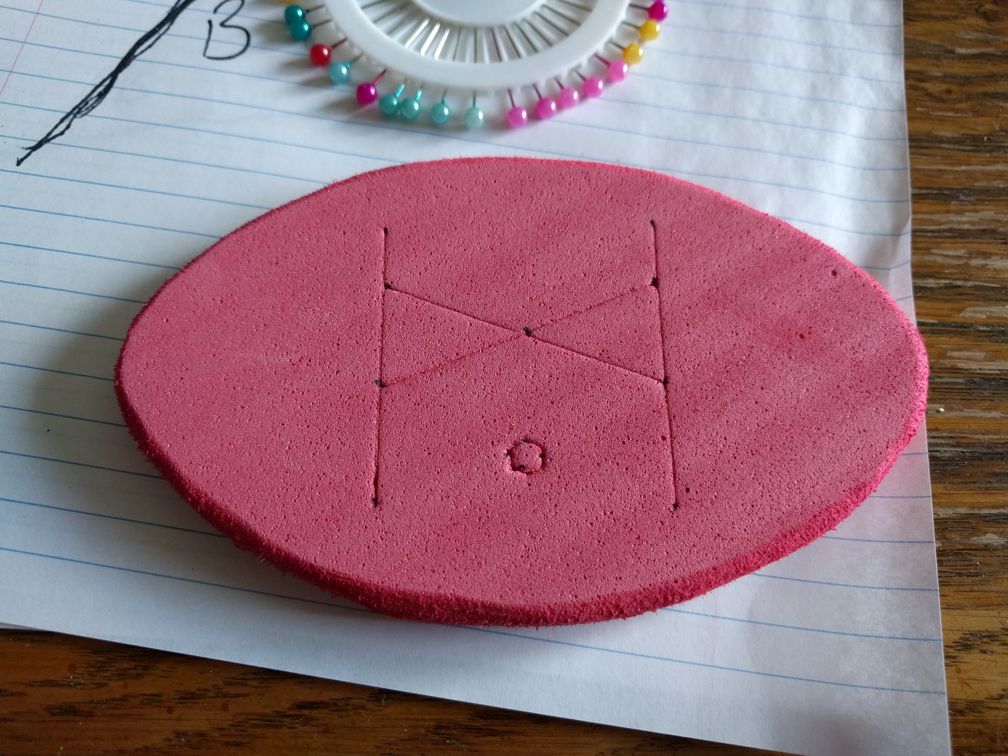
Every belt needs a buckle! This is just a simple oval buckle, but with a Diablo 2 Jah rune carved in.
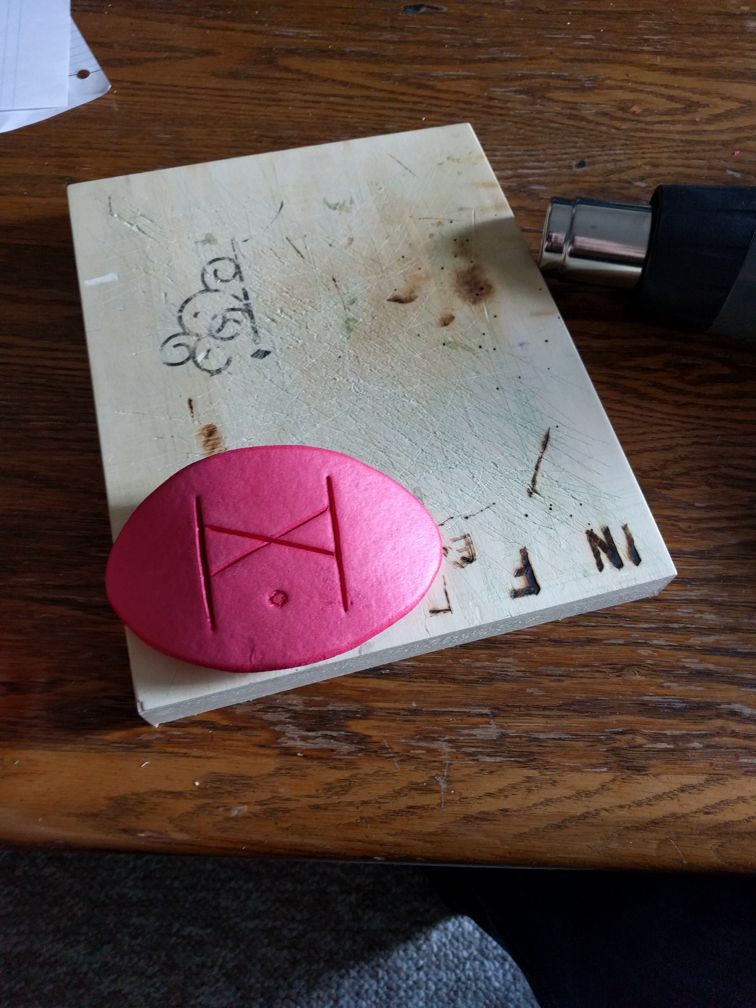
Slicing into the foam just partway through with a sharp knife and then blasting it with the heat gun will create excellent 'engraved' lines. Add a light curve while it's hot.
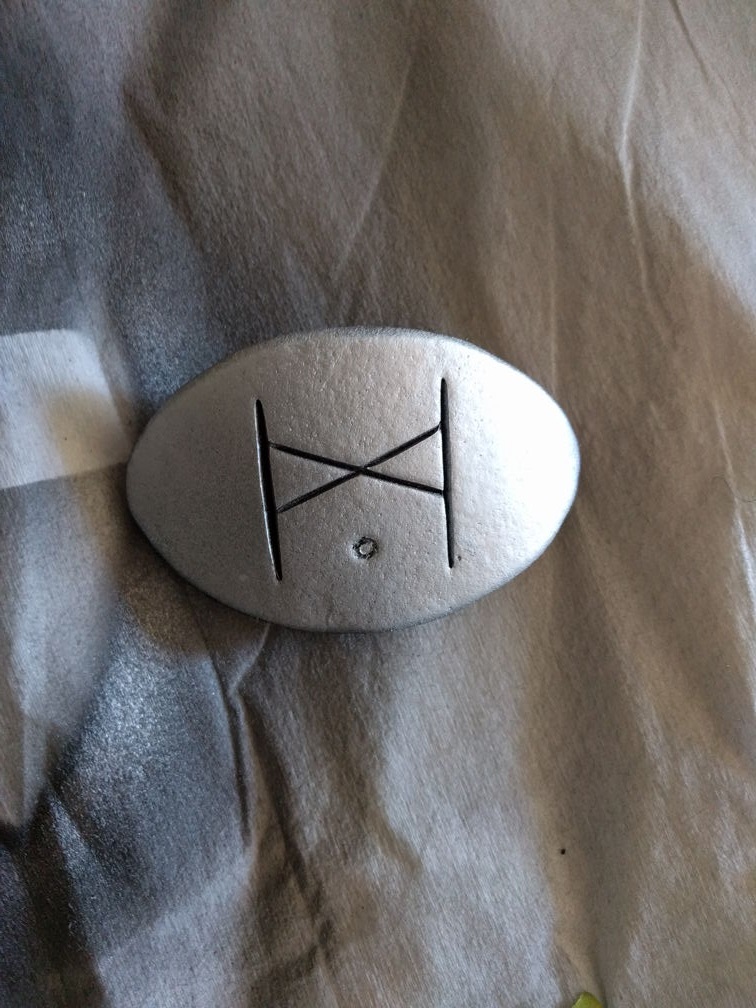
Give the belt the same painting and weathering treatment as the legs. Silver base with a black wash.
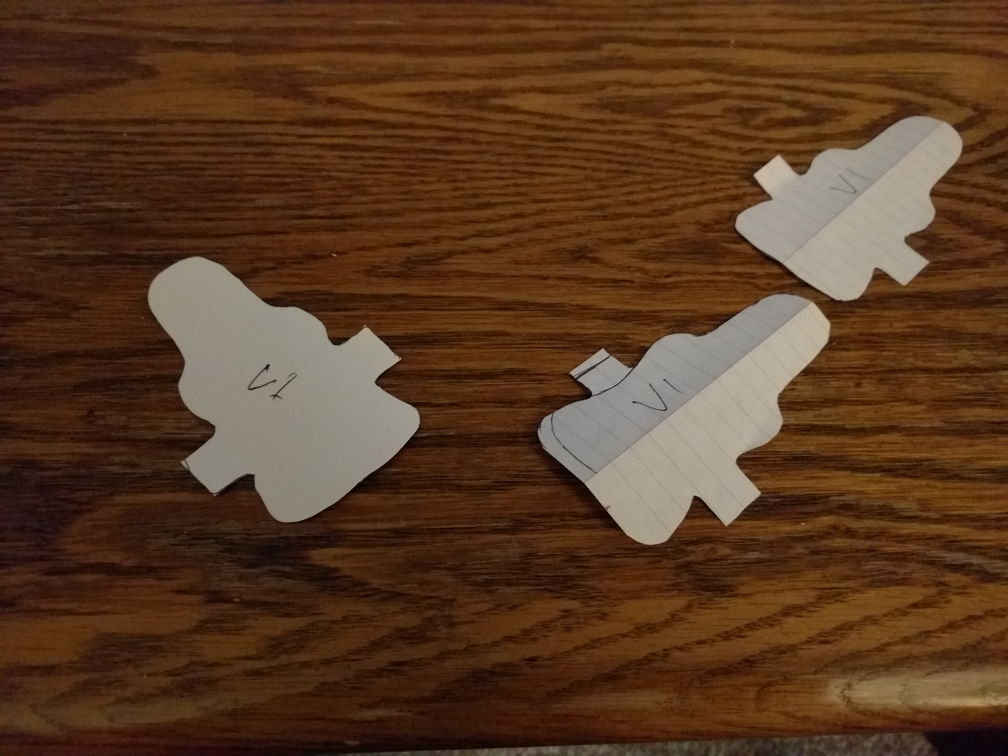
The belt needs a little something for around the sides. Why not make it look like a spine? Pattern out some vertebrae that will be cut and shaped from foam.
Cut out the vertebrae from foam and sand in the details with a rotary tool.
Heat and pressure will form up the bones to the desired shape and curve. There's a lift at one end so that they can be interlocked relatively easily.
Use a soldering iron to punch holes in the lowered bits and then tape them all down to a piece of cardboard for priming.
More brass fasteners will allow for an articulated spine. Sand down the tops of the fasteners and hot glue them to a roughed up underside of the bone pieces. These can thread through the holes made with the soldering iron. Be sure to bend the flaps down into a small profile.
Toss in some weathering in different shades of brown and these piecs are good to go! Just need to thread all the pieces together and attach some loops to fasten these to the belt.
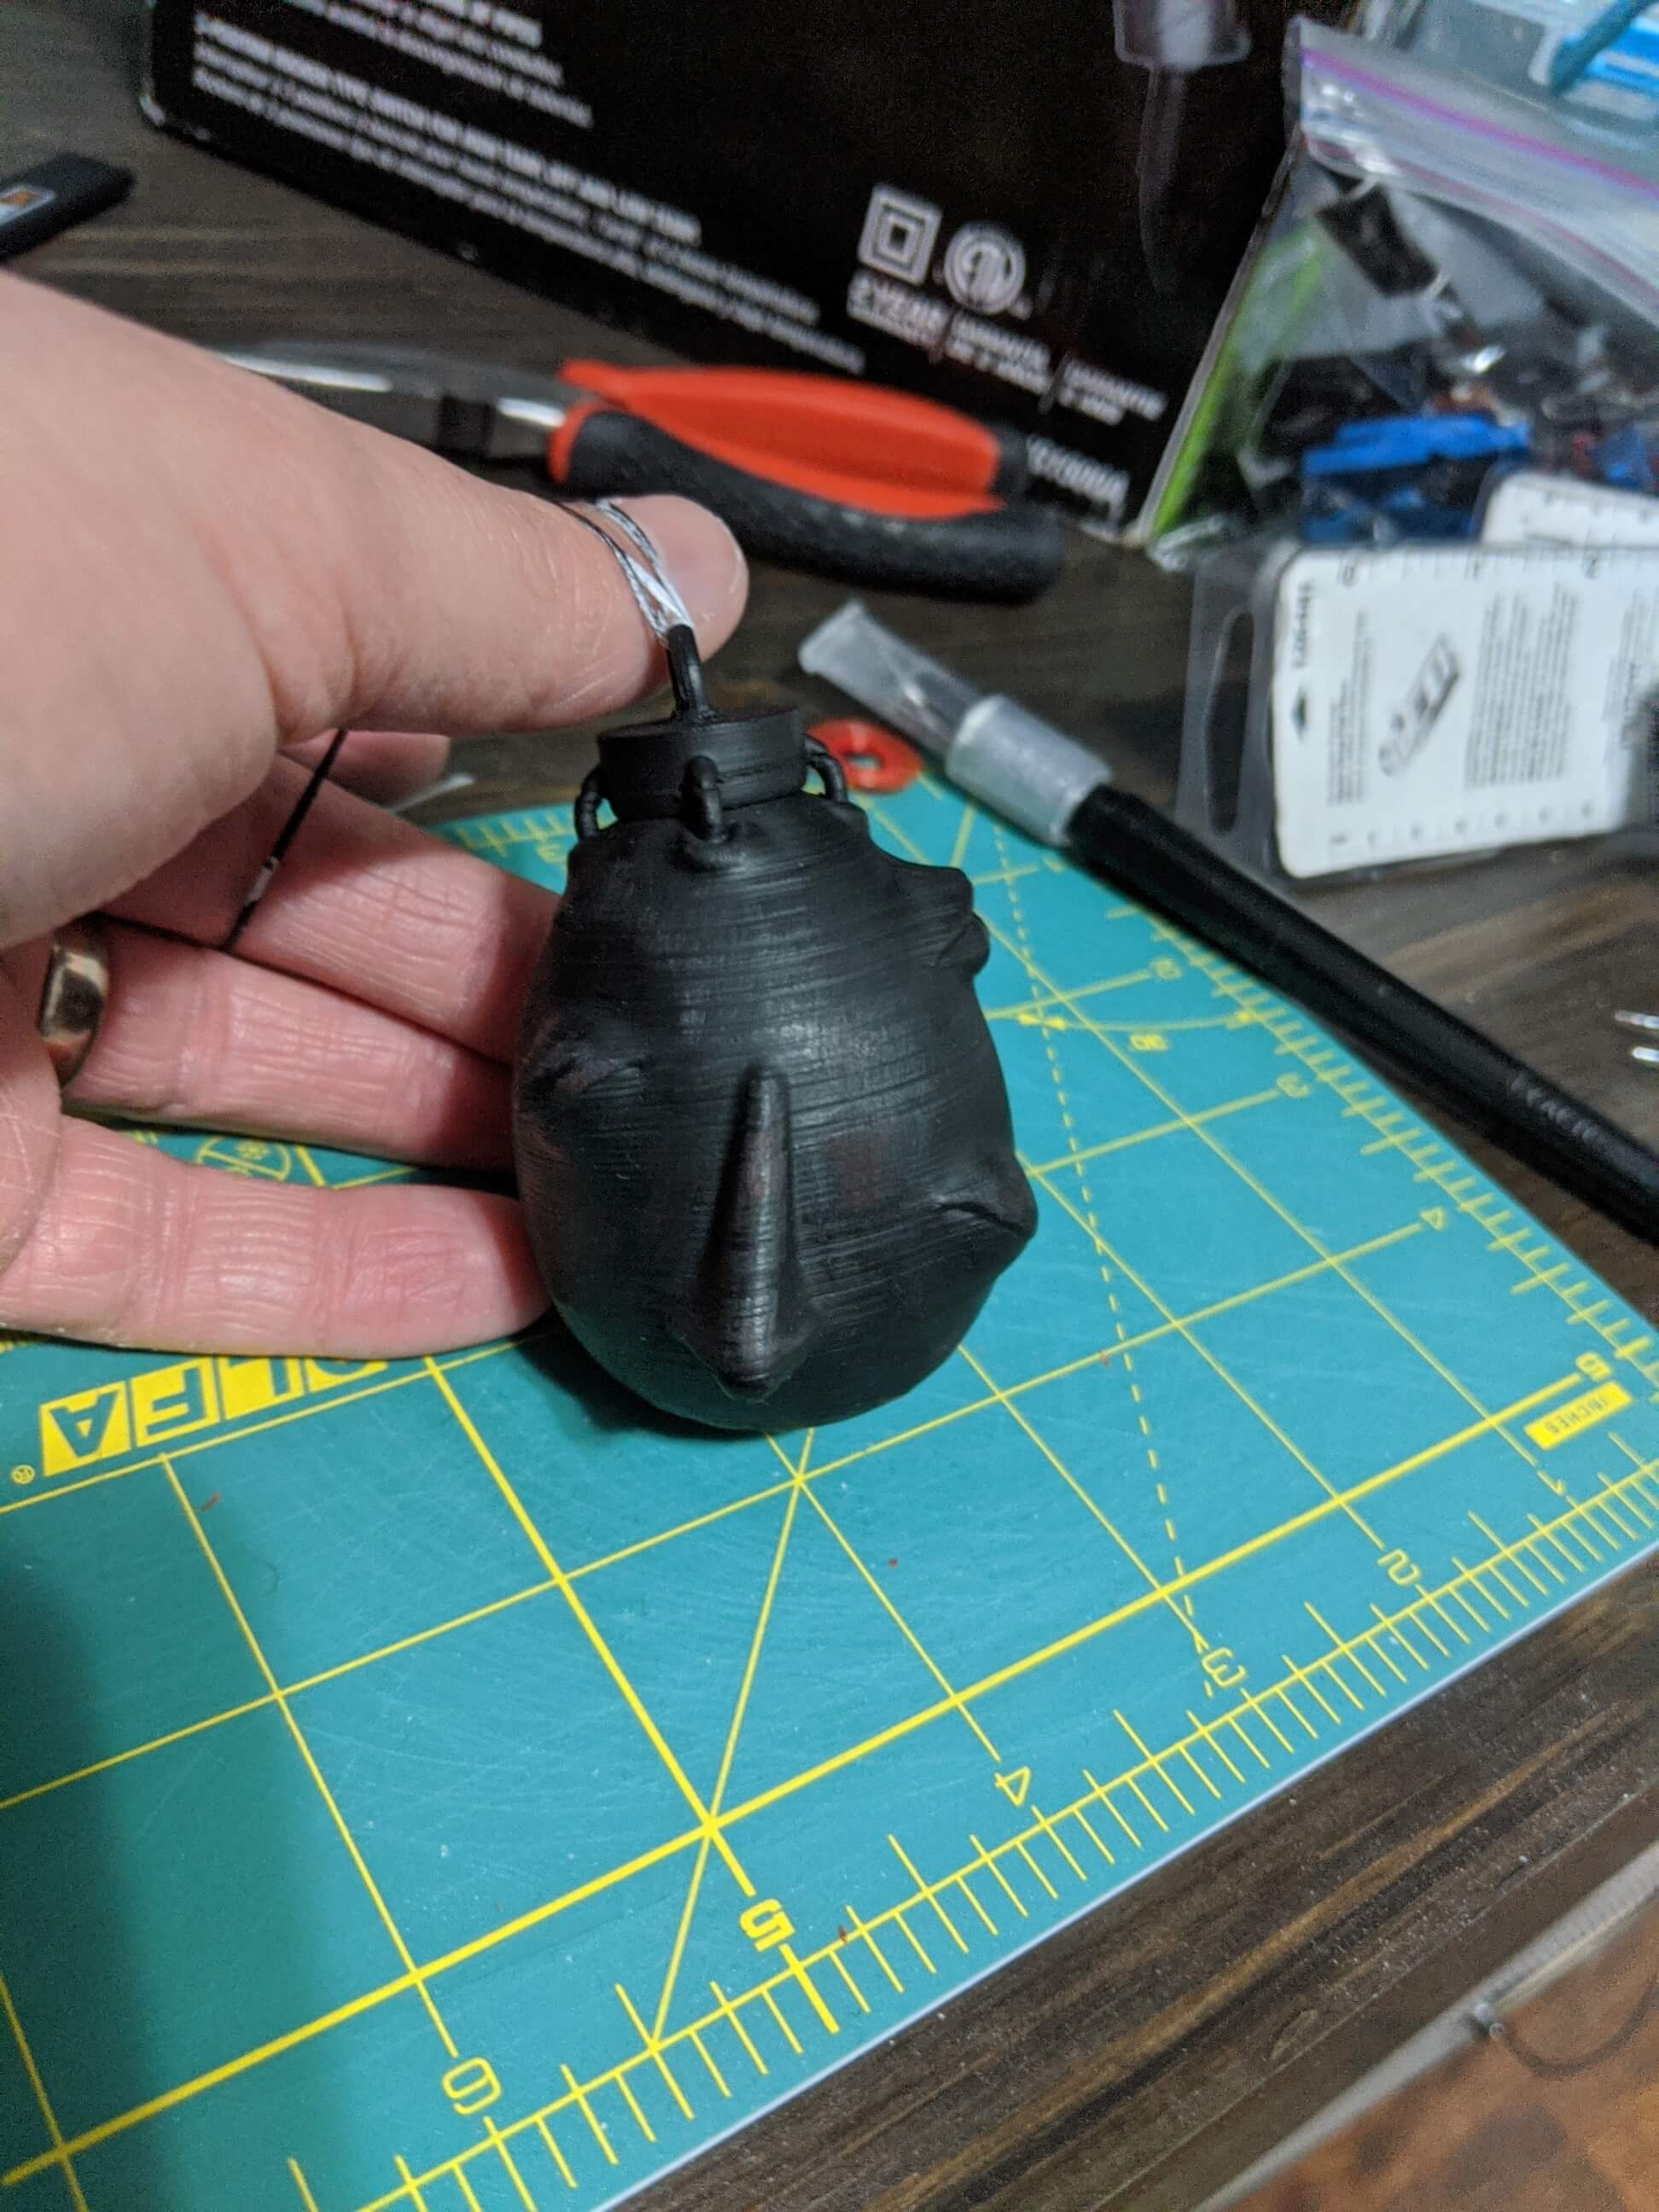
Crimson Behelit
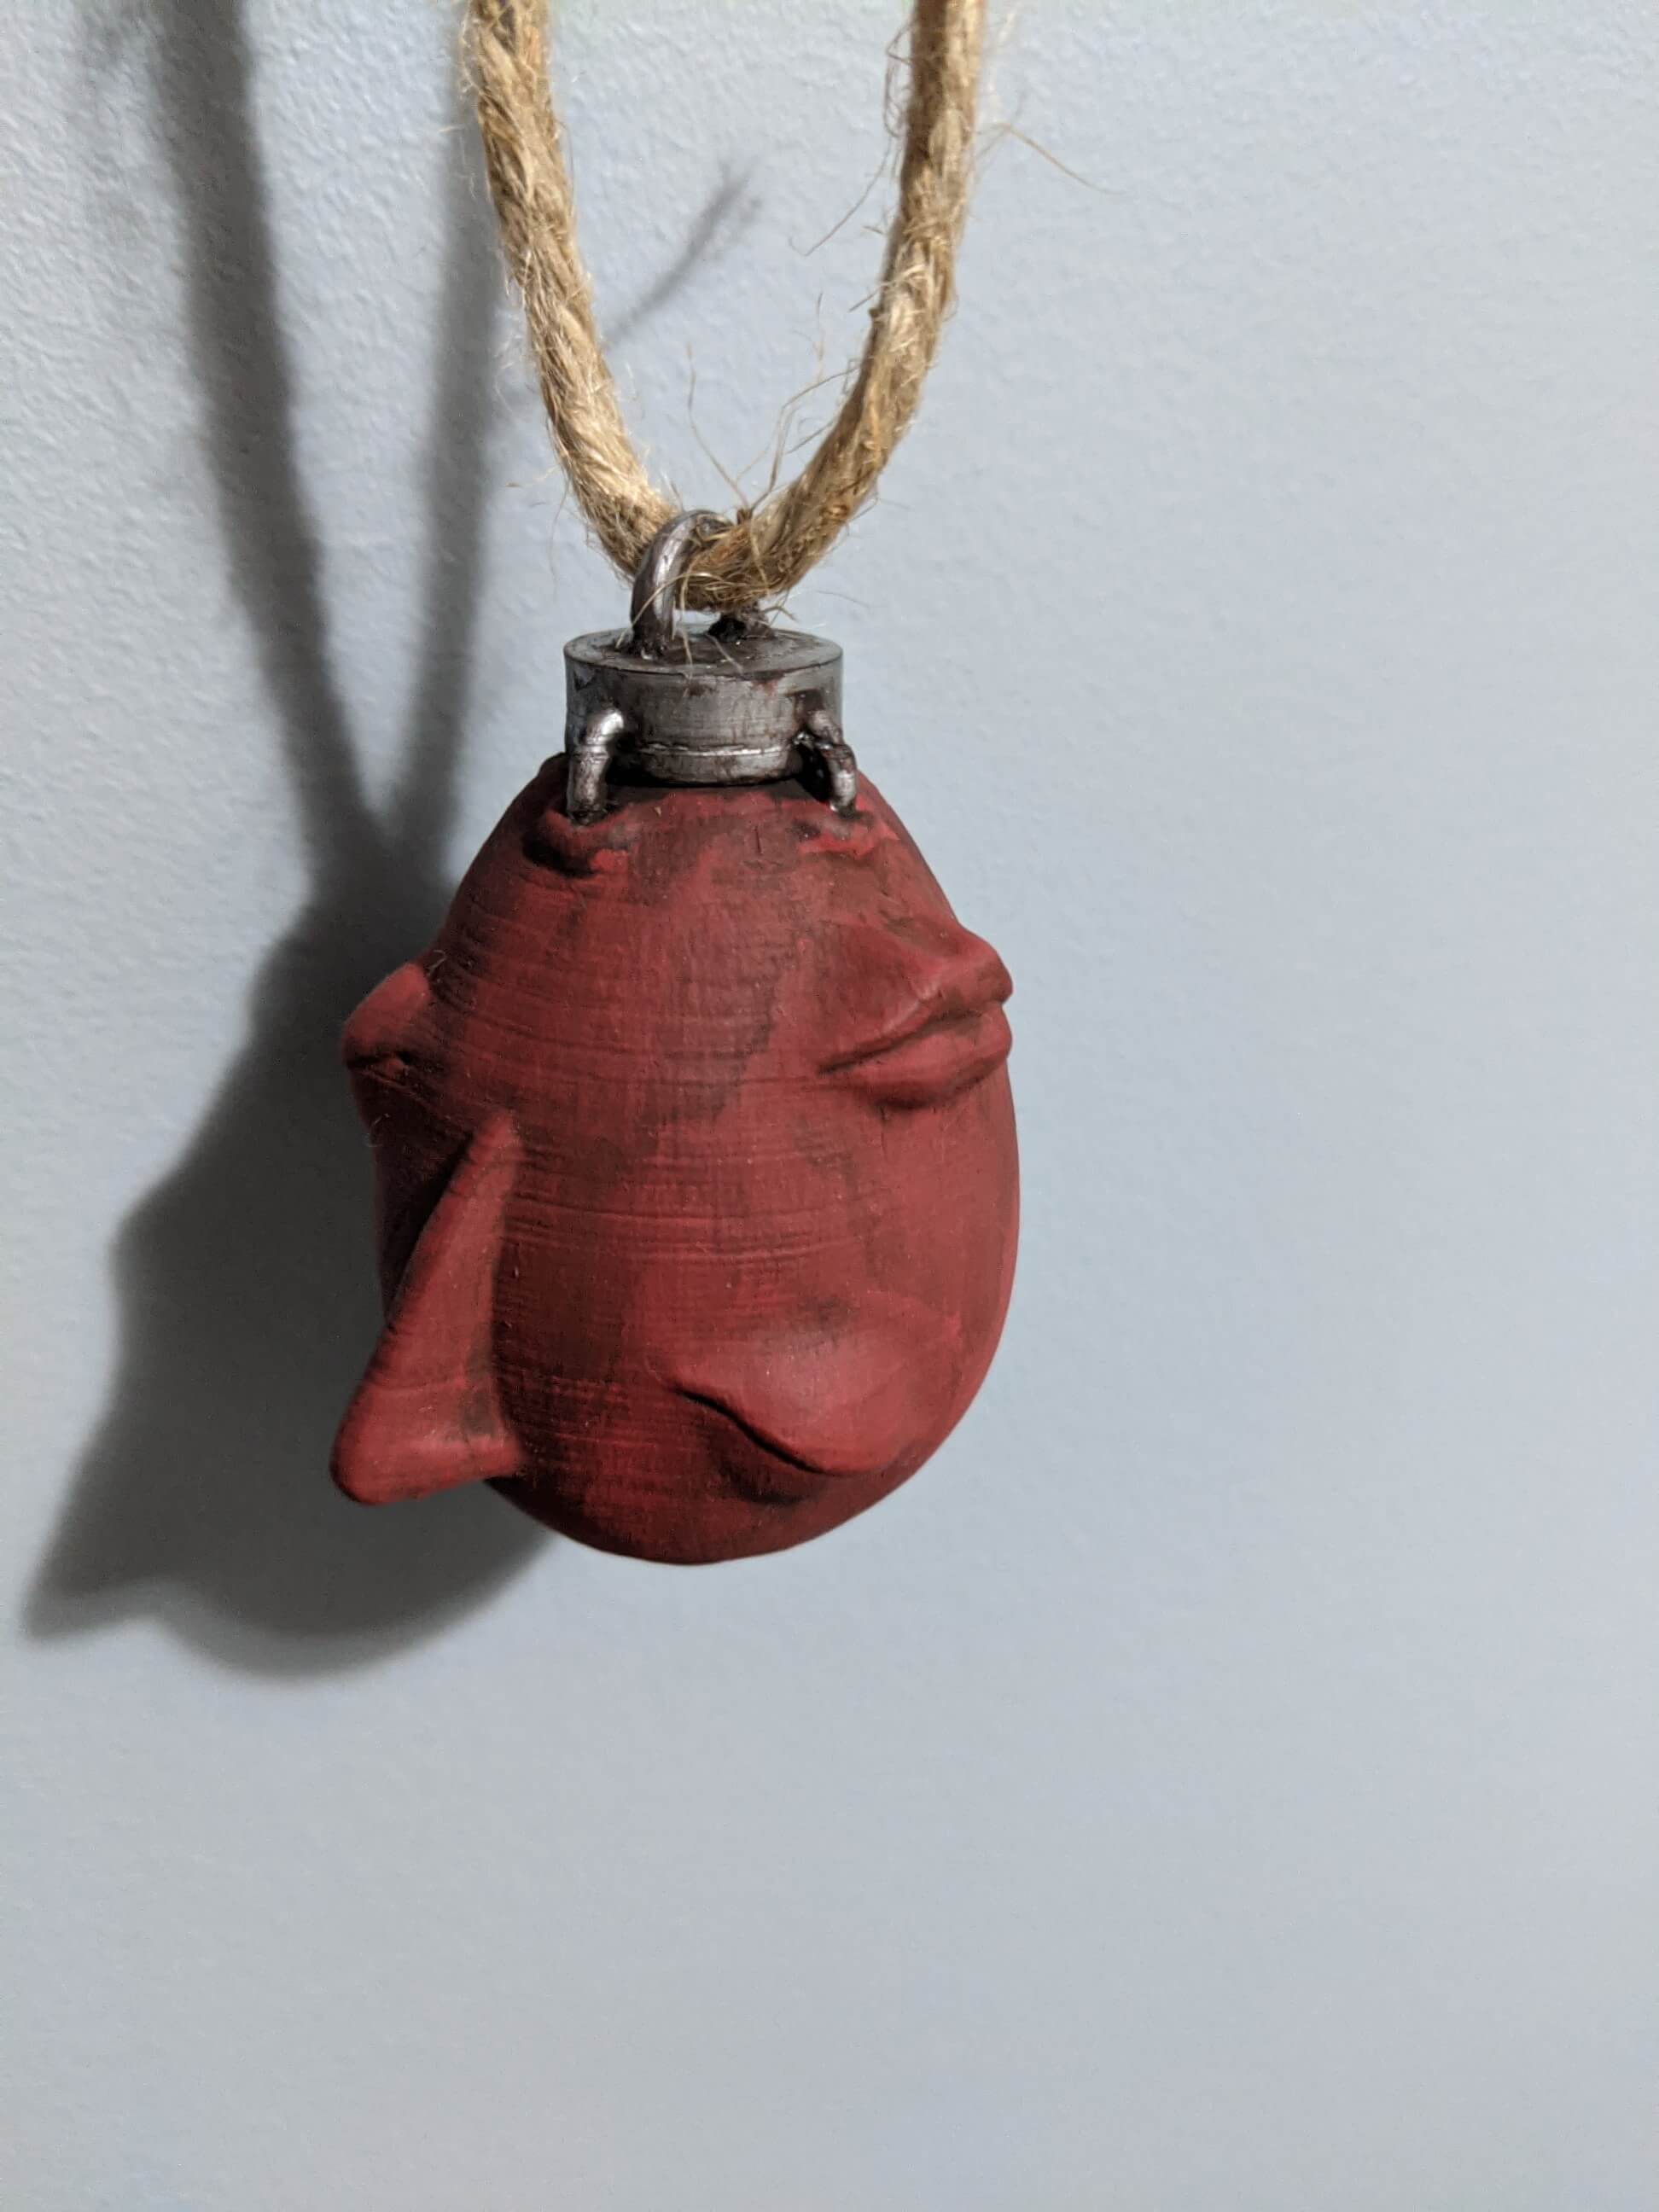
A 3D printed version of the Crimson Behelit from Berserk to use as an office decoration. I really liked this model but had never printed one for myself, so I decided to give it a go after a round of modifications to my printer.
3D Print
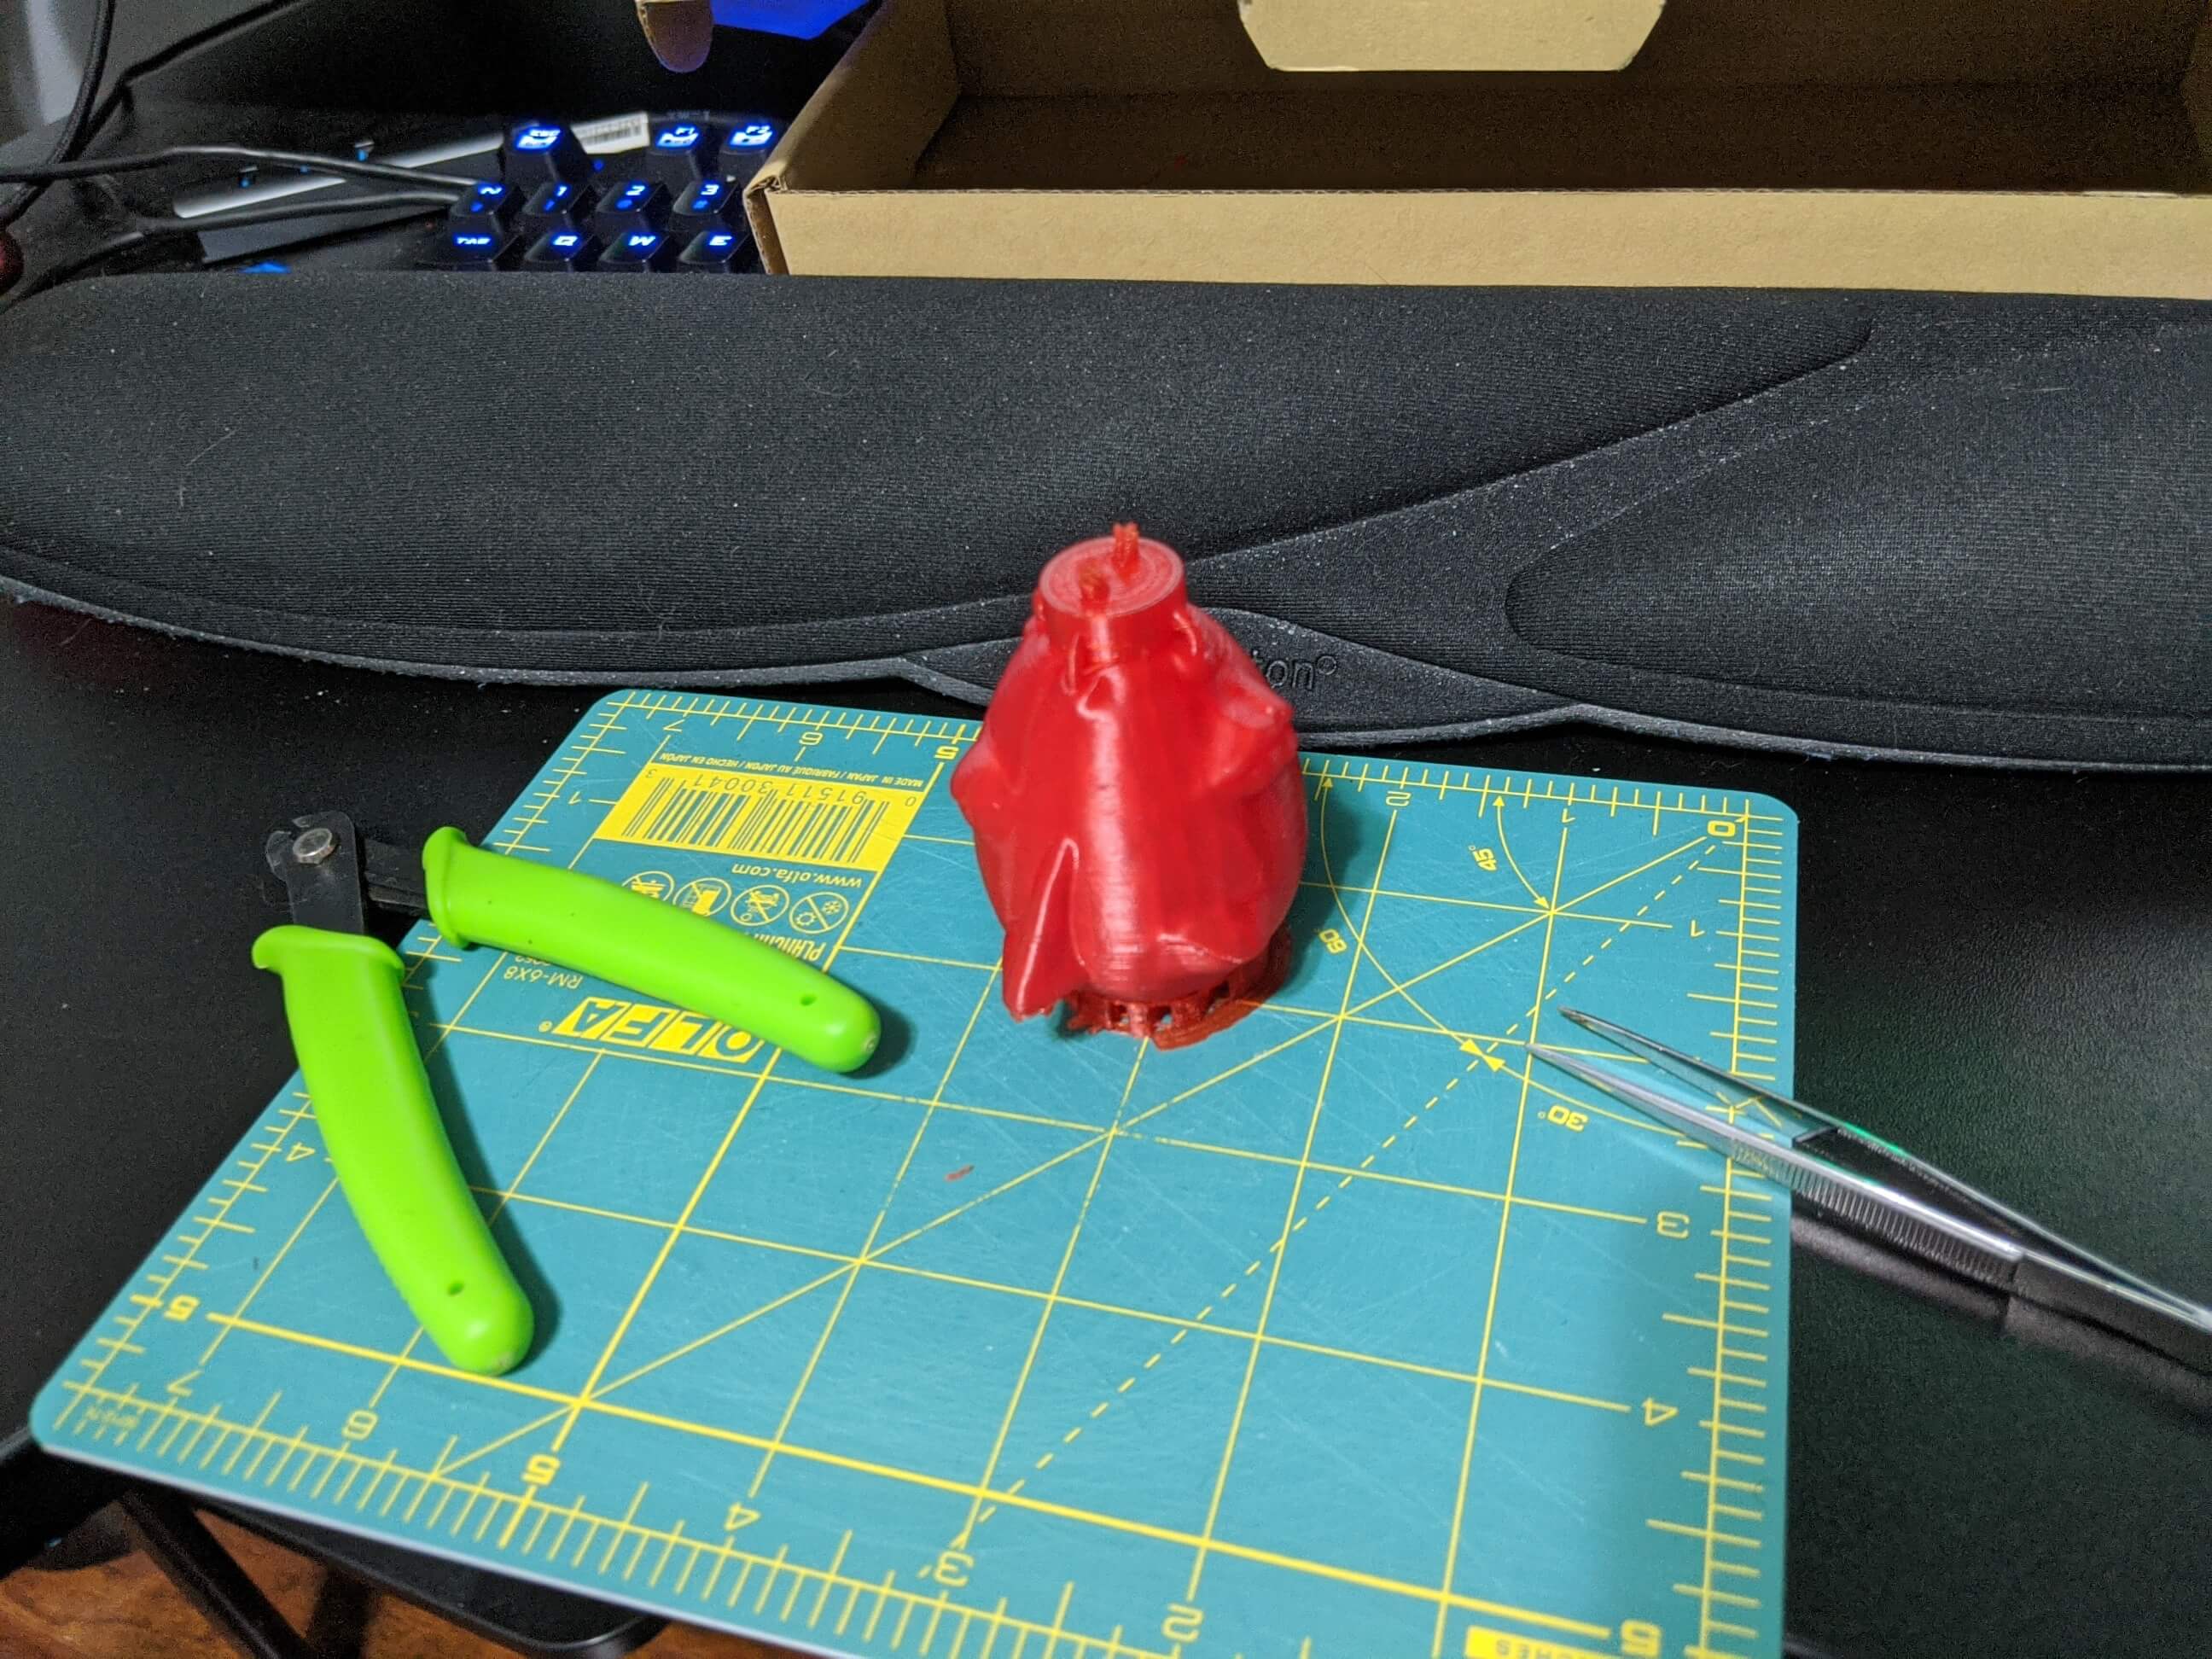
I had this model from when I first started using my printer, but have since made some changes to the configuration. The loop at the top came out garbled and unusable, but the rest of the print was good! I decided it was salvageable.
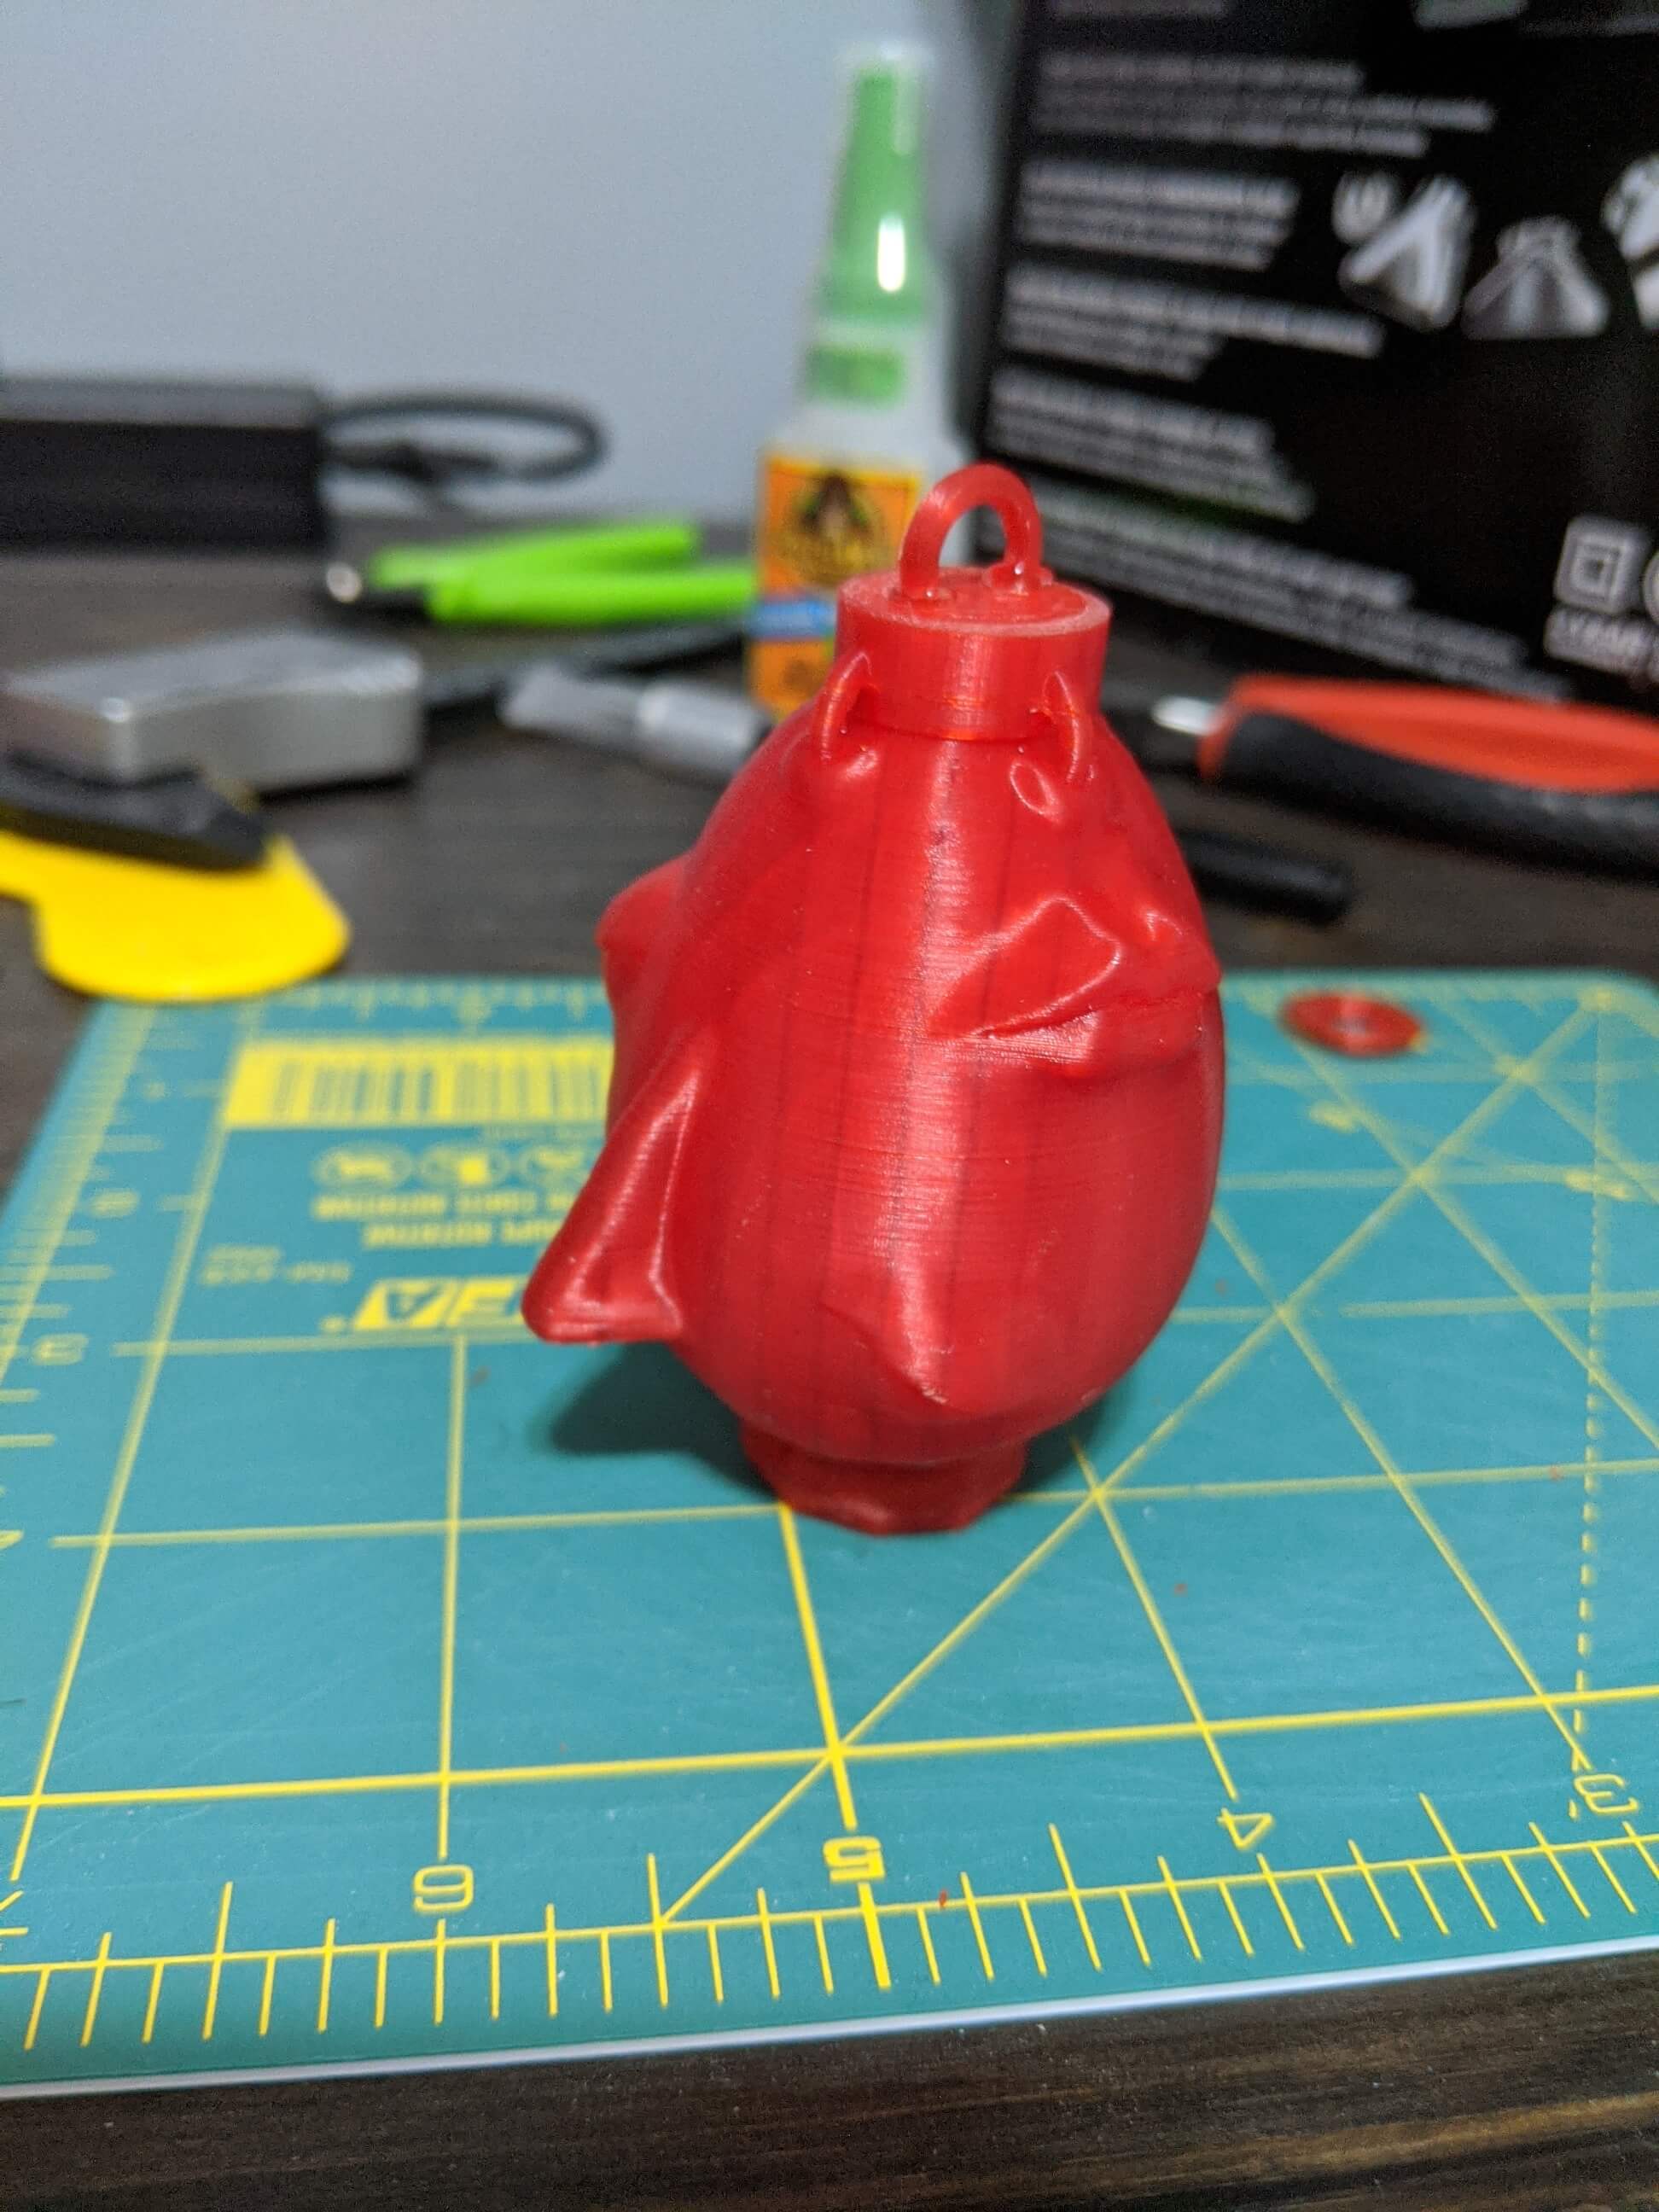
The only thing wrong with the print was the loop at the top, so I just printed a torus of the right dimensions, chopped it in half and super glued it on. It's probably stronger this way than if the loop had printed the way it wanted to, so I think this was a blessing in disguise.
Paint
I hit the behelit with 4 layers of filler primer. You can still see the print lines a little bit, but I was doing this as a quick prop and was having a hard time sanding in all the tiny crevices, so I called this good enough for priming.
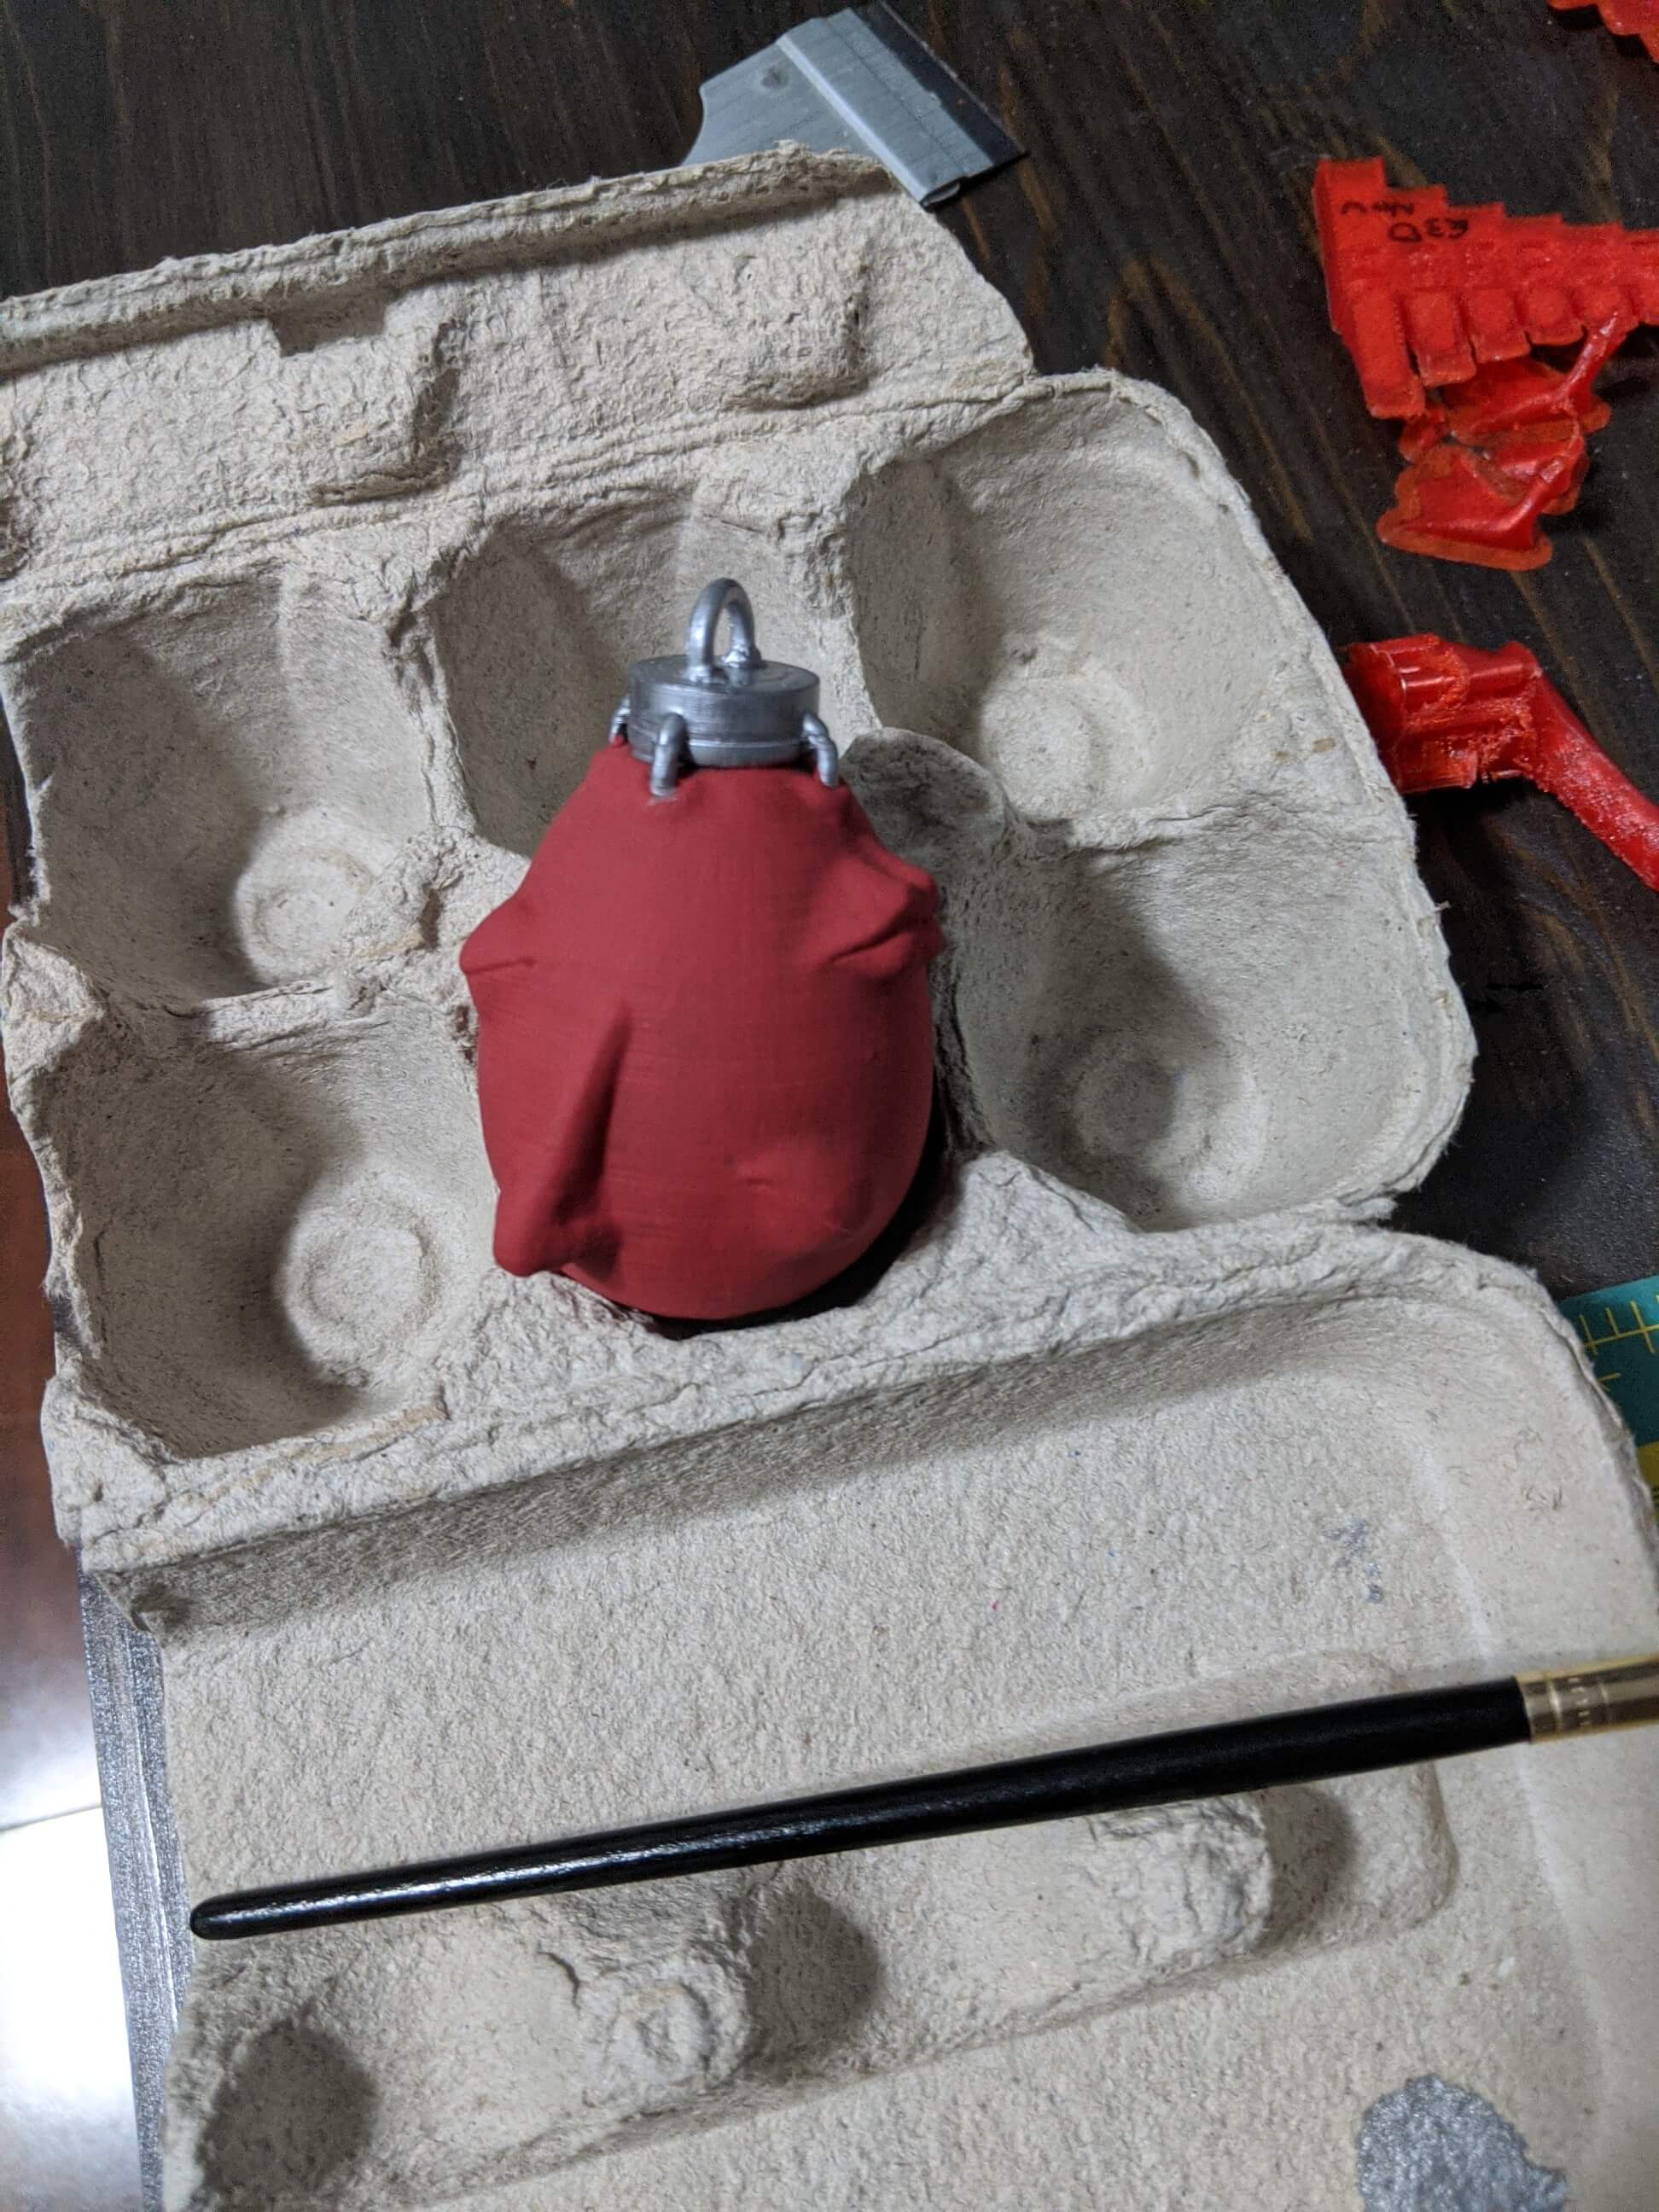
I've had pretty good results just using cheap acrylic paints on printed models, so I figured it would be fine for this quick prop. I blocked in a ruddy red for the egg bit, and found some silver acrylic that worked really well for the fastener. I needed several layers for both of these colours. The egg carton turned out to be absolutely perfect for holding it while I painted.
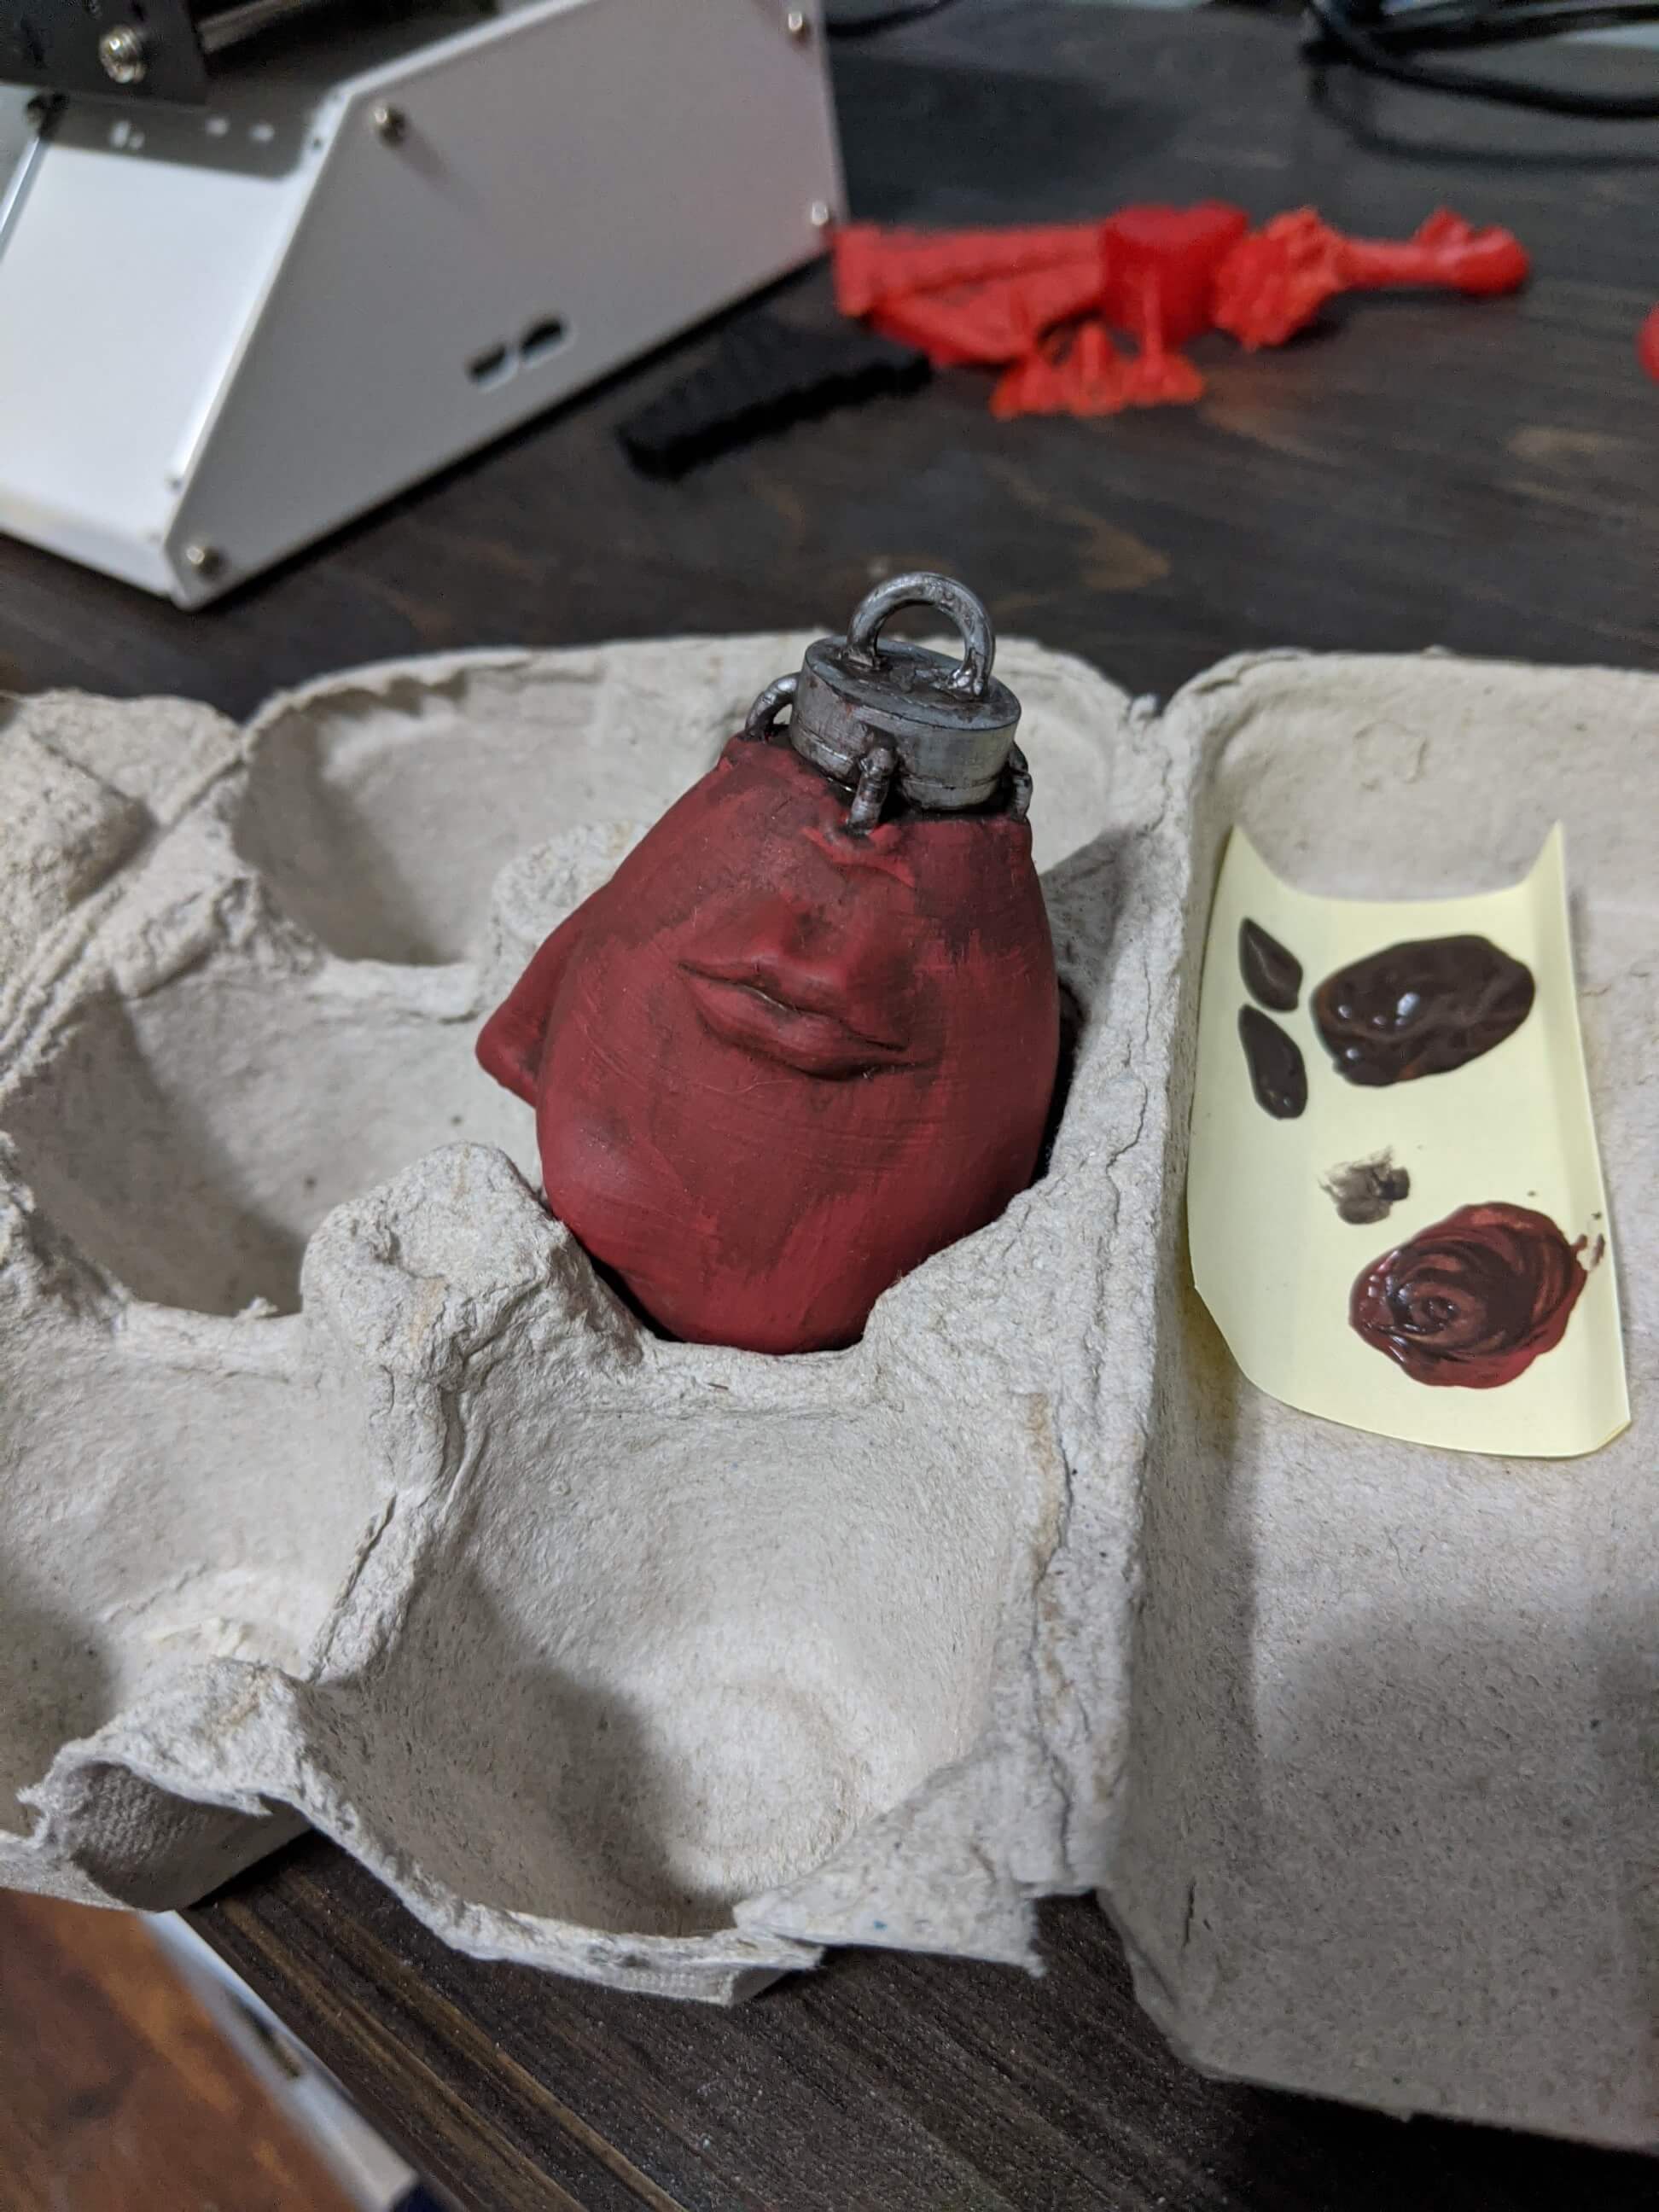
The plain colours looked too clean (plus where the colours met was pretty messy), so I hit every crack with some roughly blended brown, red, and a drop of black acrylic. I blobbed it on and wiped it away immediately with a paper towel. Next time I'll make sure to thin the weathering paing out a bit more with water, but I'm still happy enough with the result.
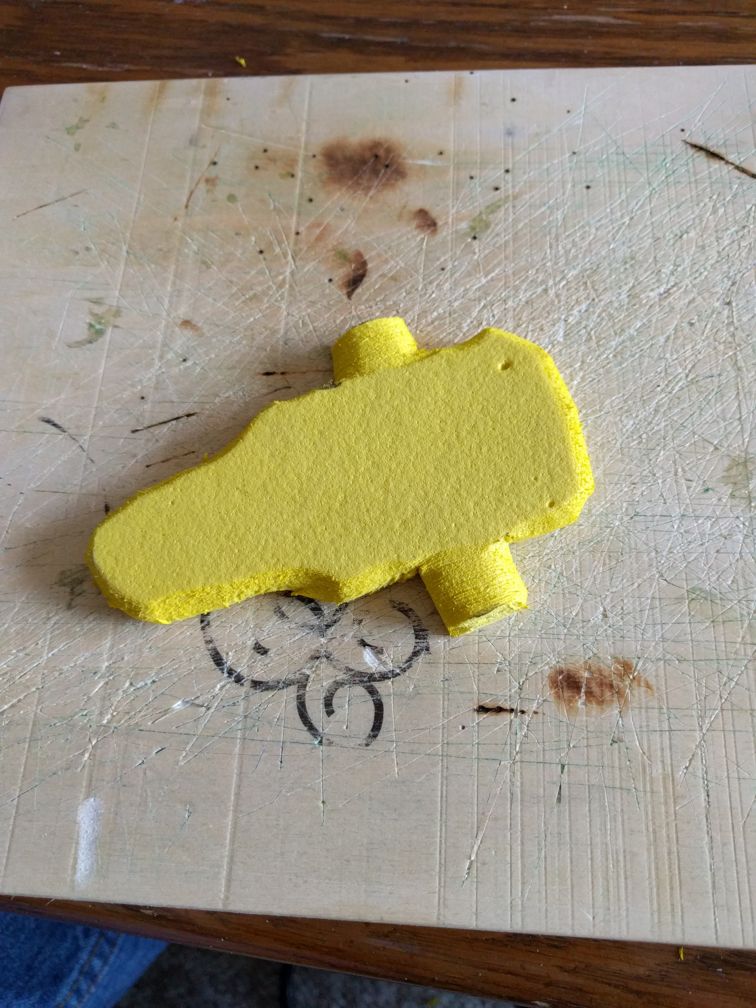
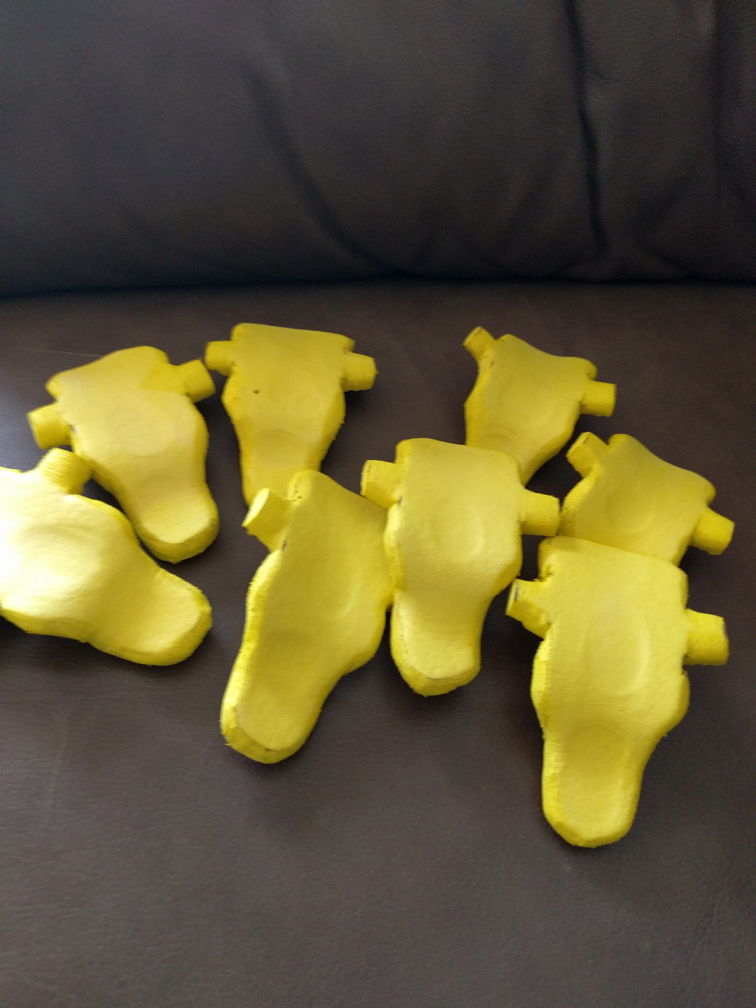
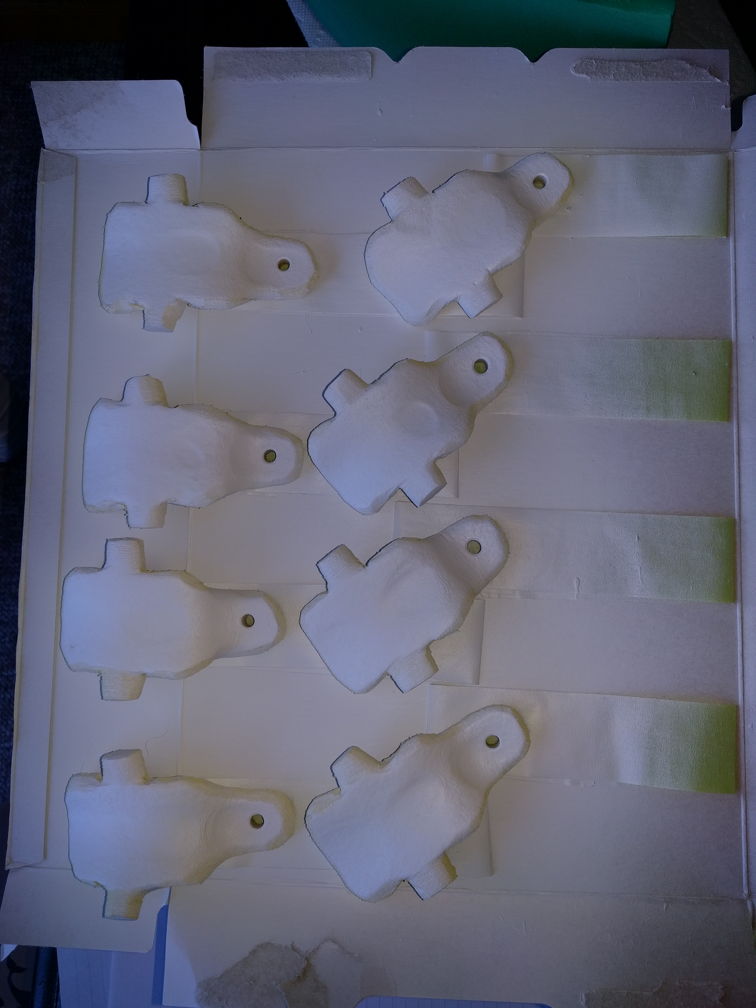
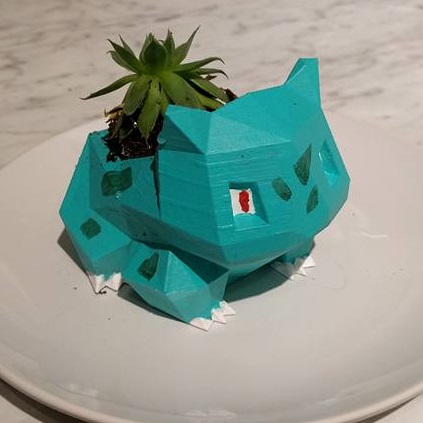
Bulbasaur Planter
When I first got my 3D printer I ran it more or less non-stop for 3 months. I had seen some bulbasaur planters online and I like succulents, so I thought I'd have a crack at making my own!
3D Print
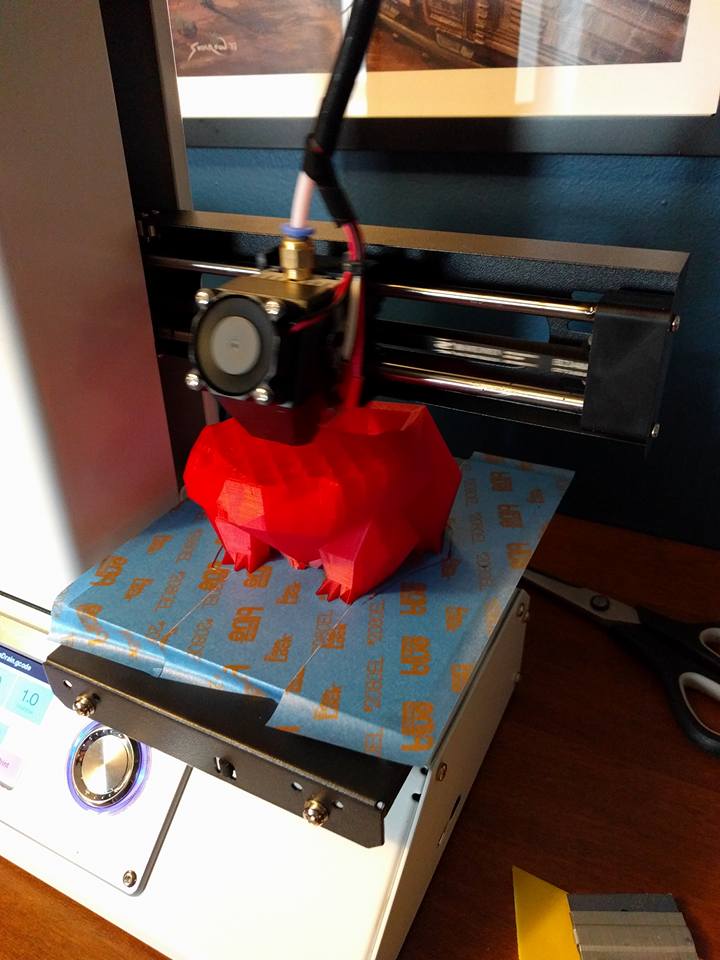
I tracked down a 3D model off of Thingiverse, dialed in the printer settings for chunky to cut down on print time, and let the printer work its magic.
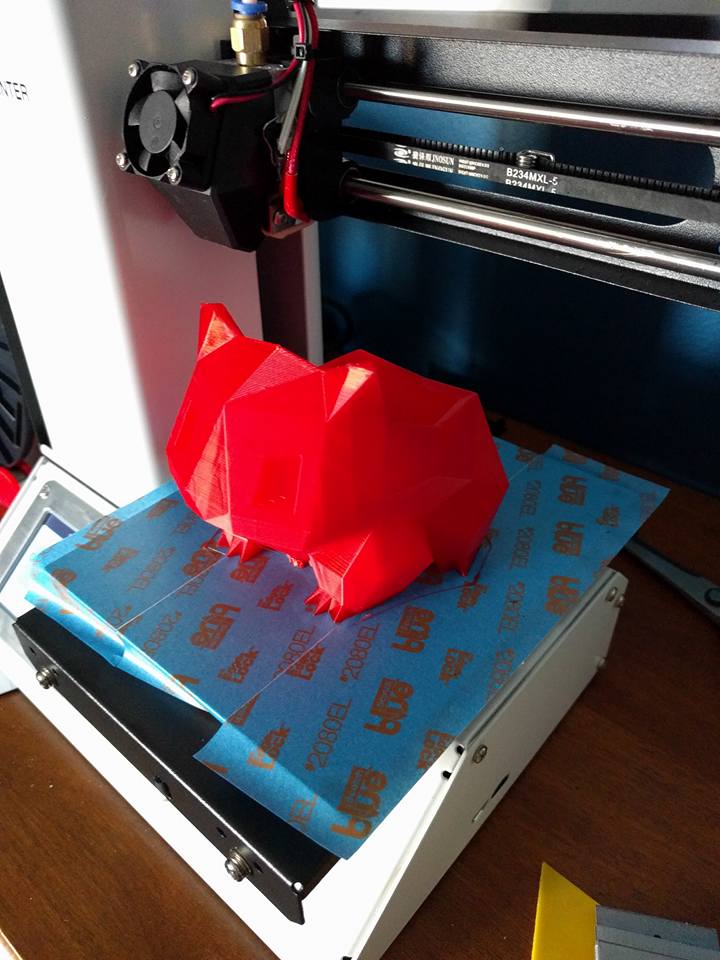
The model was pretty large, so even with a chunky layer height it ran for around 15h before it was finally done printing.
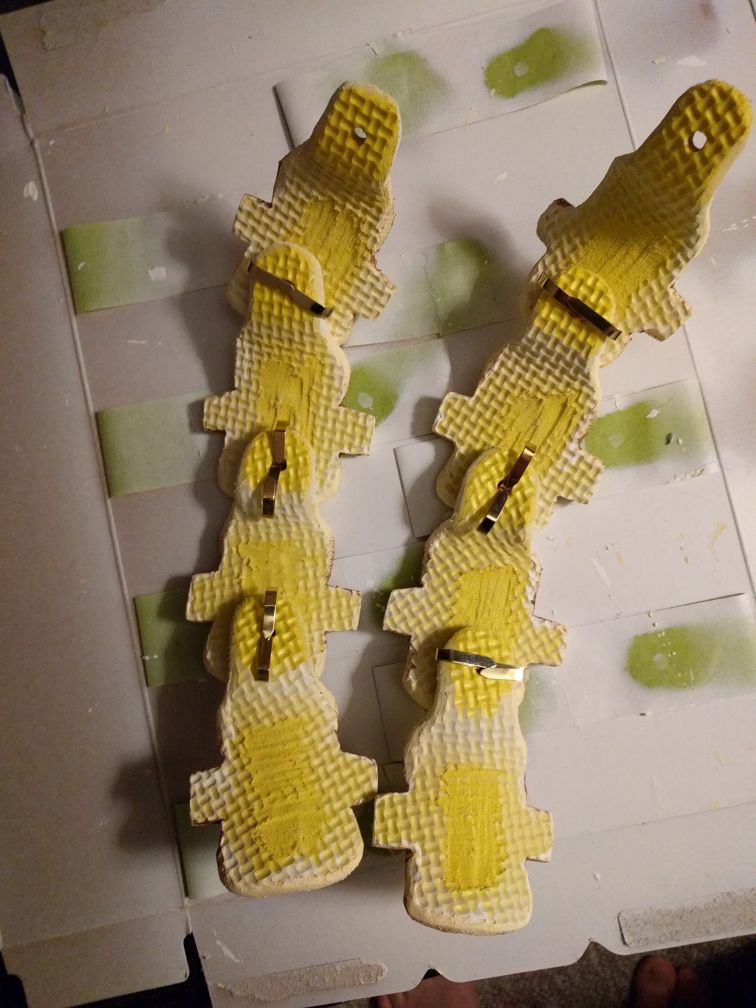
Paint
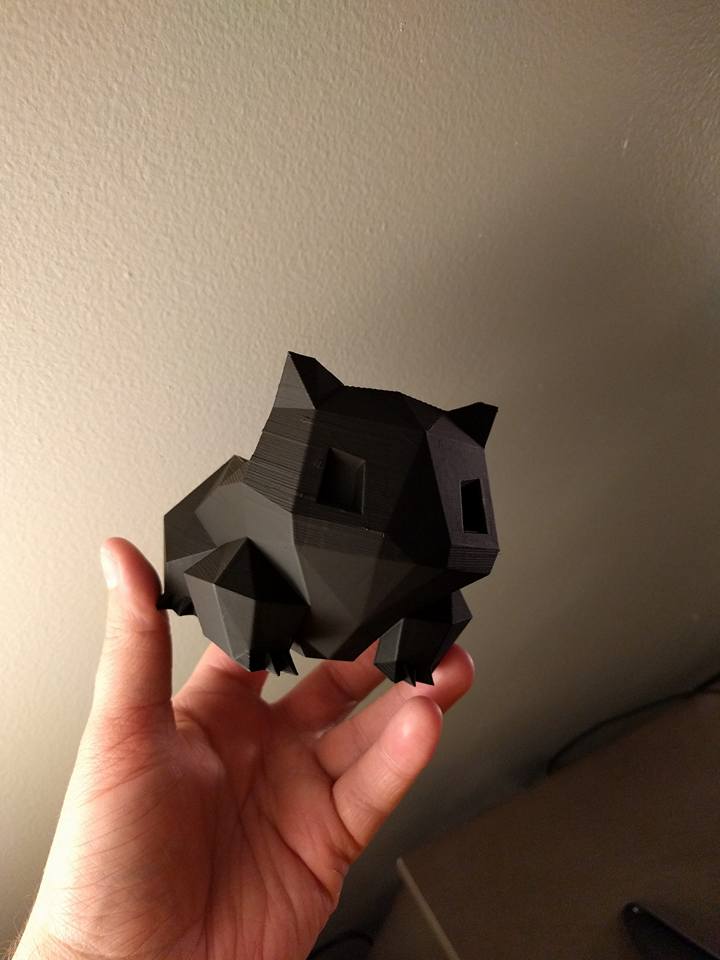
I don't mind the look of layer lines on a low poly model like this, but a little bit of primer goes a long way for making them a little more subtle (plus it makes the paint stick way better).
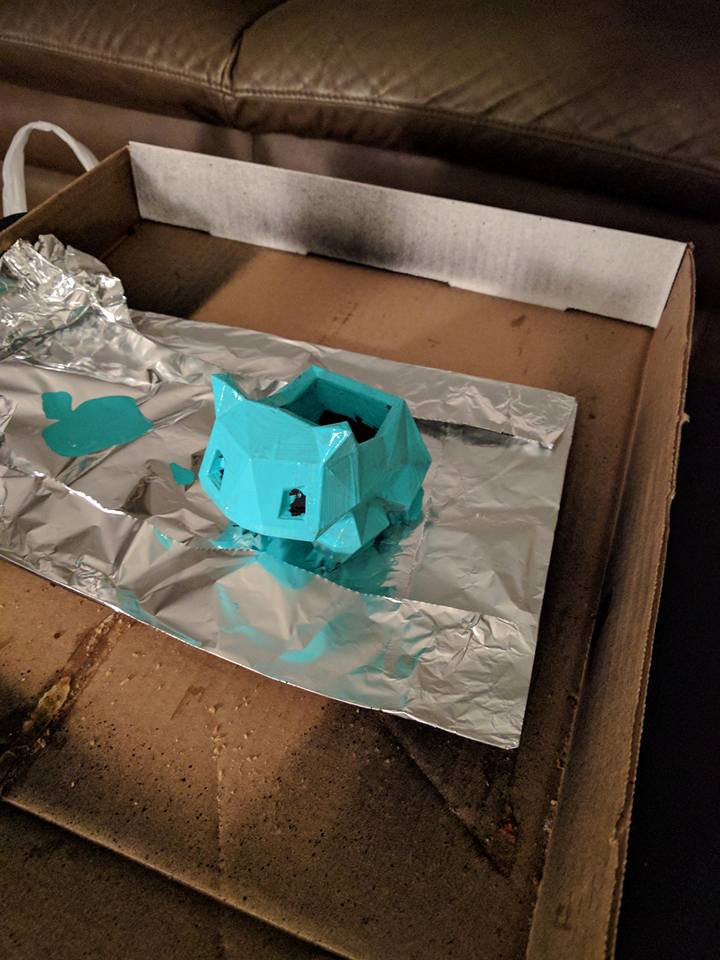
The rest I did with basic acrylic paints. I brushed on a couple coats of teal for the main body.
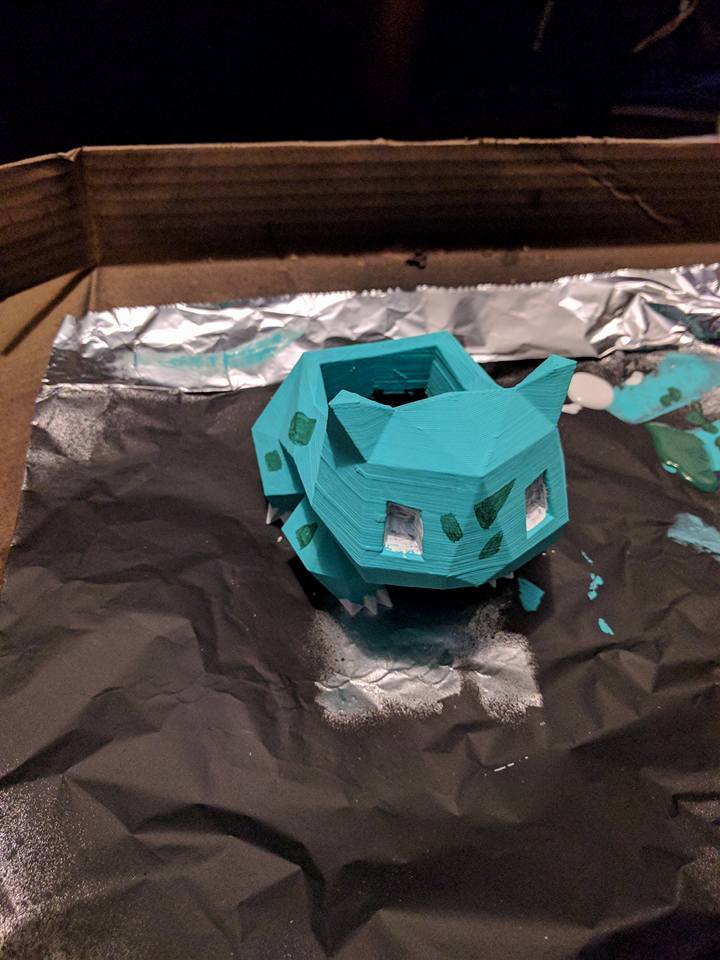
Some dark green for the "spots". The model is low poly so I tried to make the spots sharper and more basic as well. I also put several coats of white into the eye sockets. White primer would have made this easier, but black is all I had on hand for plastic safe primer.
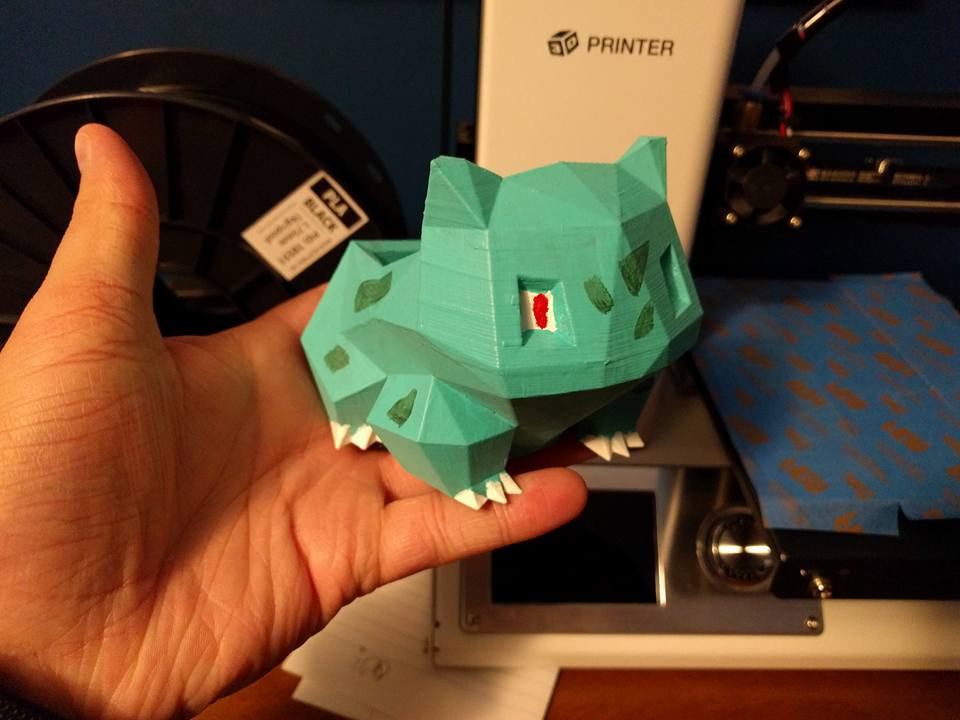
A little red for bulbasaur's super creepy eyes, a little clearcoat and it's done!